MySQL - Docker
Objective
Today I will be explaining how to configure a MySQL database and how to connect it to our web application. I will also introduce a code flaw on purpose to show how lack of input validation and sanitization can lead to unwanted consequences (SQL injection).
To make this even easier to visualise, I will create a separate container that will be running phpMyAdmin, so we can have a GUI for the database. This is the last post I am doing before starting implementing Docker Compose and AWS on this project.
First Steps
Like usual, we will start downloading the image of the services we want to configure. In my case I will be using version 9.4 for MySQL and version 5.2-apache for phpMyAdmin. To make sure that our containers can communicate to each other using DNS resolution and in a separate network (not the deafult bridge network created by Docker), I will create a custom bridge network using the following command:
1
docker network create <NETWORK-NAME>
Note: All this process will be simplified when we implement Docker Compose. Nonetheless, understanding how networking works between containers is a crucial fundamental skill, which is why we are doing it manually first.

Now we can launch both containers and give them the names that we want. Because they will share the same custom network that enables DNS resolution, it will be easy for us to locate the containers by their names.
Launching and Connecting the Services
For now, we won’t be diving into the configuration files but rather making sure both our services are working as expected so then we can configure them as we want. For this, we will start by running both containers as we usually do:
1
2
3
4
5
# Database
docker run -it --network <NETWORK-NAME> --name <CUSTOM-NAME> -e MYSQL_ROOT_PASSWORD=my-secret-pw -d <IMAGE>

# Admin PHP Panel
docker run -it --network <NETWORK-NAME> --name <CUSTOM-NAME> -p 8009:80 -e PMA_HOST=<DB-HOST> -d <IMAGE>
Note: We need to first launch the database before the GUI! I will be passing the password of the root account as an environmental variable in the command, but I would not recommend to do this. In a production environment, secrets like these would be managed by an orchestration tool like Docker Secrets or Kubernetes Secrets, not passed as plain text.

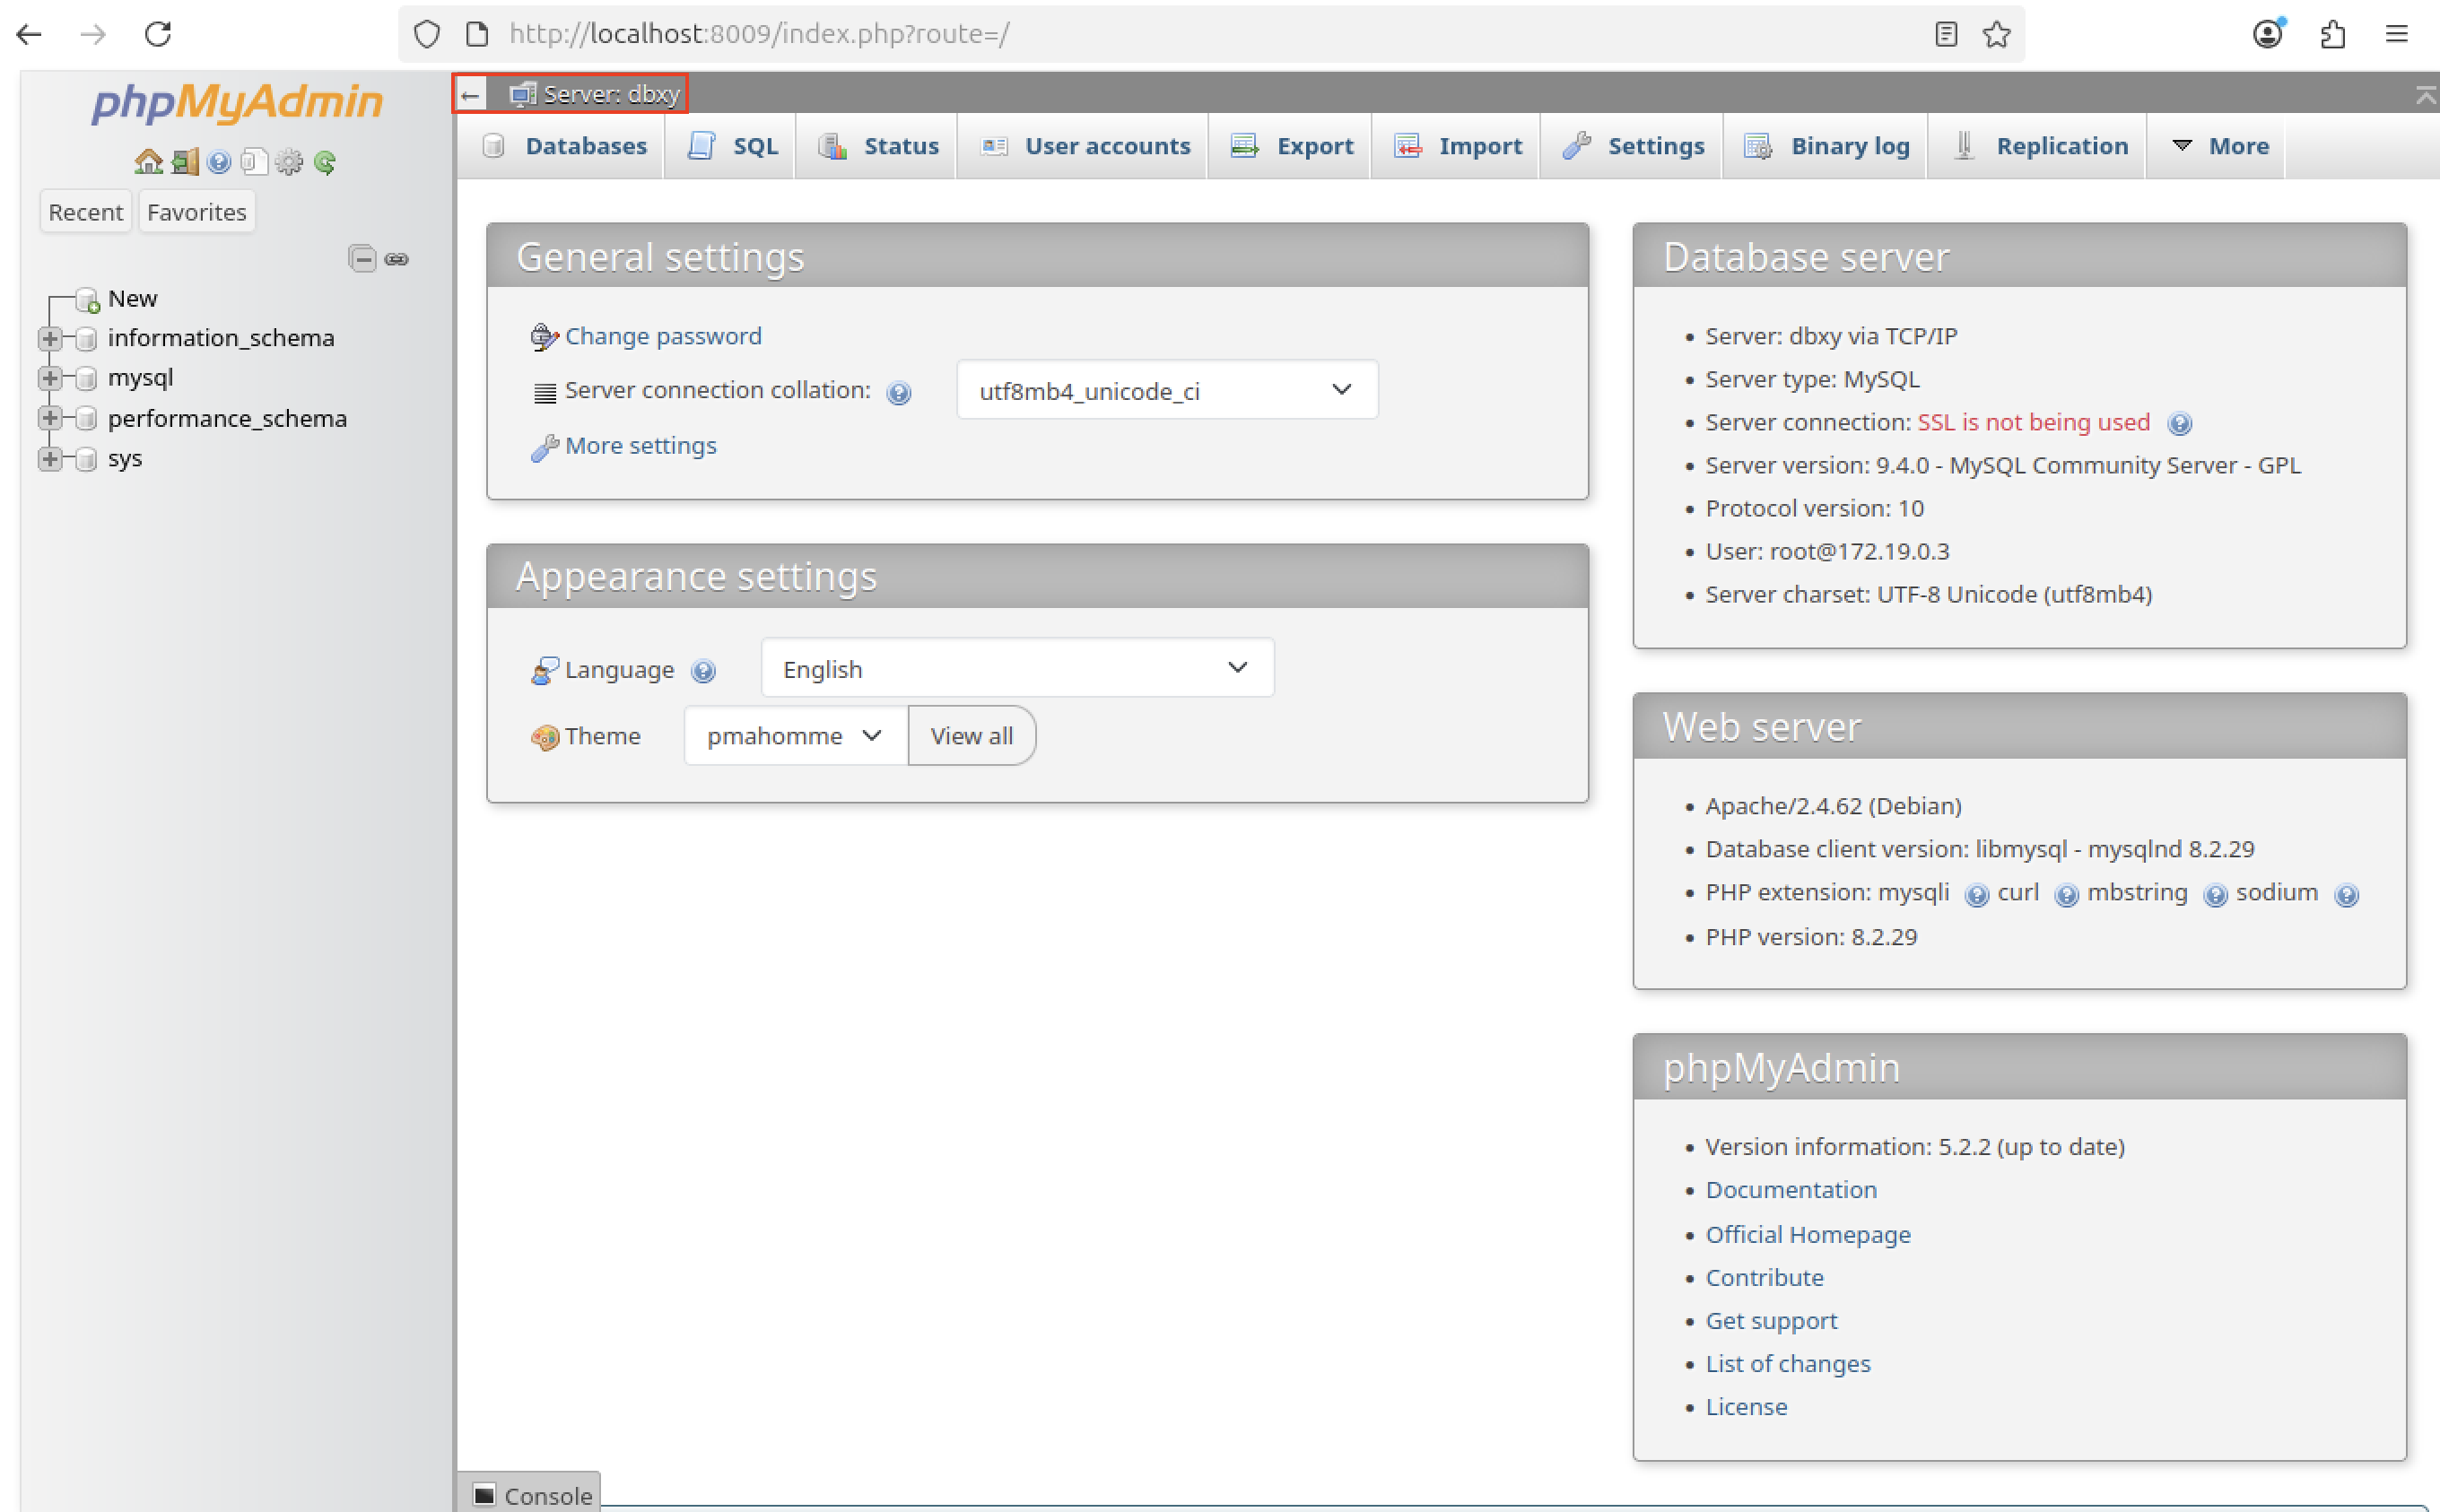
We can now navigate to our phpMyAdmin login portal and login with the root account with the provided password:
Configuring and Connecting to the Database
Before configuring our database, I will be creating an user responsible for managing the database only. For that, we can navigate to User accounts -> Add user account. The configuration will look as it follows:
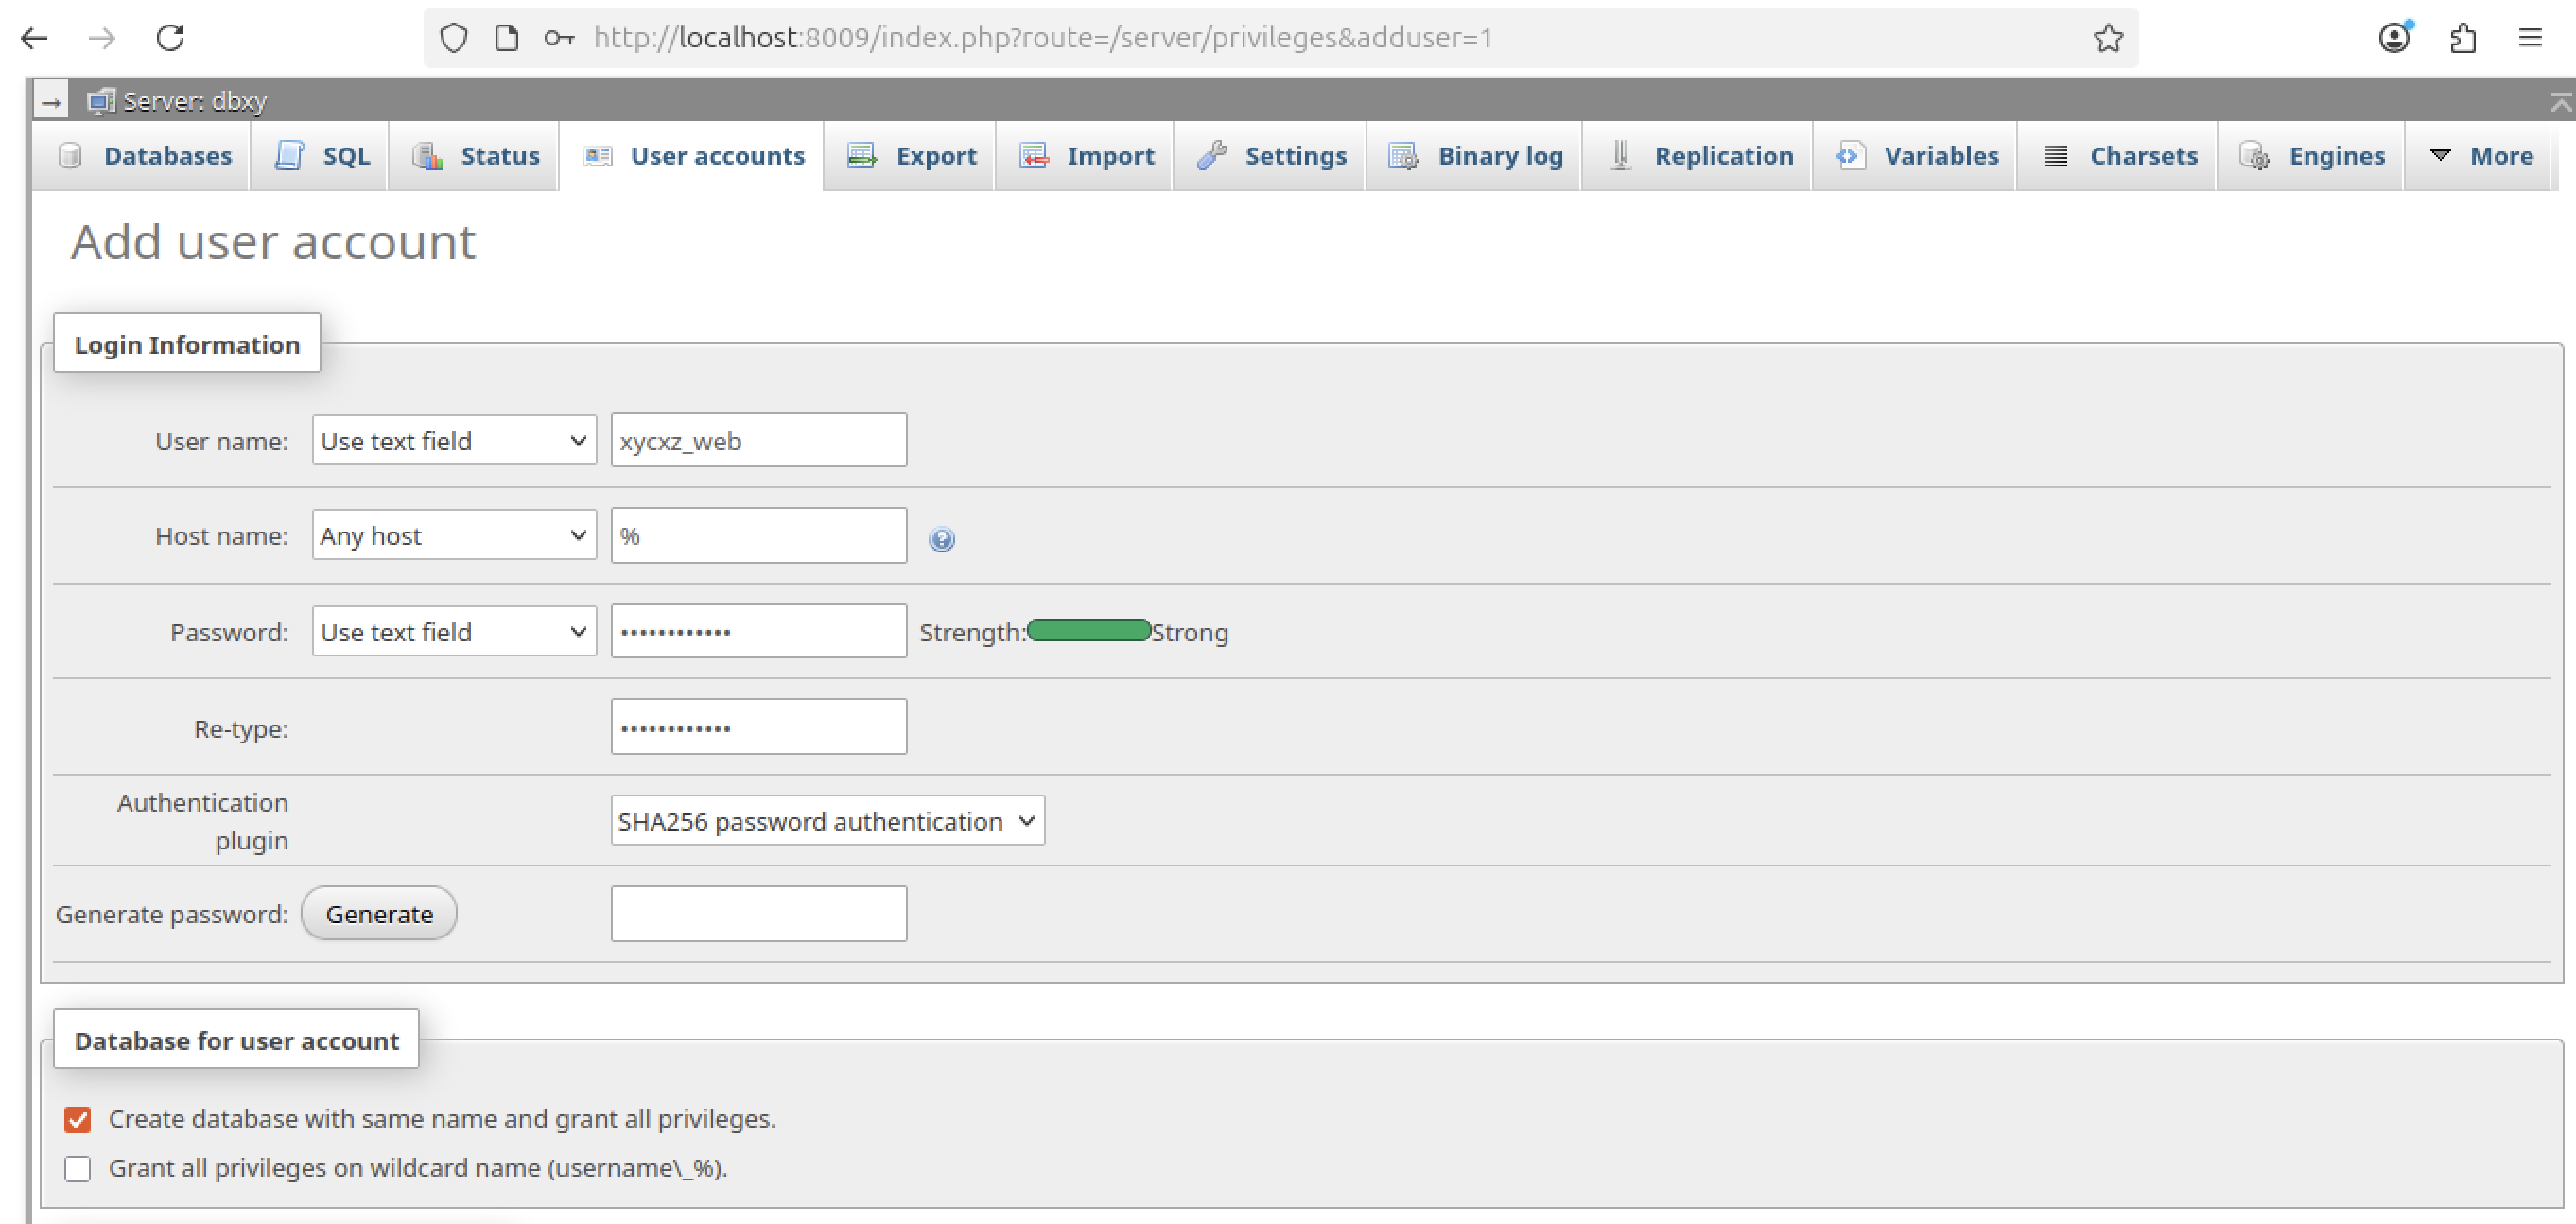
This will create a new database that the created user will have full privileges on. We also need to make sure that Host name is set to Any host, since this allows the application container to connect from the Docker network. In production, it’s safer to restrict access to specific IPs or use localhost where possible.
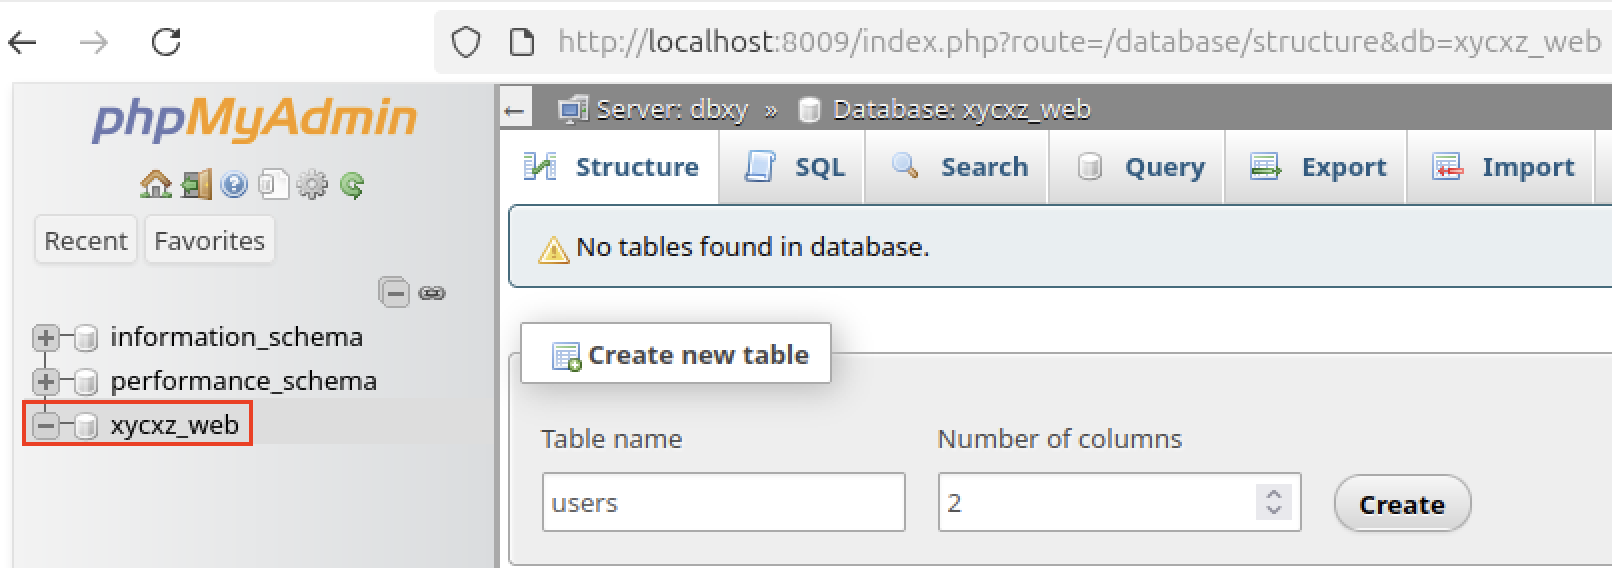
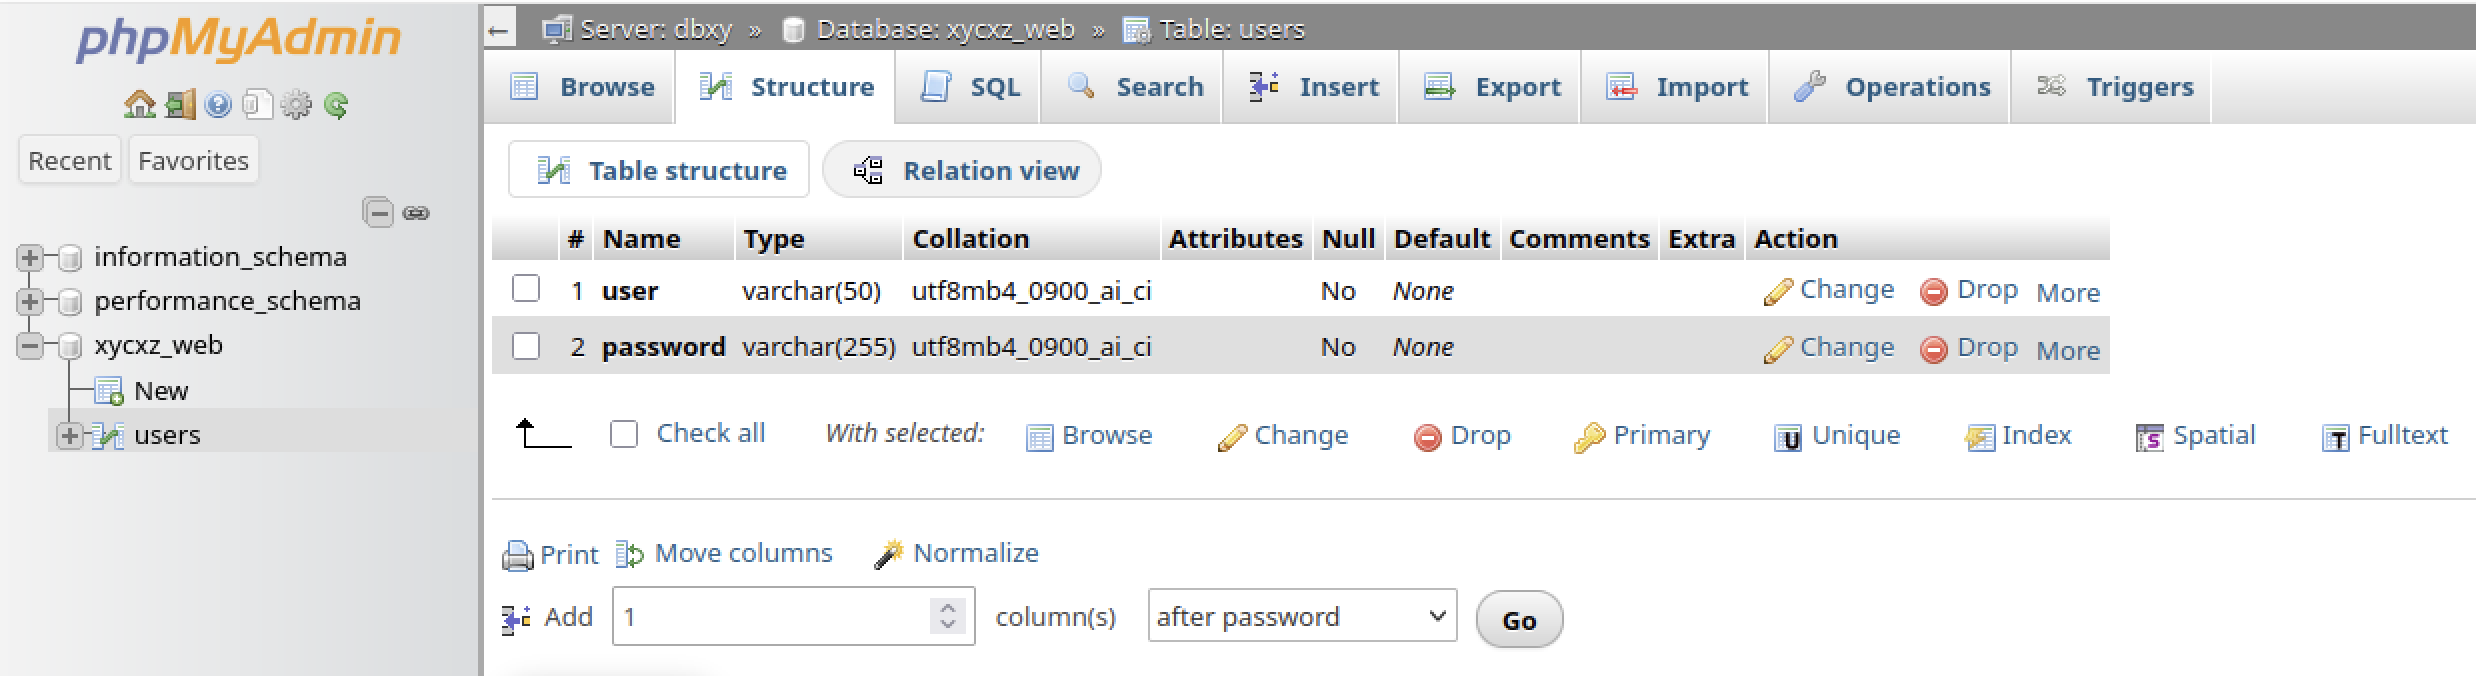
Let’s login with this user now and create the table needed in the database. I will be creating a users table that will consist of two columns: one holding the username, and the other one its password. For that, we will select the corresponding database and create the table:
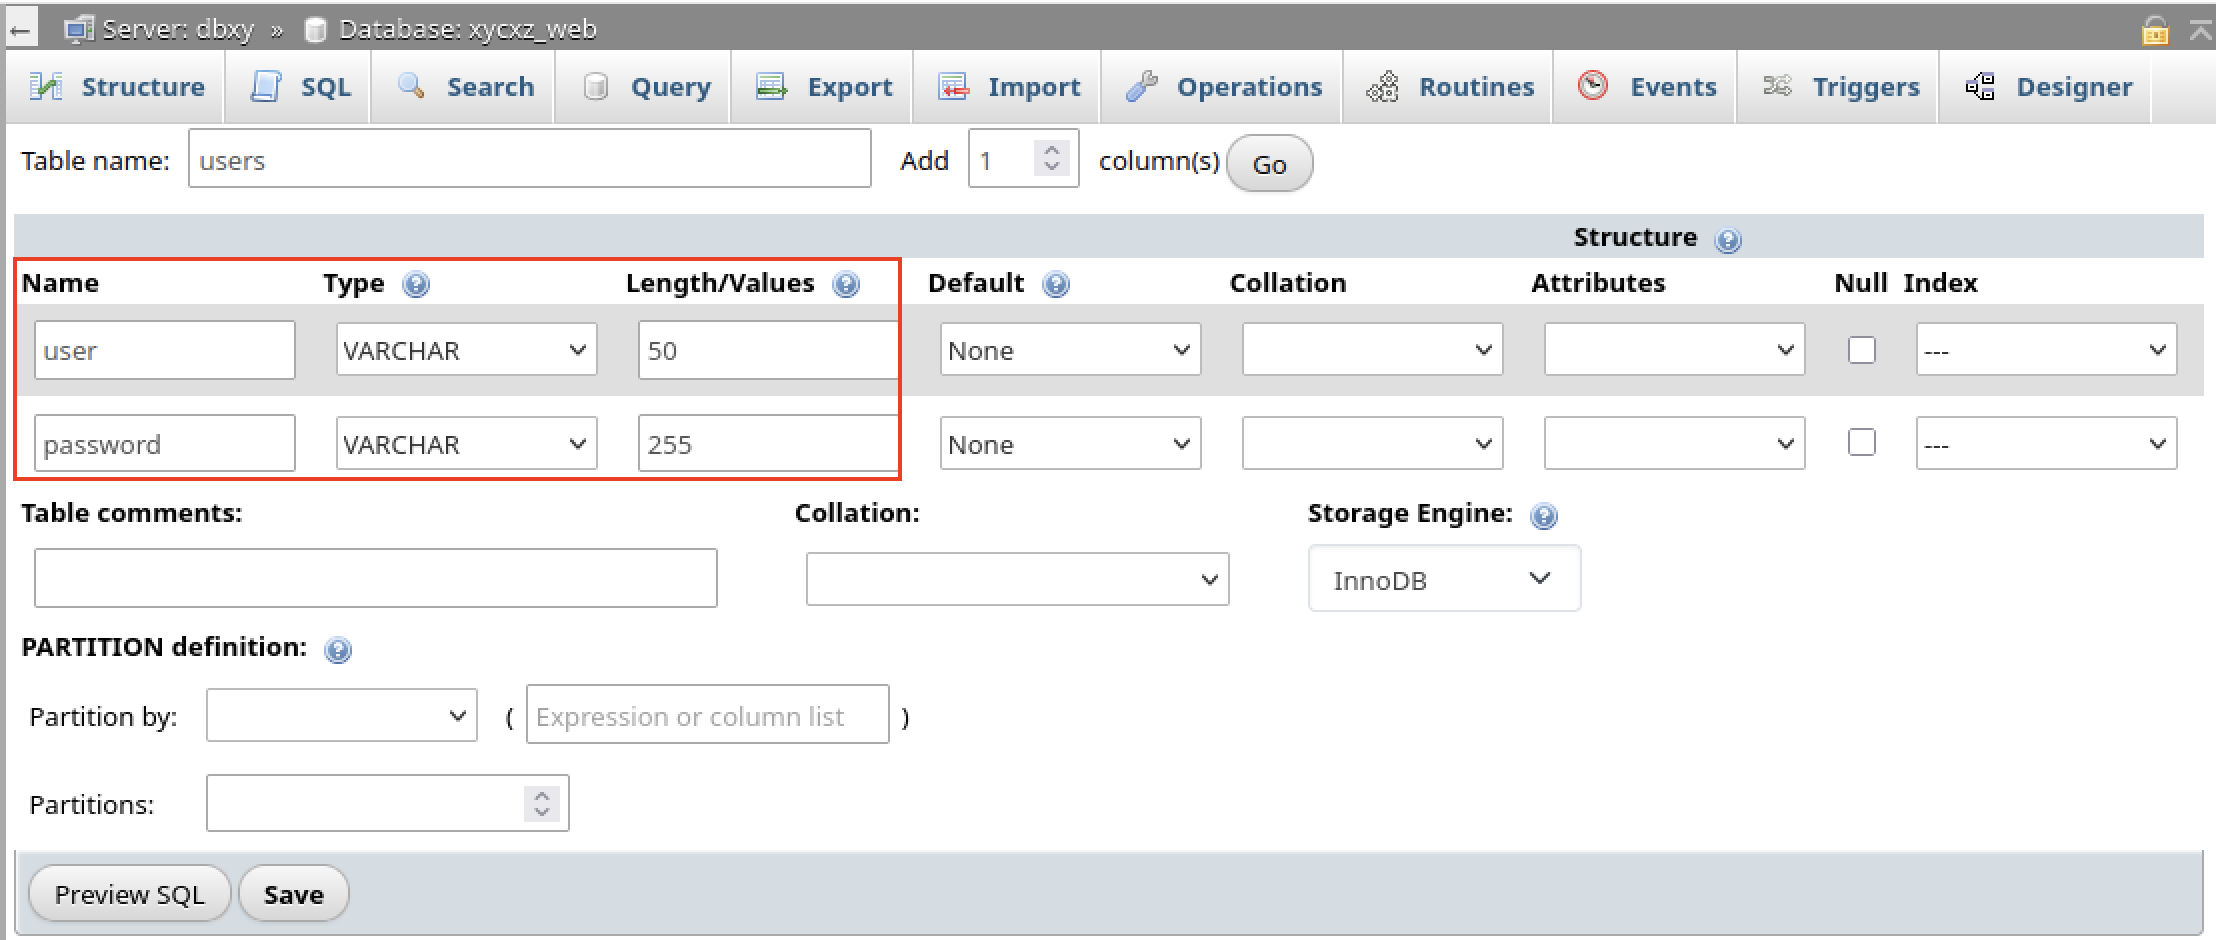
Now that we defined the schema of our table, we just need to click on Save:
To start filling our table with data, we can click on the Insert button and pass the desired data:
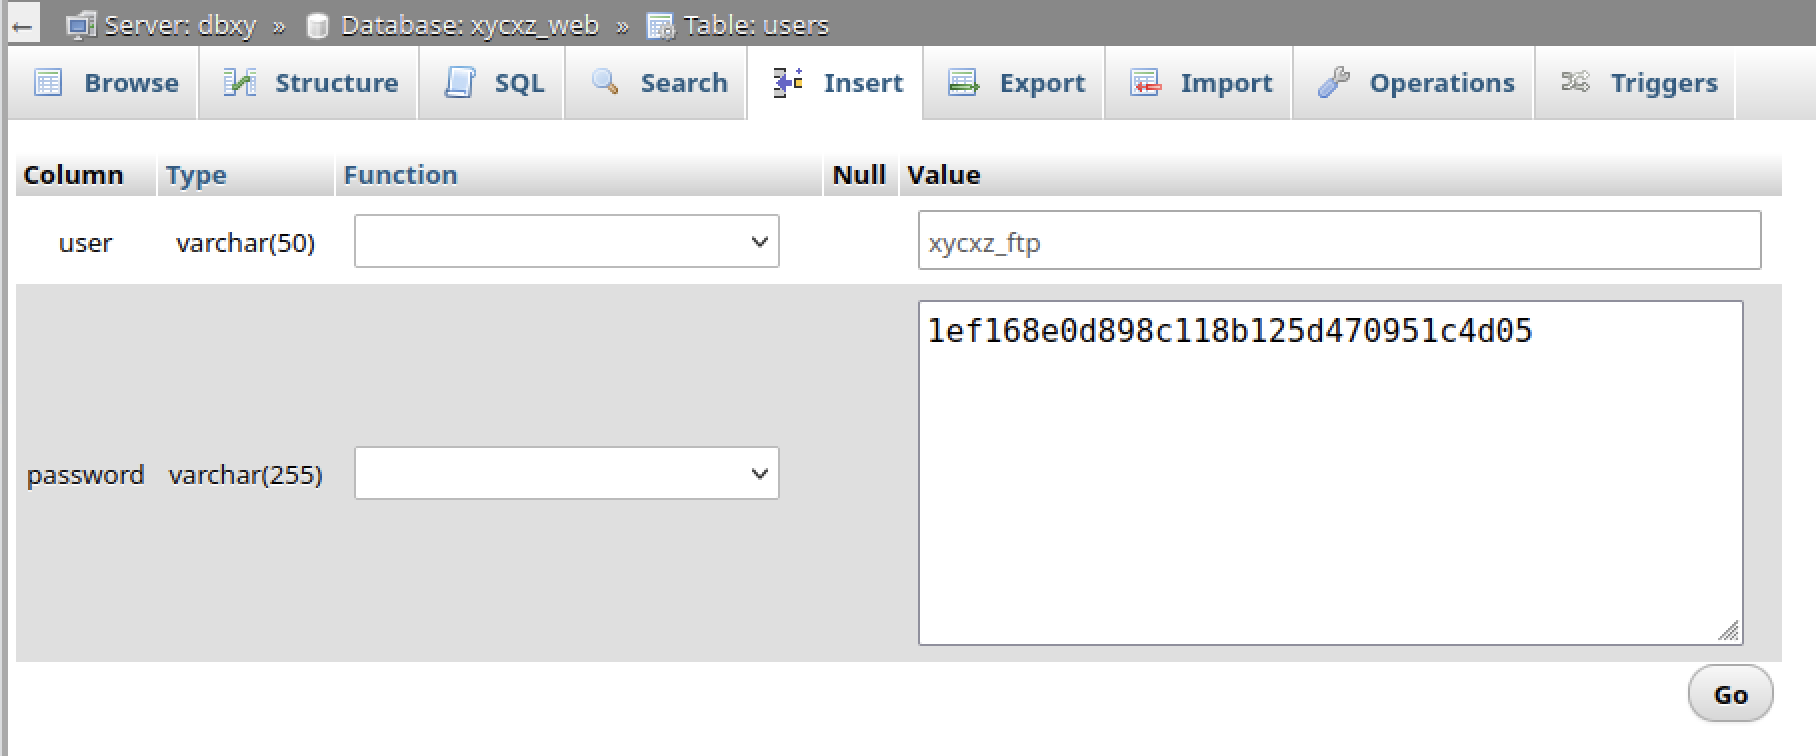
Note: I am hardcoding the password of the user with a weak hashing algorithm (MD5) for demonstration purposes. Please, when working in a production environment NEVER do this. You should always use special programming functions to encrypt the passwords!
Once we passed in the data, we can click on Go. I will be adding extra users to make this feel a bit more realistic:

Note: You can configure the database to not allow duplicates by adding a column with the name of id and the type of INT (check the A I box as well to generate unique IDs). Make sure to also give this column an index and select the value of PRIMARY (you can do this during the table creation process as well). Don’t forget to empty your table before doing this, otherwise it will throw an error! Adding this will give us more control over the database.
With our database ready, what we need to do now is connect it to our web application that is running on the Apache container. For that, I will write the following code:
db_connect.php
1
2
3
4
5
6
7
8
<?php

# Initializing a new database connection
$pdo = new PDO('mysql:host=<DB_CONTAINER>;dbname=<DB_NAME>', '<USER>', '<PASSWORD>', [
	PDO::ATTR_ERRMODE => PDO::ERRMODE_EXCEPTION
]);

?>
Note: In the connection string mysql:host=dbxy, we use the container’s name, dbxy, as the hostname. This works because both containers are on the same custom Docker network, which provides a built-in DNS service that resolves container names to their internal IP addresses. The user and password are the ones used to connect to this specific database, so we have to make sure they match what we previously did when creating the database and the user that manages it. Additionally, we can use the var_dump($pdo) function to check connectivity. If it works, we should get a message like this: object(PDO)#1 (0) {}.
Now we can implement the backend logic and update the index.php file shown in my previous post. The final code will look like the following:
index.php
1
2
3
4
5
6
7
8
9
10
11
12
13
14
15
16
17
18
19
20
21
22
23
24
25
26
27
28
29
30
31
32
33
34
35
36
37
38
39
40
41
42
43
44
45
46
47
48
49
50
51
52
53
54
55
56
57
58
59
60
61
62
63
64
<?php
// Start a session to store login state
session_start();

// Include your database connection file (it is on the same directory as my index.php)
require_once 'db_connect.php';

if ($_SERVER["REQUEST_METHOD"] == "POST") {

    $username = $_POST['username'];
    $password = $_POST['password'];

// The query is built by directly inserting user input, making it vulnerable to SQL Injection!
    $sql = "SELECT * FROM users WHERE user = '$username' AND password = '" . md5($password) . "'";

    try {
        // Execute the insecure query
        $stmt = $pdo->query($sql);
        $user = $stmt->fetch(PDO::FETCH_ASSOC);

        // Check if the query returned a user
        if ($user) {
            // If a user is found, the login is successful
            $_SESSION['loggedin'] = true;
            $_SESSION['username'] = $user['user'];
            echo "<h1 style='color: green; font-family: sans-serif;'>Welcome, " . htmlspecialchars($user['user']) . "! Login successful.</h1>";
        } else {
            // If no user is found, the login fails
            echo "<h2 style='color: red; font-family: sans-serif;'>Login failed. Invalid username or password.</h2>";
        }
    } catch (PDOException $e) {
        // Show any database errors (In-Band injection)
        echo "Query failed: " . $e->getMessage();
    }

} else {
?>

    <!DOCTYPE html>
    <html>
    <head>
        <title>Login</title>
    </head>
    <body>
        <h2>Please Log In</h2>
        <p>Enter your credentials to continue please...</p>

        <form action="index.php" method="post">

            <label for="username">Username:</label><br>
            <input type="text" id="username" name="username"><br><br>

            <label for="password">Password:</label><br>
            <input type="password" id="password" name="password"><br><br>

            <input type="submit" value="Log In">

        </form>
    </body>
    </html>

<?php
}
?>
Creating the Custom Image
With the database ready and connected to our web application, we just need to make sure to create our custom image using Dockerfile.
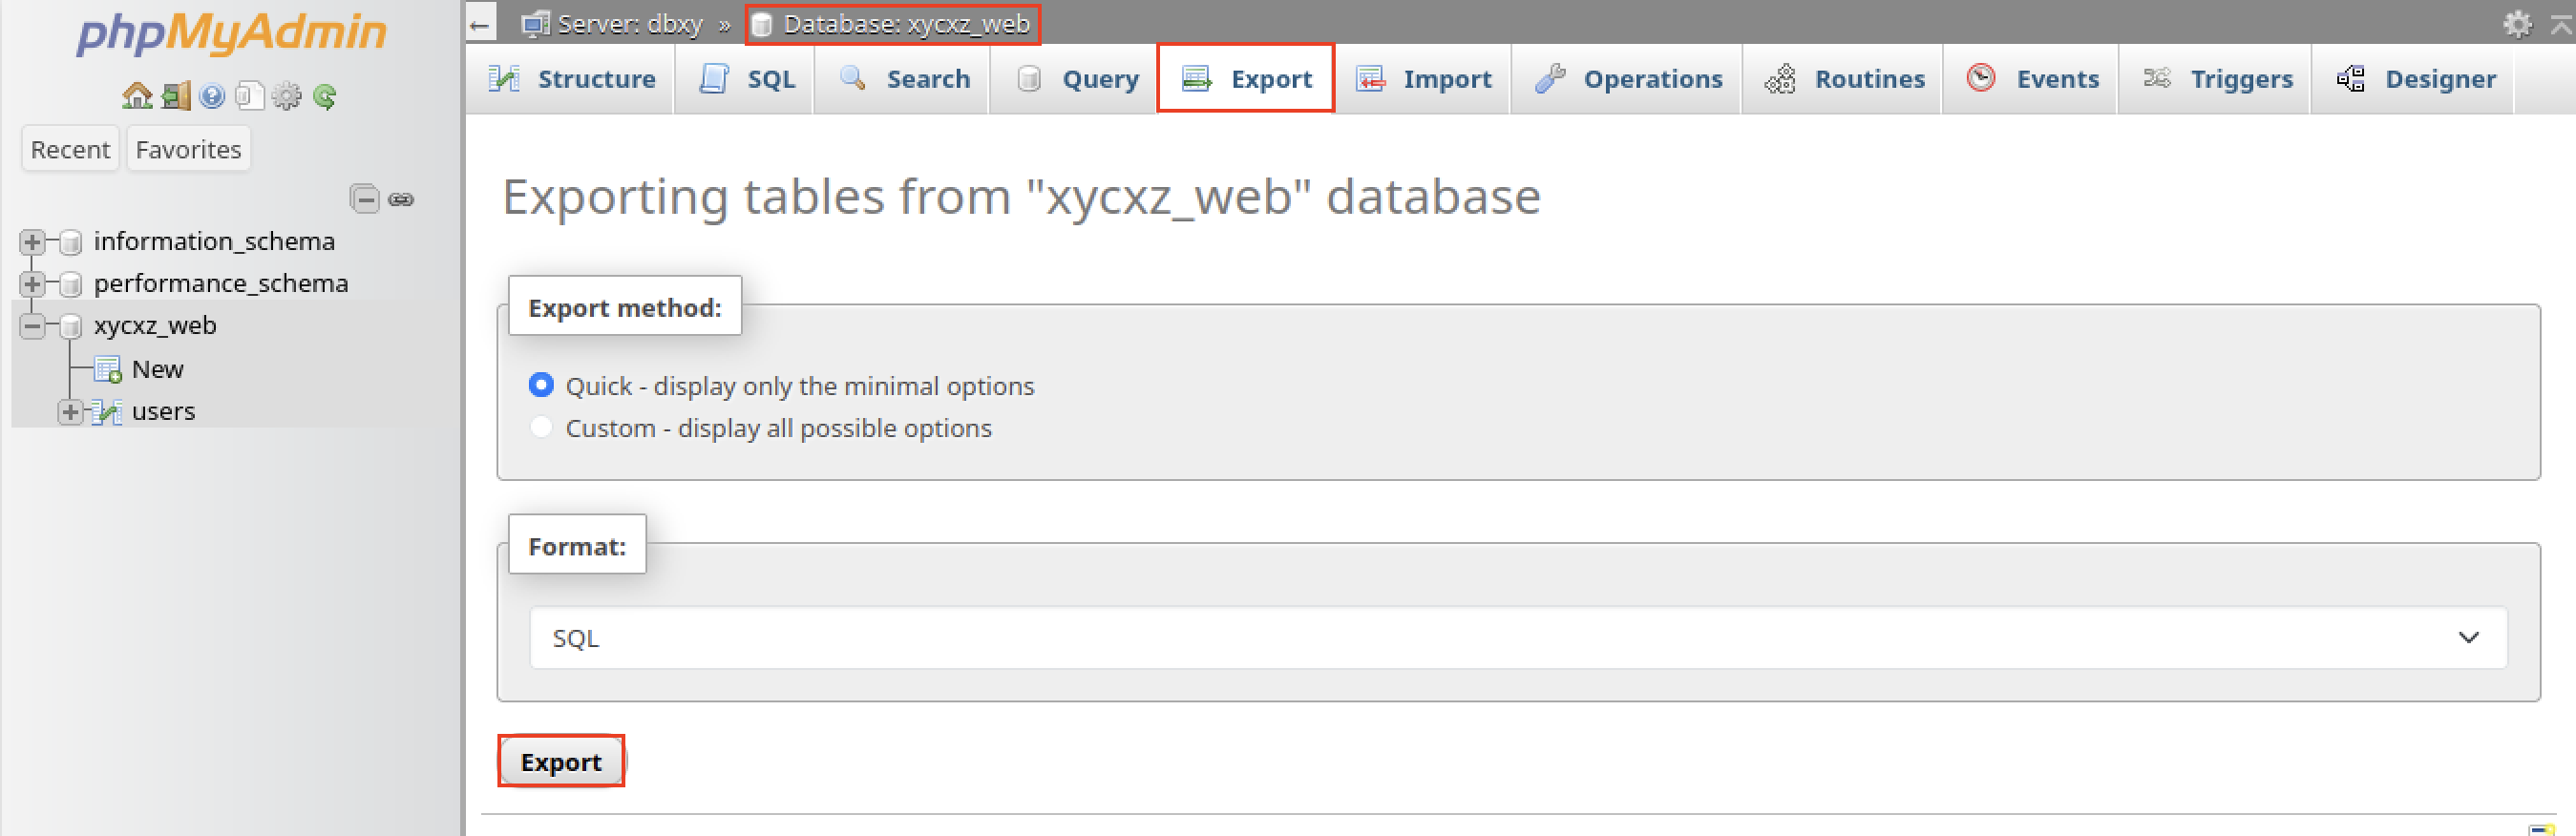
For that, first we need to export our database using the phpMyAdmin interface so then we can use it when the image gets built. To achieve this, select the database, click on Export, and choose SQL format. Then we can click on Export:

We need to add the following lines to our exported file to make sure it works properly:
1
2
3
4
5
6
7
8
9
10
11
12
13
14
15
16
17
...
<SNIP>

/*!40101 SET @OLD_CHARACTER_SET_CLIENT=@@CHARACTER_SET_CLIENT */;
/*!40101 SET @OLD_CHARACTER_SET_RESULTS=@@CHARACTER_SET_RESULTS */;
/*!40101 SET @OLD_COLLATION_CONNECTION=@@COLLATION_CONNECTION */;
/*!40101 SET NAMES utf8mb4 */;

CREATE DATABASE IF NOT EXISTS `<DB-NAME>`;
USE `<DB-NAME>`;

CREATE USER 'xycxz_webapp'@'%' IDENTIFIED BY 'Password123!';
GRANT ALL PRIVILEGES ON `xycxz_web`.* TO 'xycxz_webapp'@'%';
FLUSH PRIVILEGES;

...
<SNIP>
Now that we have our .sql file, we can create the Dockerfile:
1
2
3
FROM mysql:9.4

COPY <SQL-FILE> /docker-entrypoint-initdb.d/
Note: It’s worth noting that with this Dockerfile, we aren’t building a new version of the MySQL software itself. We are using a powerful feature of the official MySQL image: any .sql file we COPY into the /docker-entrypoint-initdb.d/ directory will be automatically executed the first time the database starts. This is the standard way to initialise a new database with tables and data.
Final Web Server Dockerfile
To finish with the configuration, we need to update the Dockerfile of our web server by modifying index.php and adding db_connect.php:
1
2
3
4
5
6
7
8
9
10
11
12
13
14
15
16
17
18
19
20
21
FROM php:8.2-apache

RUN apt-get update && \
    useradd -m -s /bin/bash apache2 && \
    a2dissite 000-default.conf && \
    rm /etc/apache2/sites-available/* && \
    rm /etc/apache2/ports.conf && \
    docker-php-ext-install pdo pdo_mysql

COPY xycxz.conf /etc/apache2/sites-available/
COPY ports.conf /etc/apache2

COPY index.php /var/www/html/
COPY db_connect.php /var/www/html/

RUN a2ensite xycxz.conf && \
    chown -R apache2:apache2 /var/www/html

EXPOSE 8080

USER apache2
Conclusion
This time I won’t provide any kind of automation. The reason behind this is that this is the core part of the vulnerability I am trying to showcase, and I want you to fully understand it without any automated process. Don’t forget to check my other posts where I set up the FTP and Web Server containers! They are required for you to fully understand my project.
Next Steps
Now that we’ve created our custom Docker images using Dockerfile, the next step will be putting everything together but this time using Docker Compose, which will ease the configuration process of multiple containers, saving networking headaches, for example.
Docker Compose will be the last Docker feature I will use in this project. After that, I will introduce AWS concepts and also show some cool stuff we can do with the cloud!. Stay tuned for upcoming posts!