IAM - AWS
Objective
I will explain what is the Amazon AWS command-line and also configure it in a way that would be useful to us in this project. Personally, I like doing most of my work using a terminal interface (I will be prioritising this over the GUI) unless I really have to use it or consider it is better for an explanation.
I will also be introducing Identity and Access Management (IAM) topic so you don’t get lost when I have to assume that you should know the topic in future posts.
AWS CLI: What is it?
The AWS command-line allows us to perform anything we can do through the AWS Dashboard and even more things, like task automation, scripting, or integration with CI/CD pipelines.
It will be a requirement for us to install the AWS CLI locally in our system to follow along what I am going to show. Remember that I am using Linux, so this is going to be the OS I will be focusing on. Nevertheless, I will also provide the link to the documentation in case you are working with a different OS.
Installing AWS CLI Locally
One of the options would be following the steps seen in the official documentation. However, we can also simply use the snap package manager because it supports Ubuntu distros (if you are using another distro, make sure you are able to use this package manager). For that, we just need to run the following command:
1
sudo snap install aws-cli --classic
Note: We don’t have to worry about updating this tool because snap packages update automatically in the background. Bear in mind that I am using a VM with a full functioning OS and in case of trying to do this within a container, snap packages will not work since containers do not have a systemd init (or similar) and also access to deep parts of the kernel that cannot be reached from an isolated container.
Identity and Access Management (IAM)
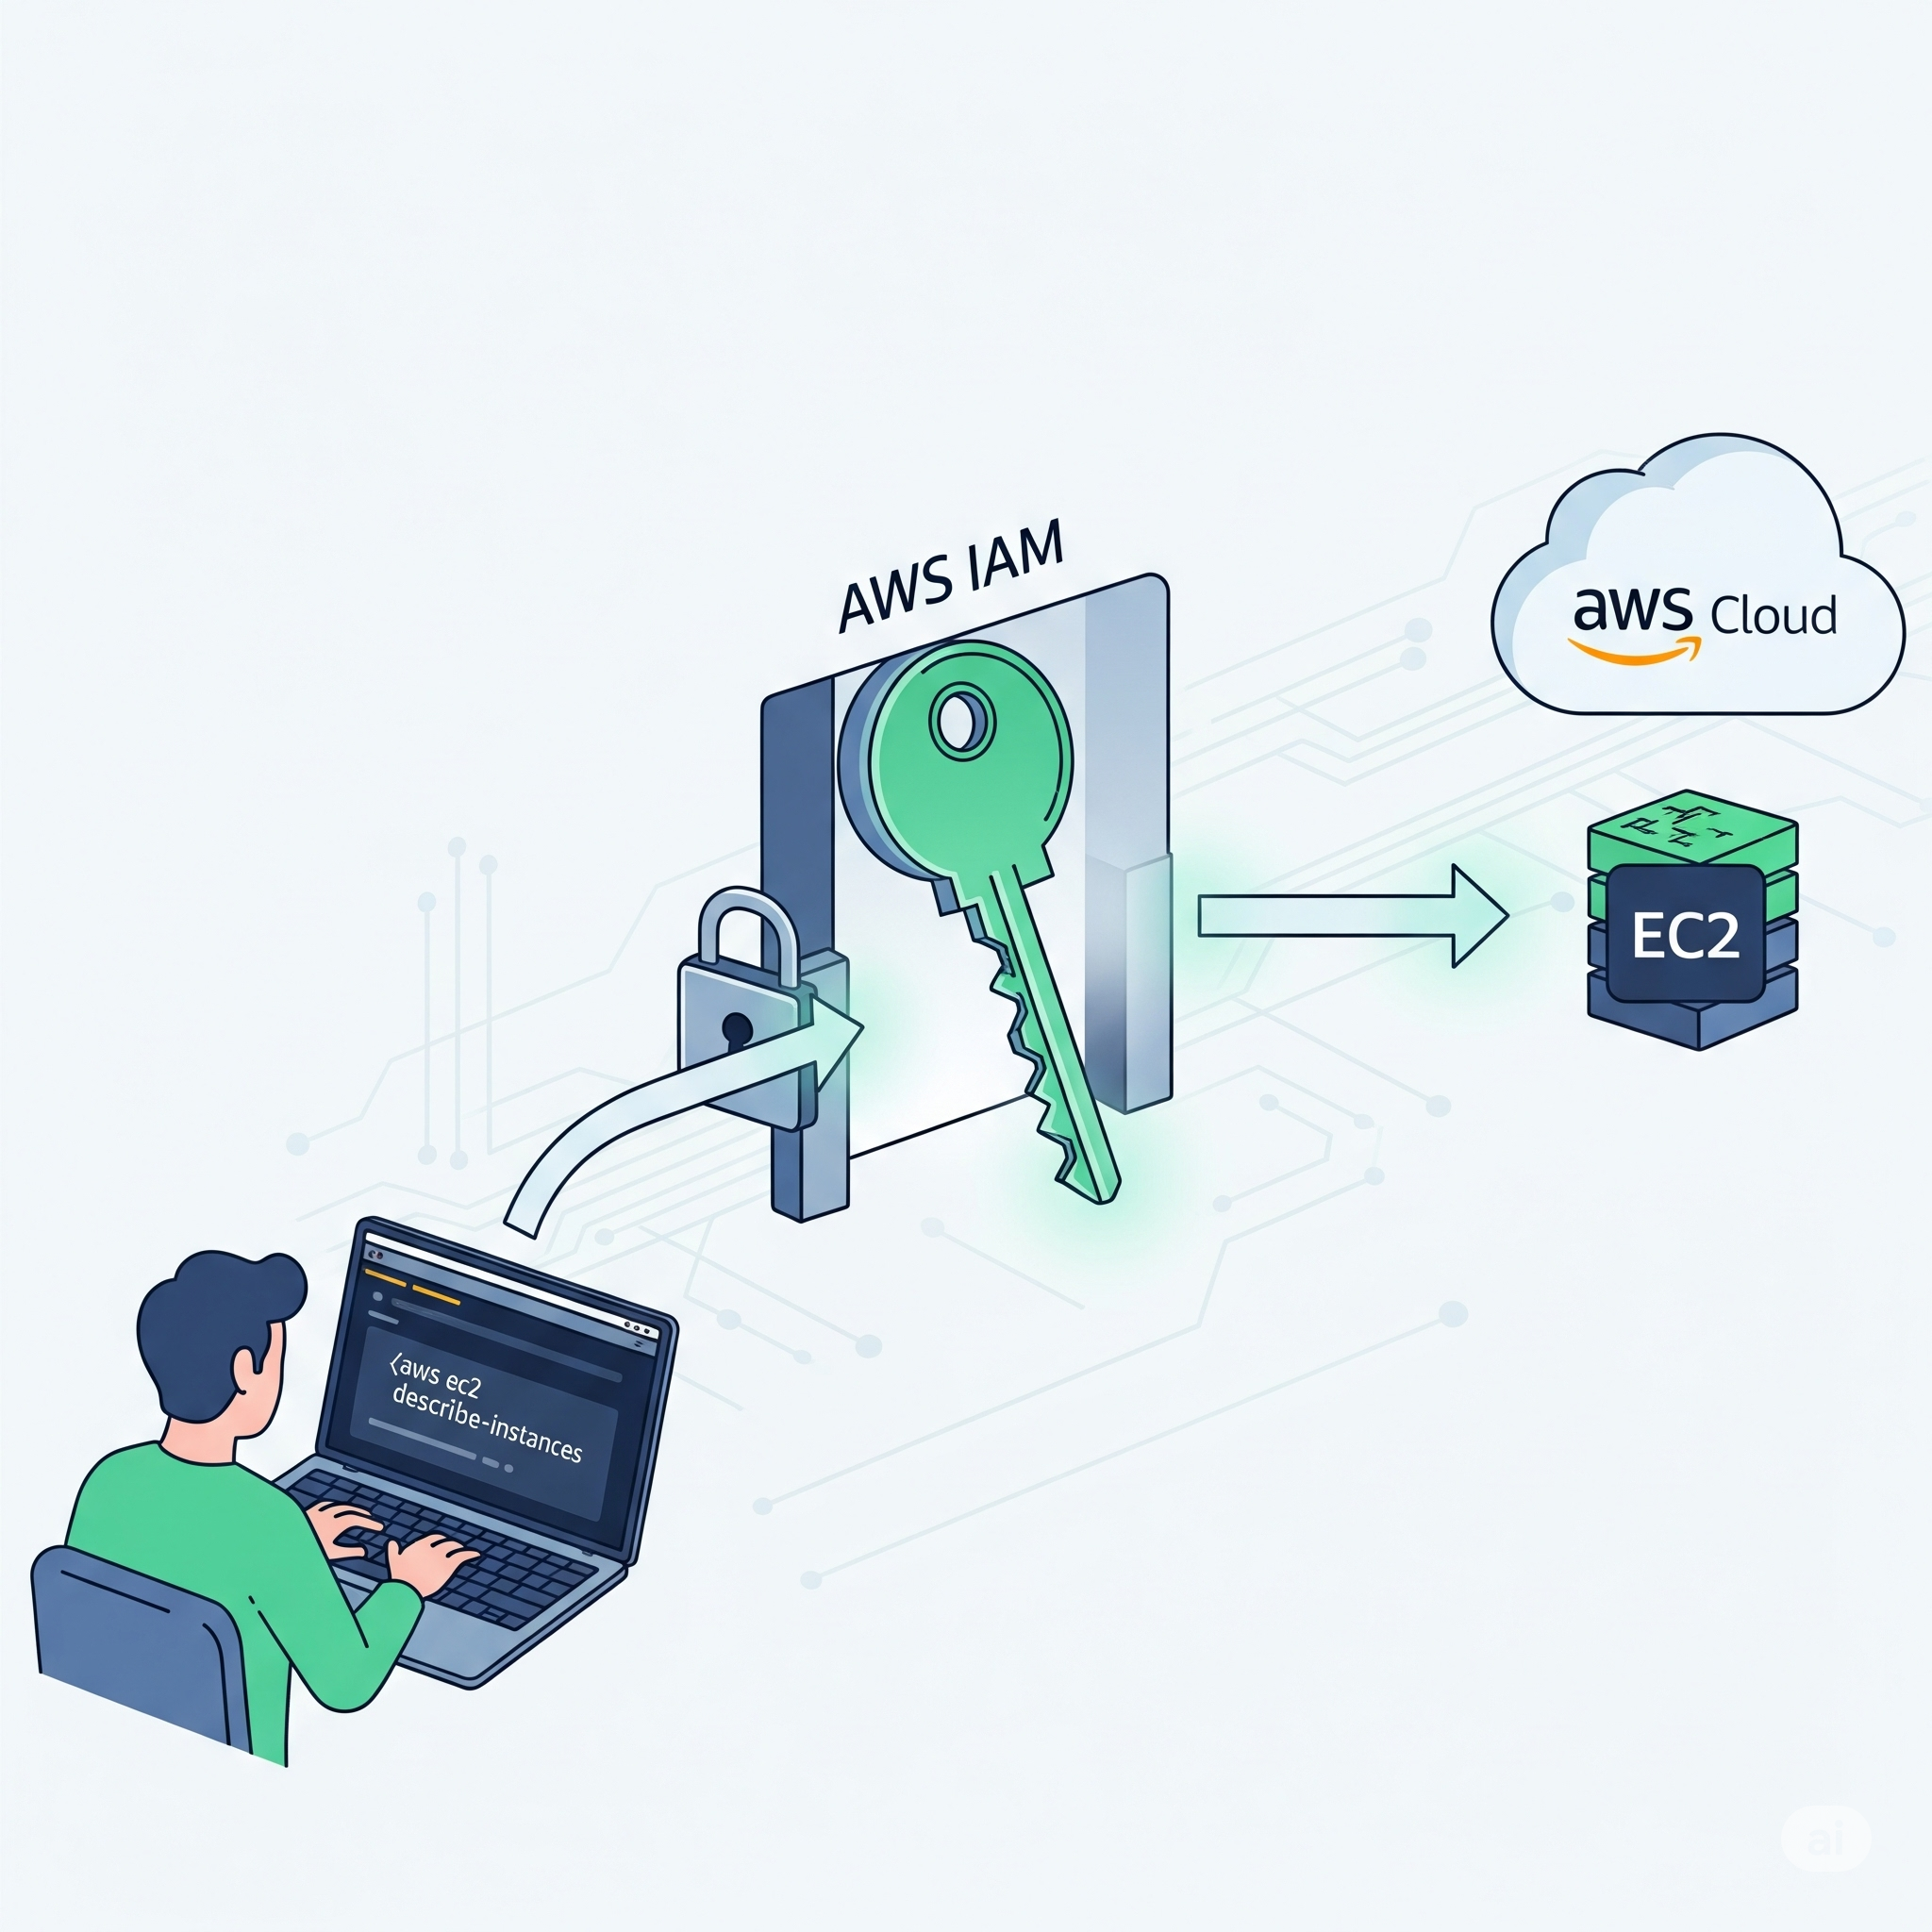
IAM is the mechanism that controls (in the AWS cloud) which user or role can access what. It consists of a few main categories.
IAM Users
The IAM users represent individual people or services that need access to AWS resources. They can have their own credentials (passwords, keys…) and permissions associated with them as well.
Within users in IAM, there is the root user which is the account owner. This account has full access to all the resources and services. Because it is never a good idea to perform actions being this user (for security reasons), we will be creating another user later on this post.
IAM Groups
The IAM groups are a collection of IAM users. The existence of groups can help us to apply different configuration settings to many users or services at once without having to apply a rule to each one by one.
IAM Policies
IAM Policies are the documents (in JSON format) that define permissions or, in other words, specify what actions are allowed or denied for AWS resources. Policies can be attached to users, groups, and many more.
Exploring the Dashboard
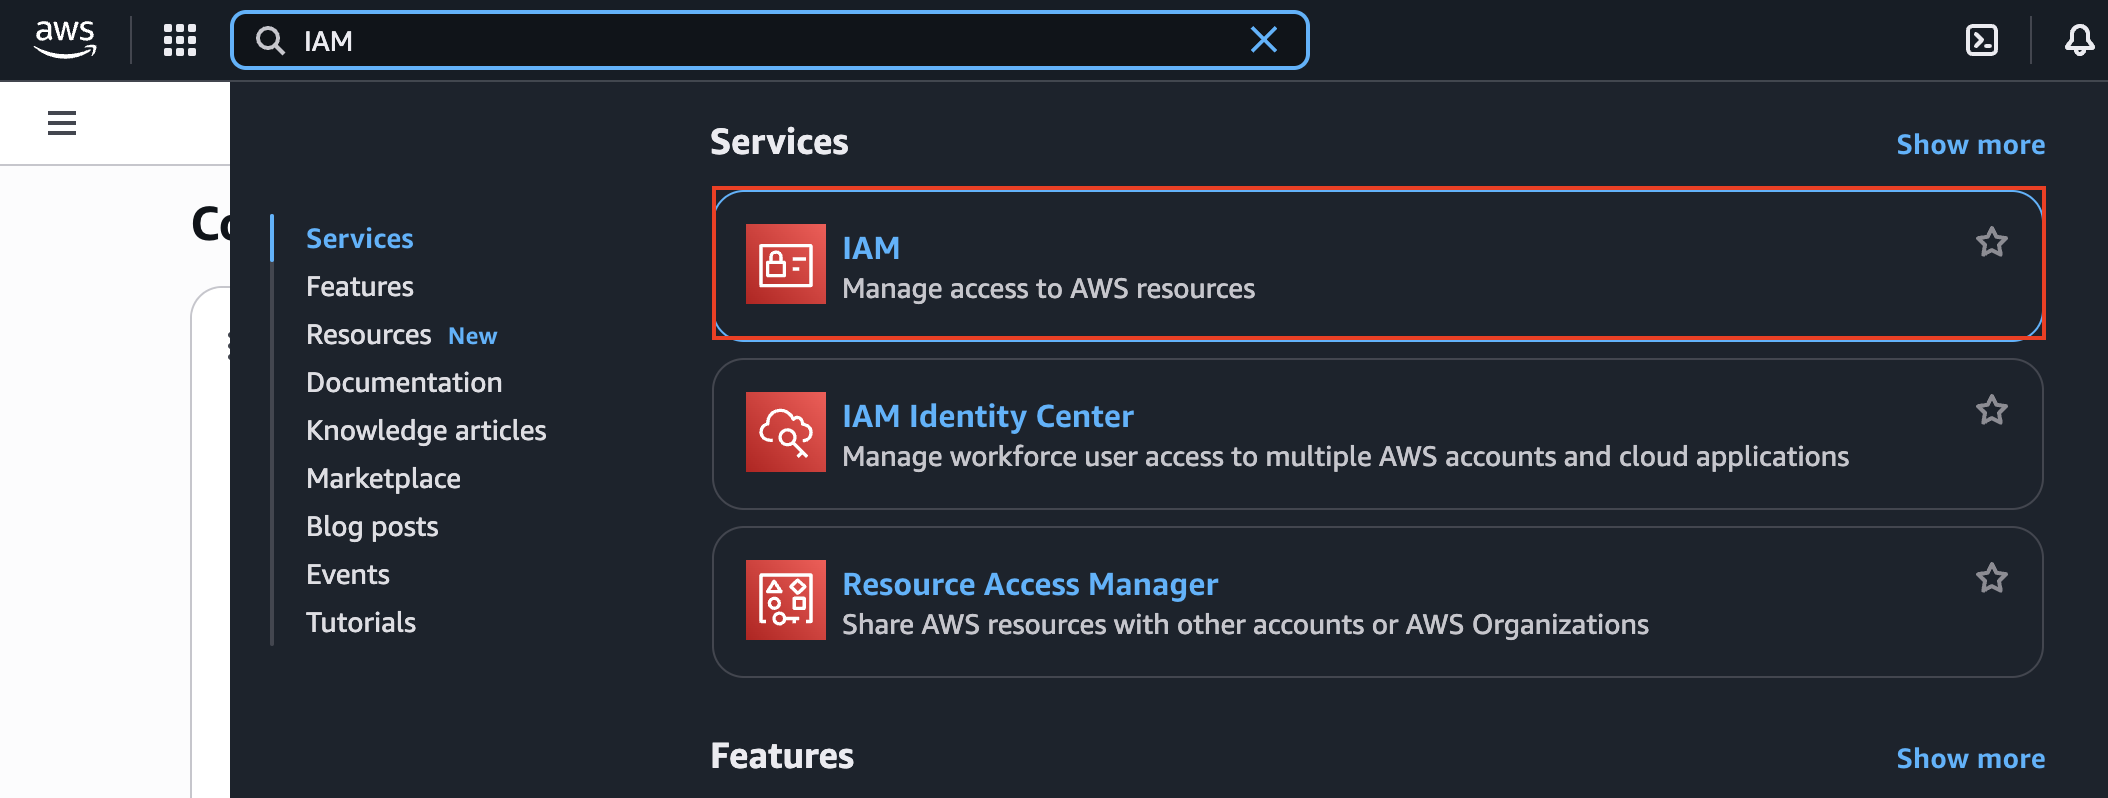
To enter the dashboard of AWS IAM, we have to use the search feature and type in “IAM” and click the first option:
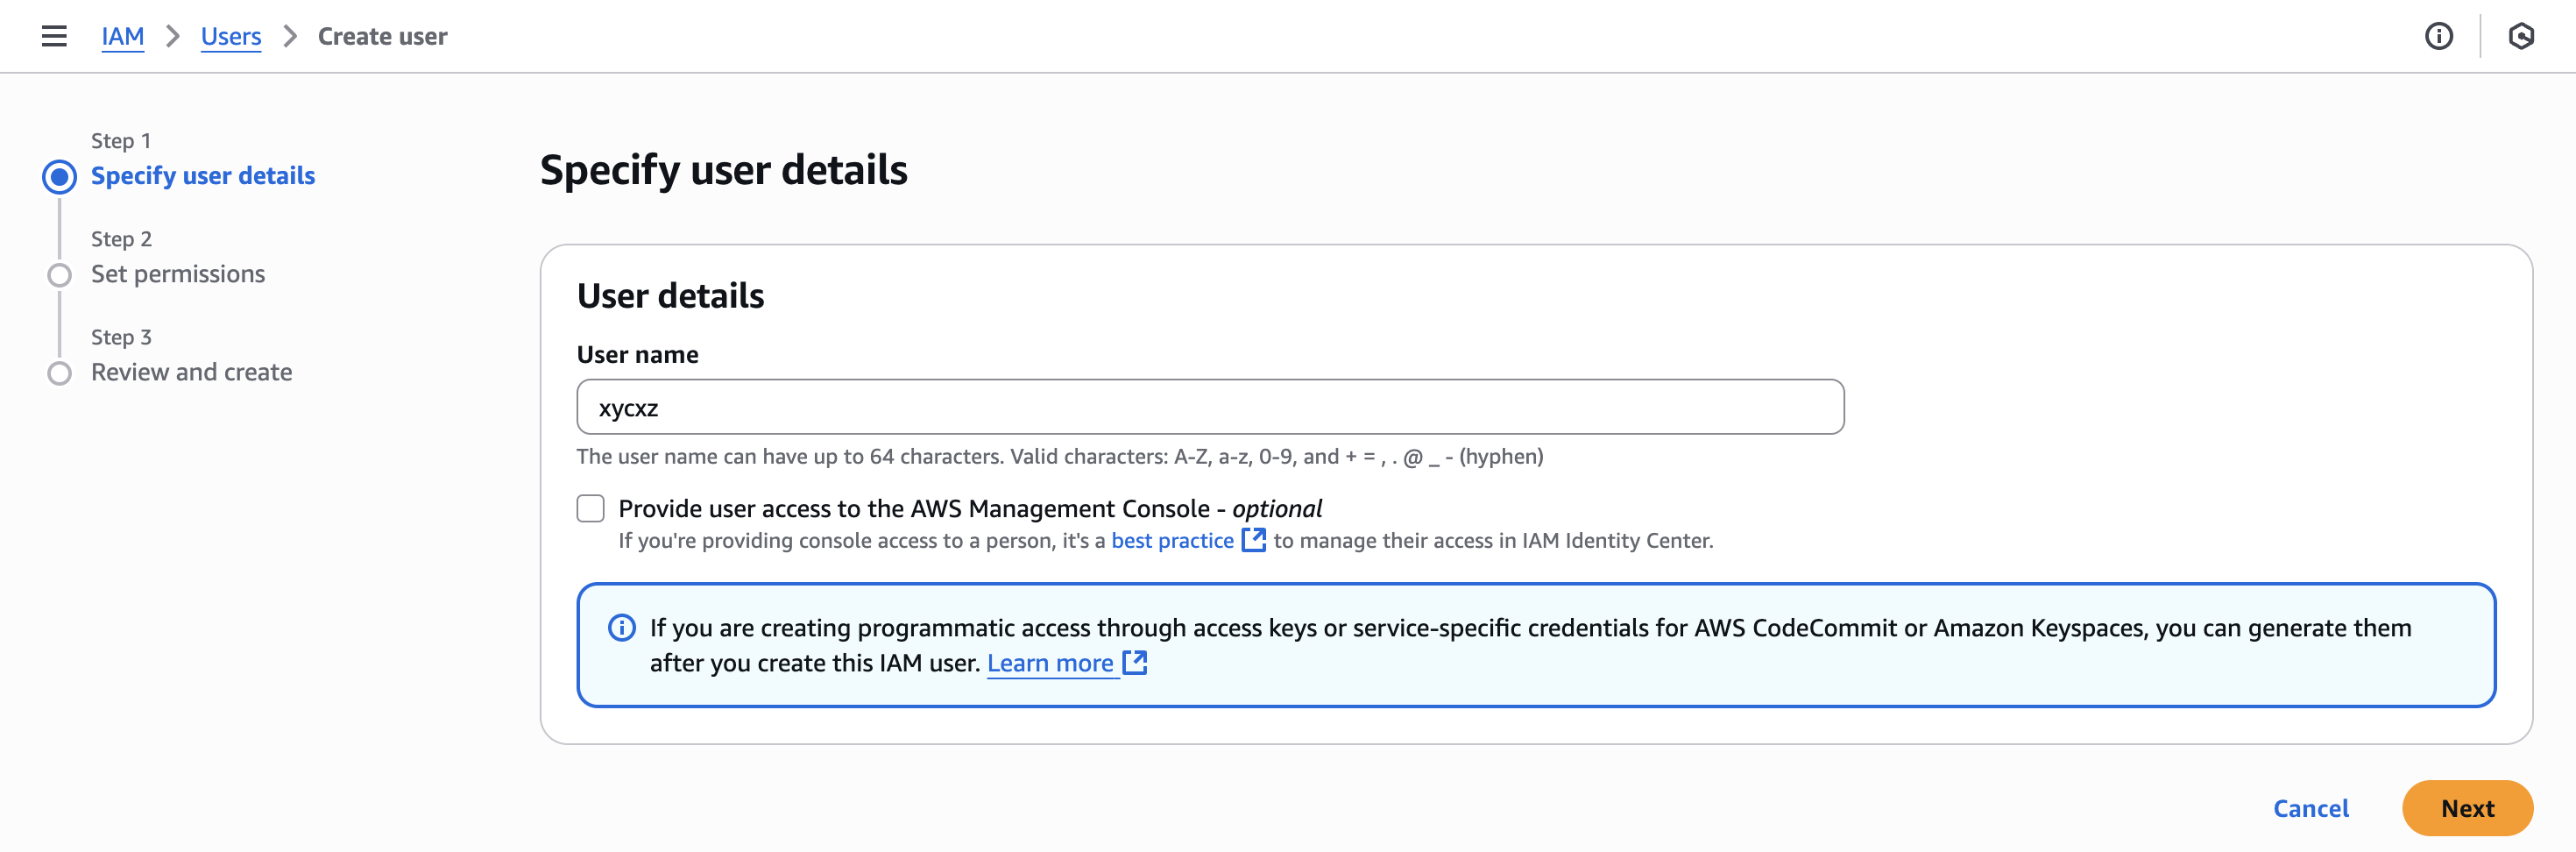
Once we get inside the dashboard, we will click on Users -> Create user to start creating our user. I won’t check the box seen in the image because I will only be using the command-line:
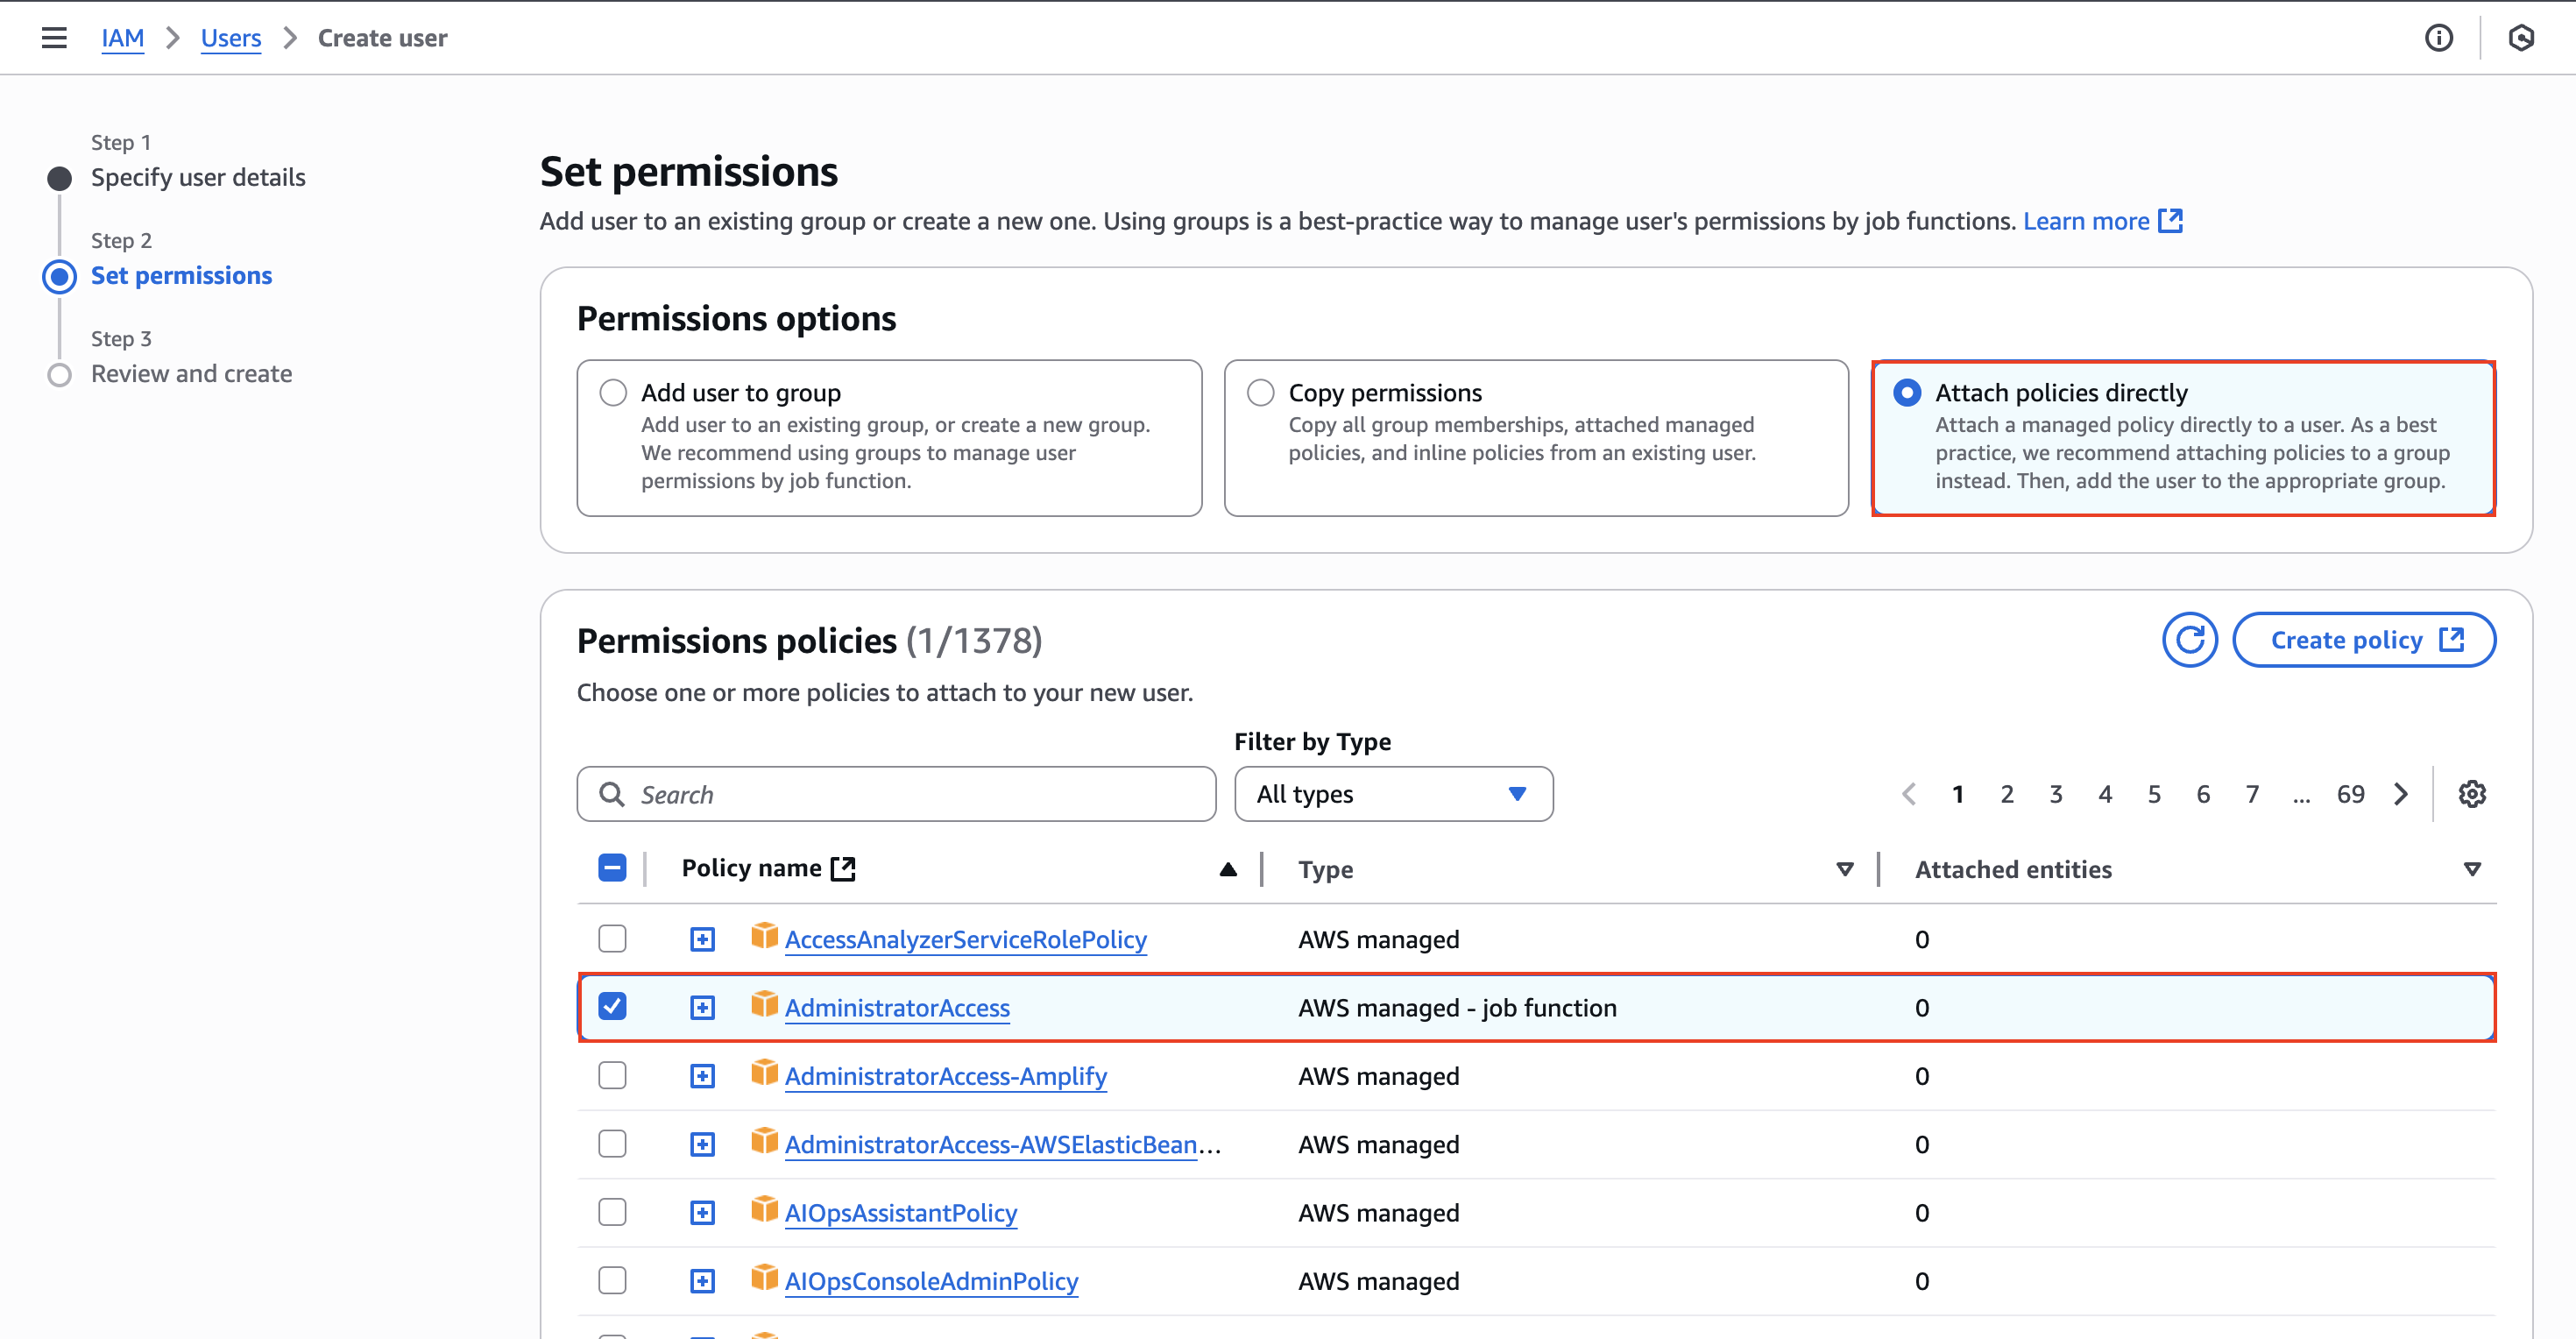
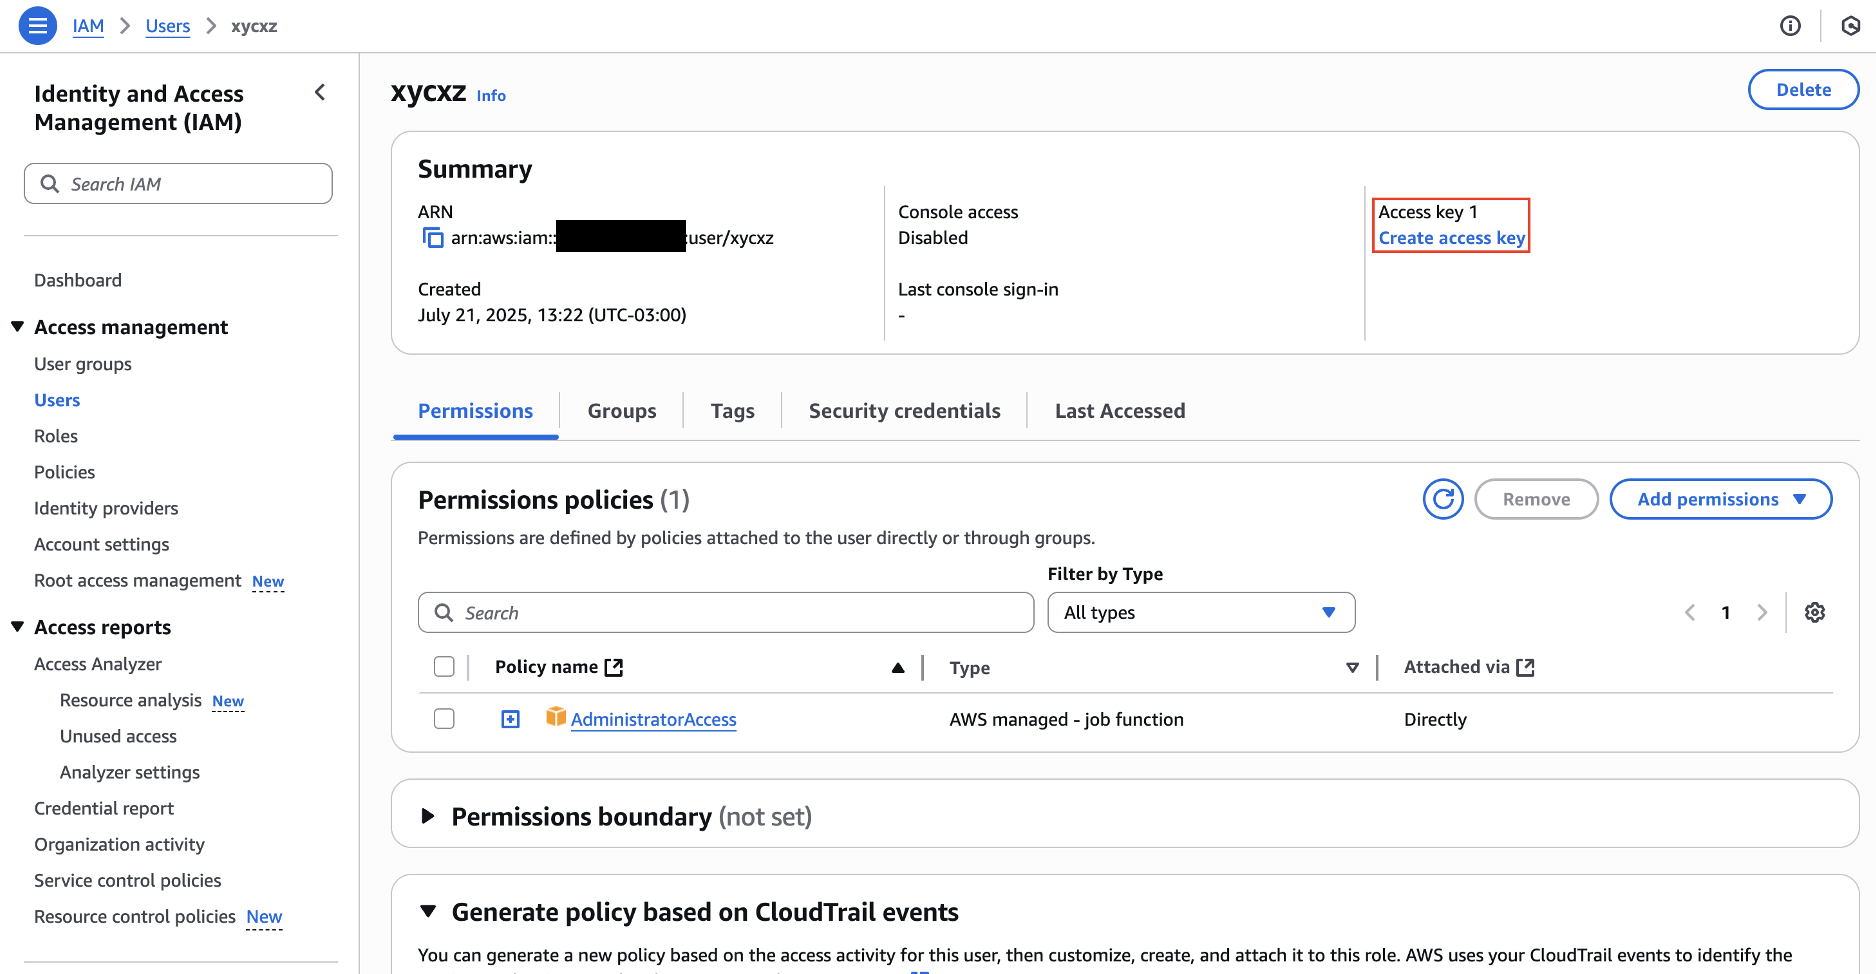
After clicking on Next, we will be asked to configure the permissions. In here I will be providing a policy called AdministratorAccess. Be aware that this policy will provide our user access to pretty much everything in AWS. This is something we should probably avoid in a production environment, but I do this for demonstration purposes.
Now we can click on Next -> Create user to finally create our user. Once that’s done, we will attach an Access key to it:
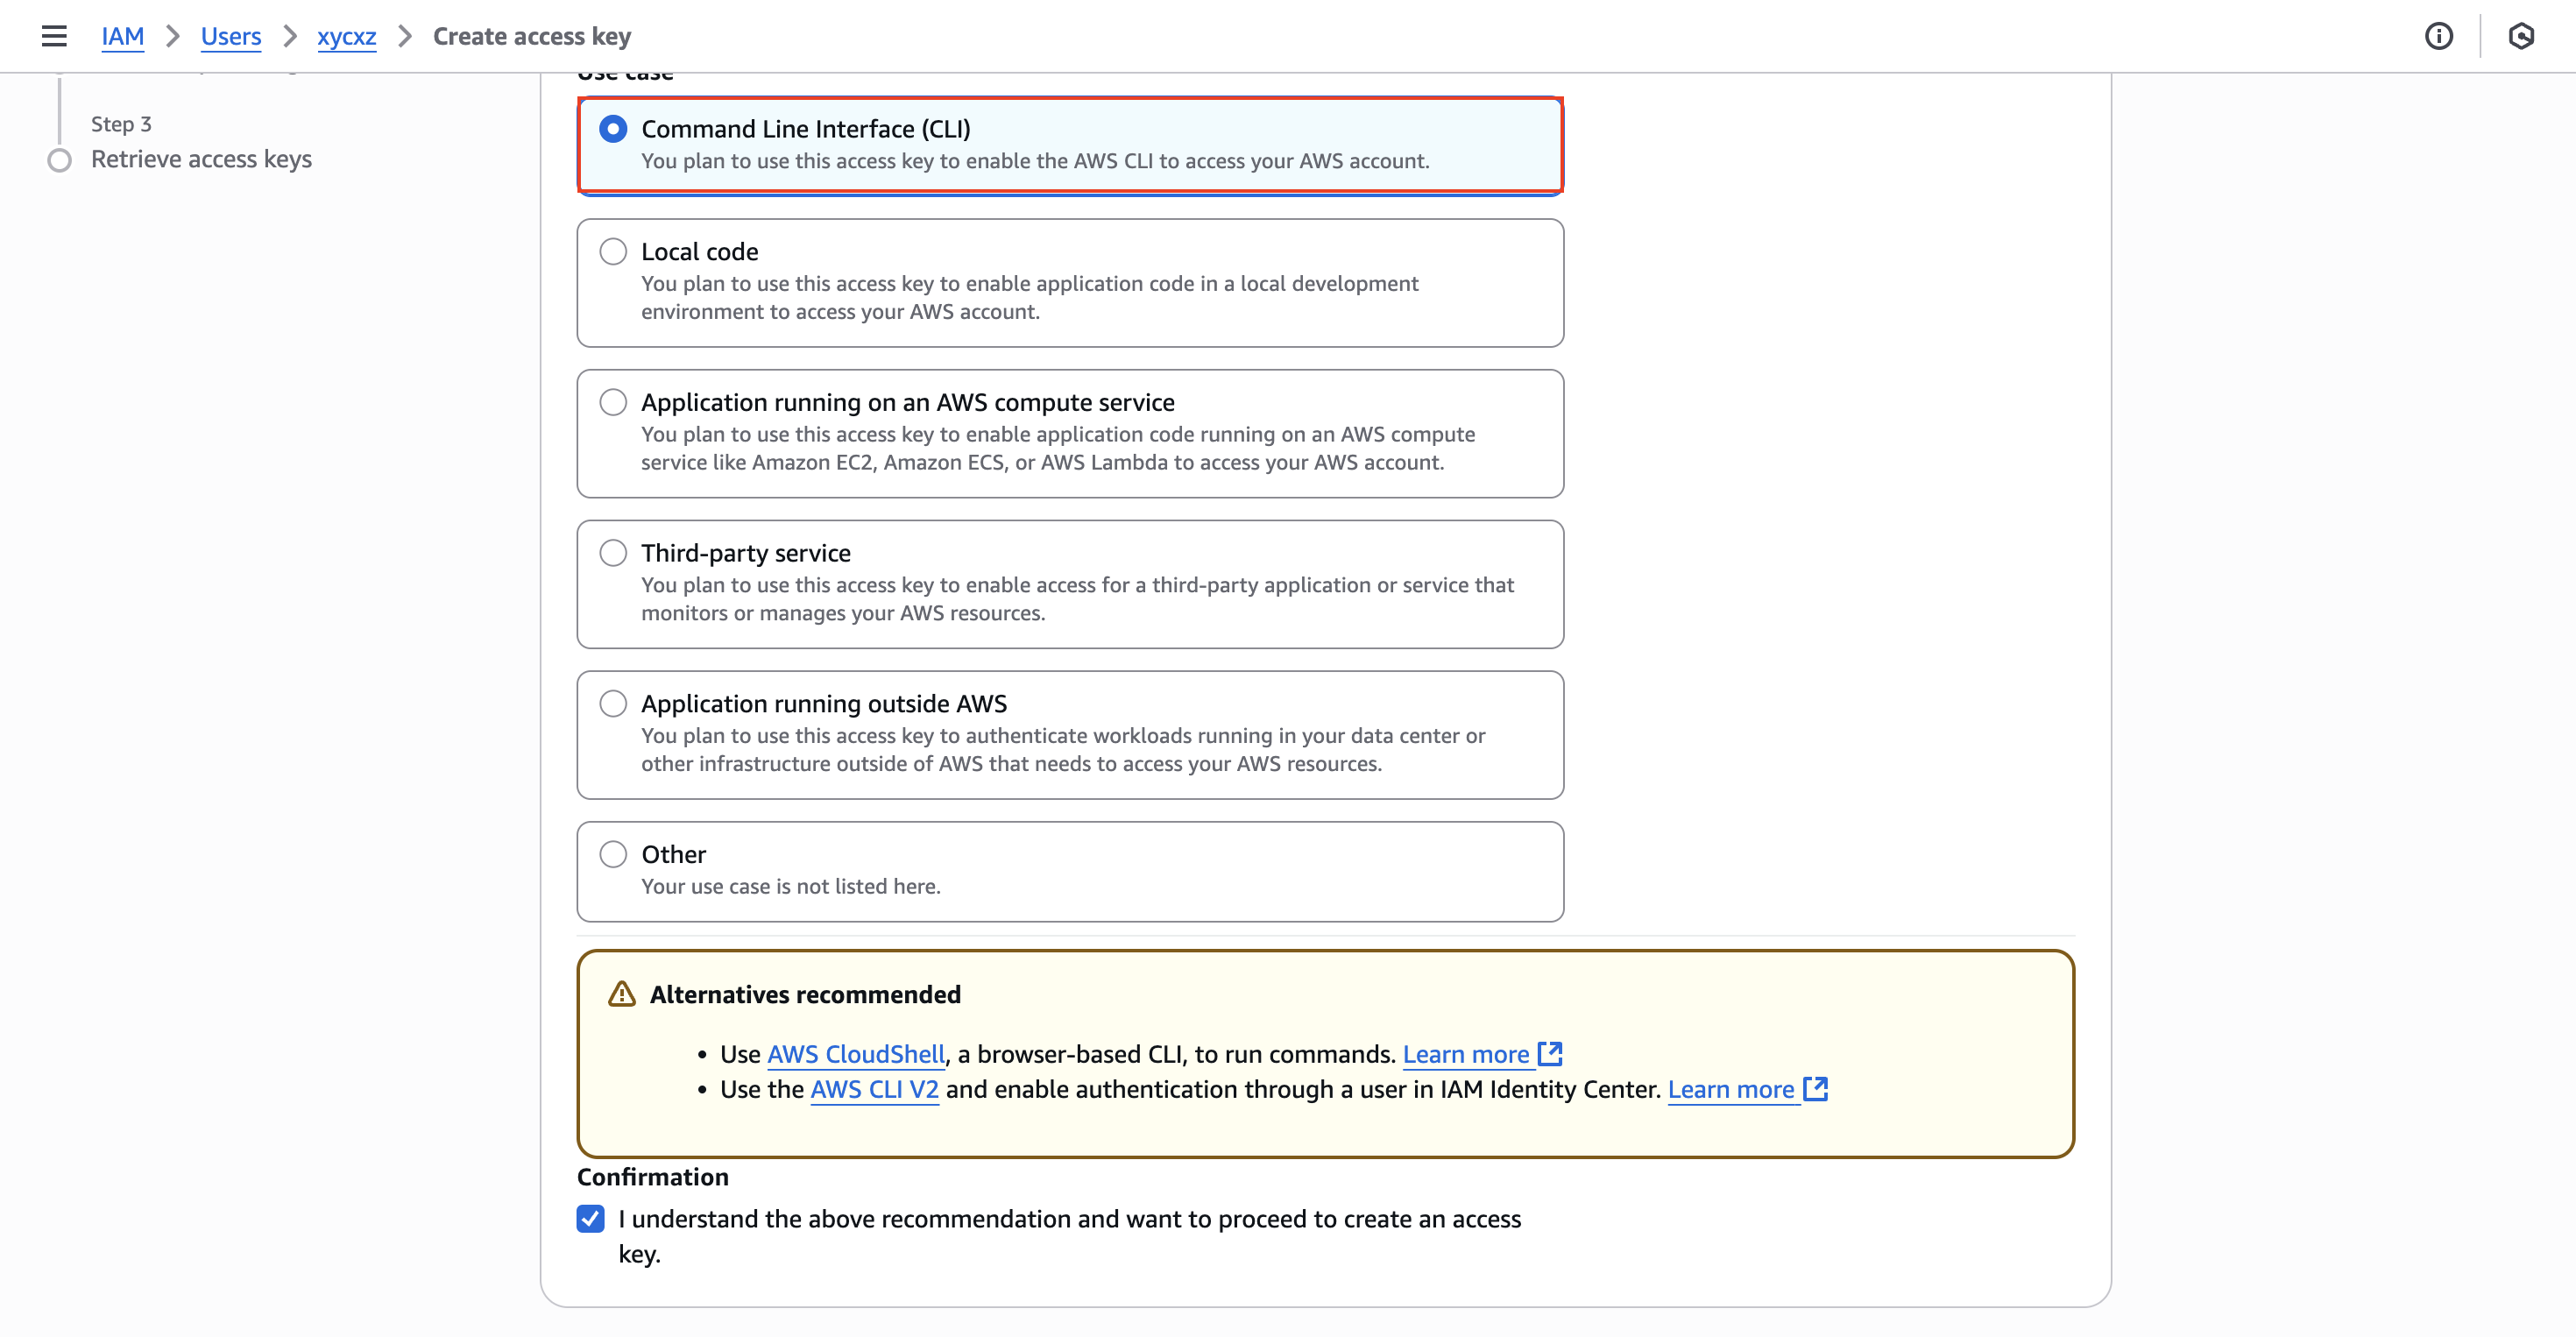
Note: For a production environment it is recommended to explore IAM Identity Center to enhance security!
Then, we can click on Next and give a Tag to our key. Finally, we can create it and we should see something similar to this:
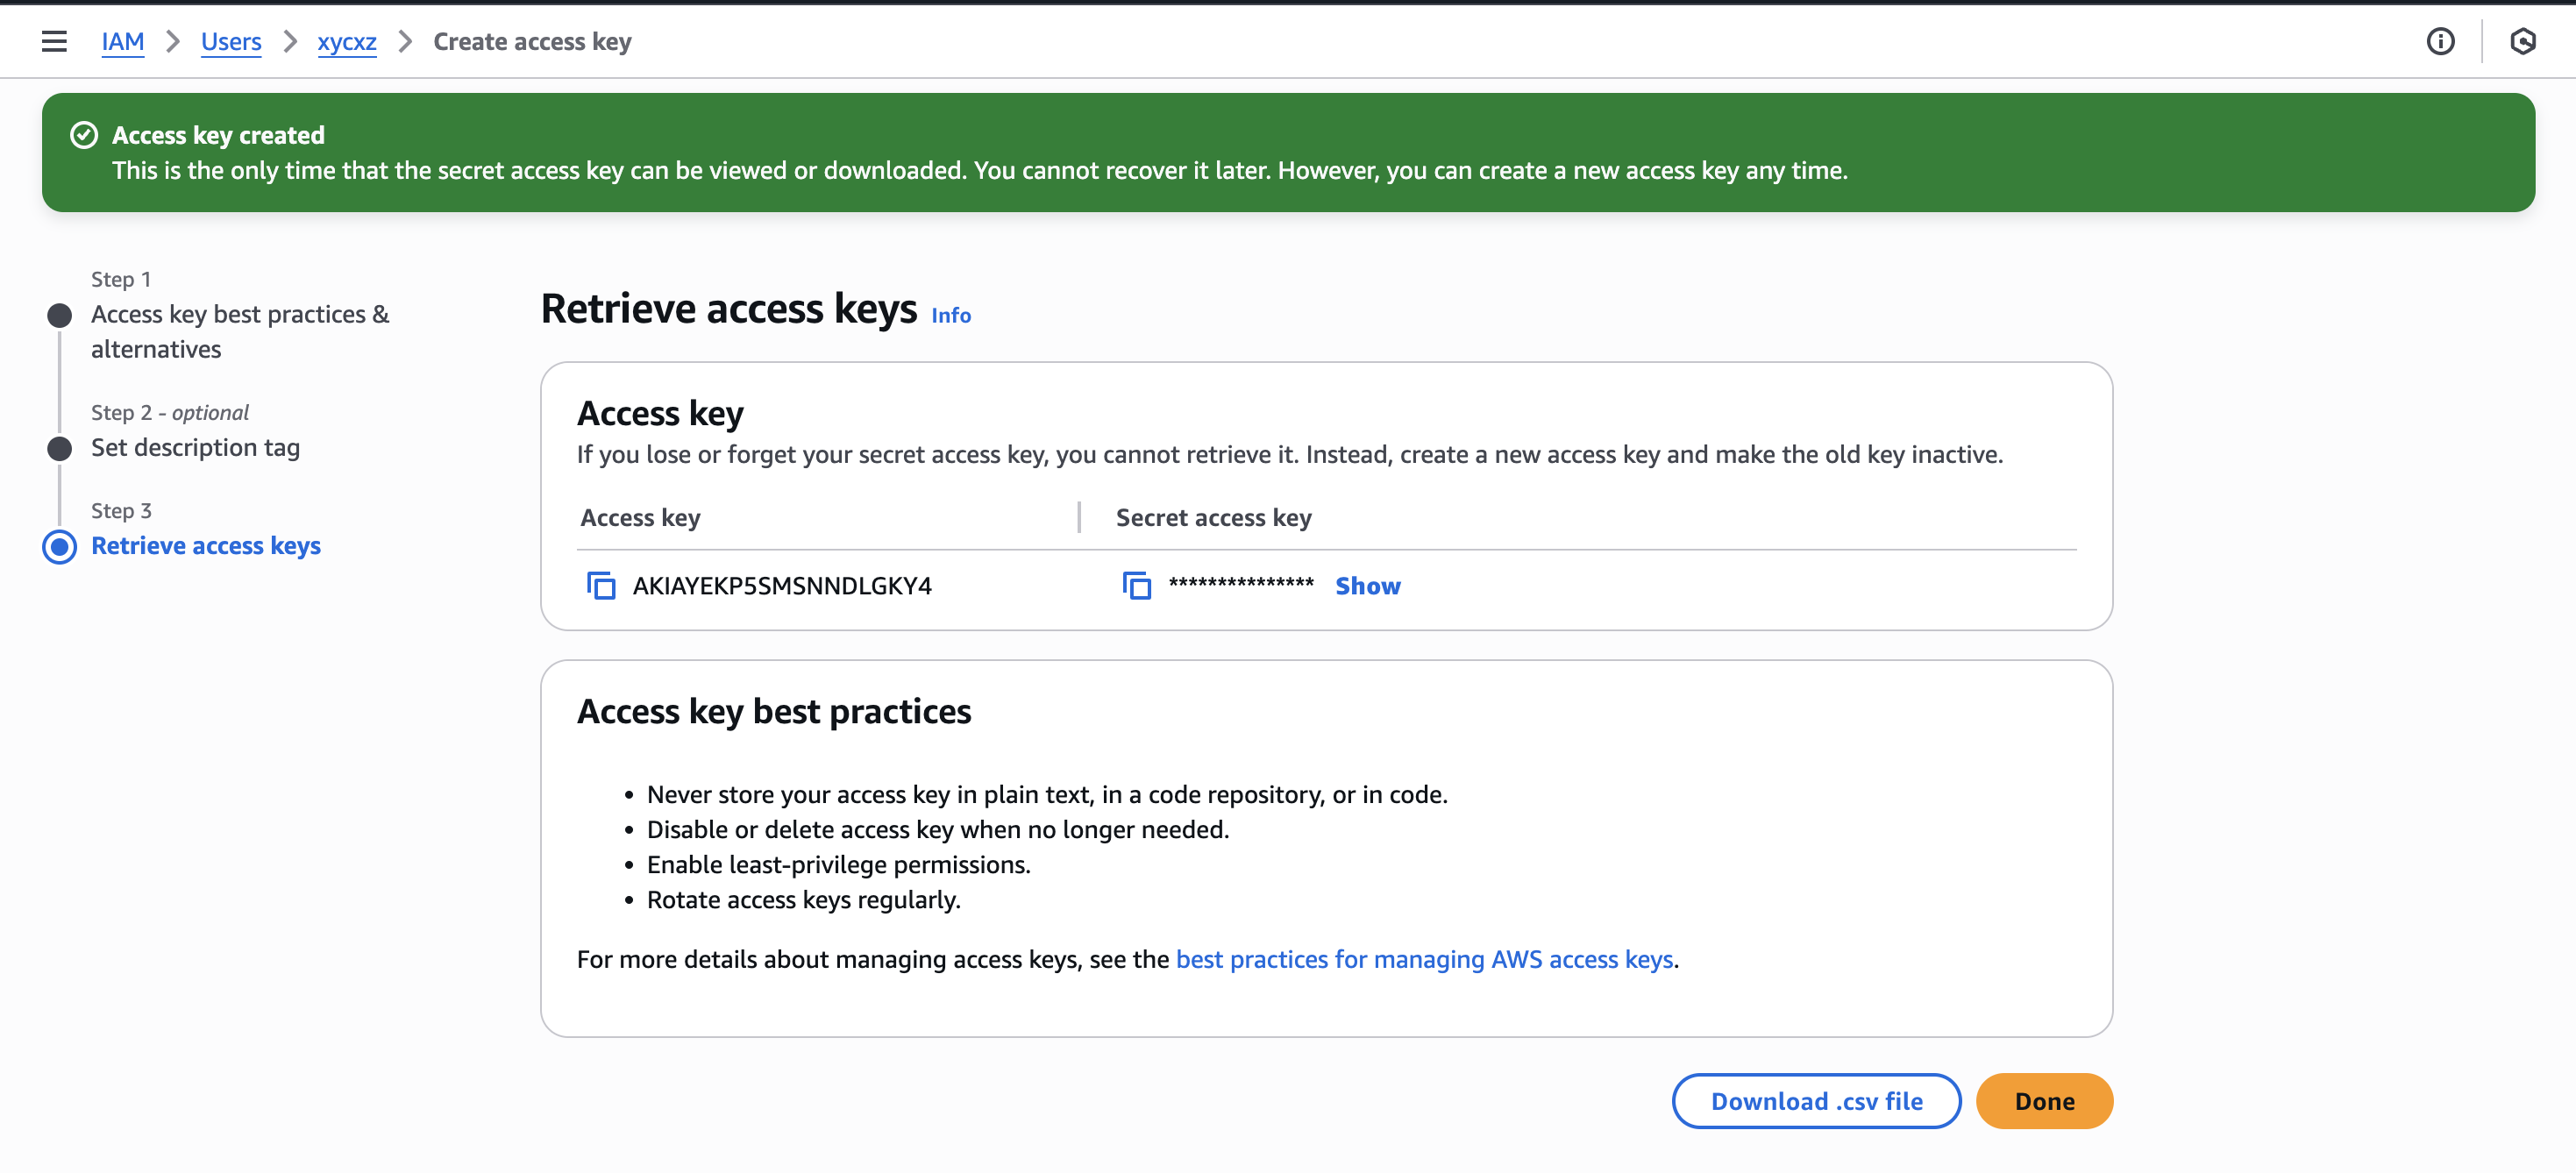
Note: For security reasons, never share the secret access key to anyone! Also, it is important to know that the secret access key will only be shown once. This means that we have to make sure to copy it in a safe place or create another key in case of losing it
We will use the user with its key to access AWS through the AWS CLI. There are some ways we can do this: One of them include granting access temporarily to our user by defining environmental variables. However, this approach can produce a security issue since our private key would be stored in our shell history.
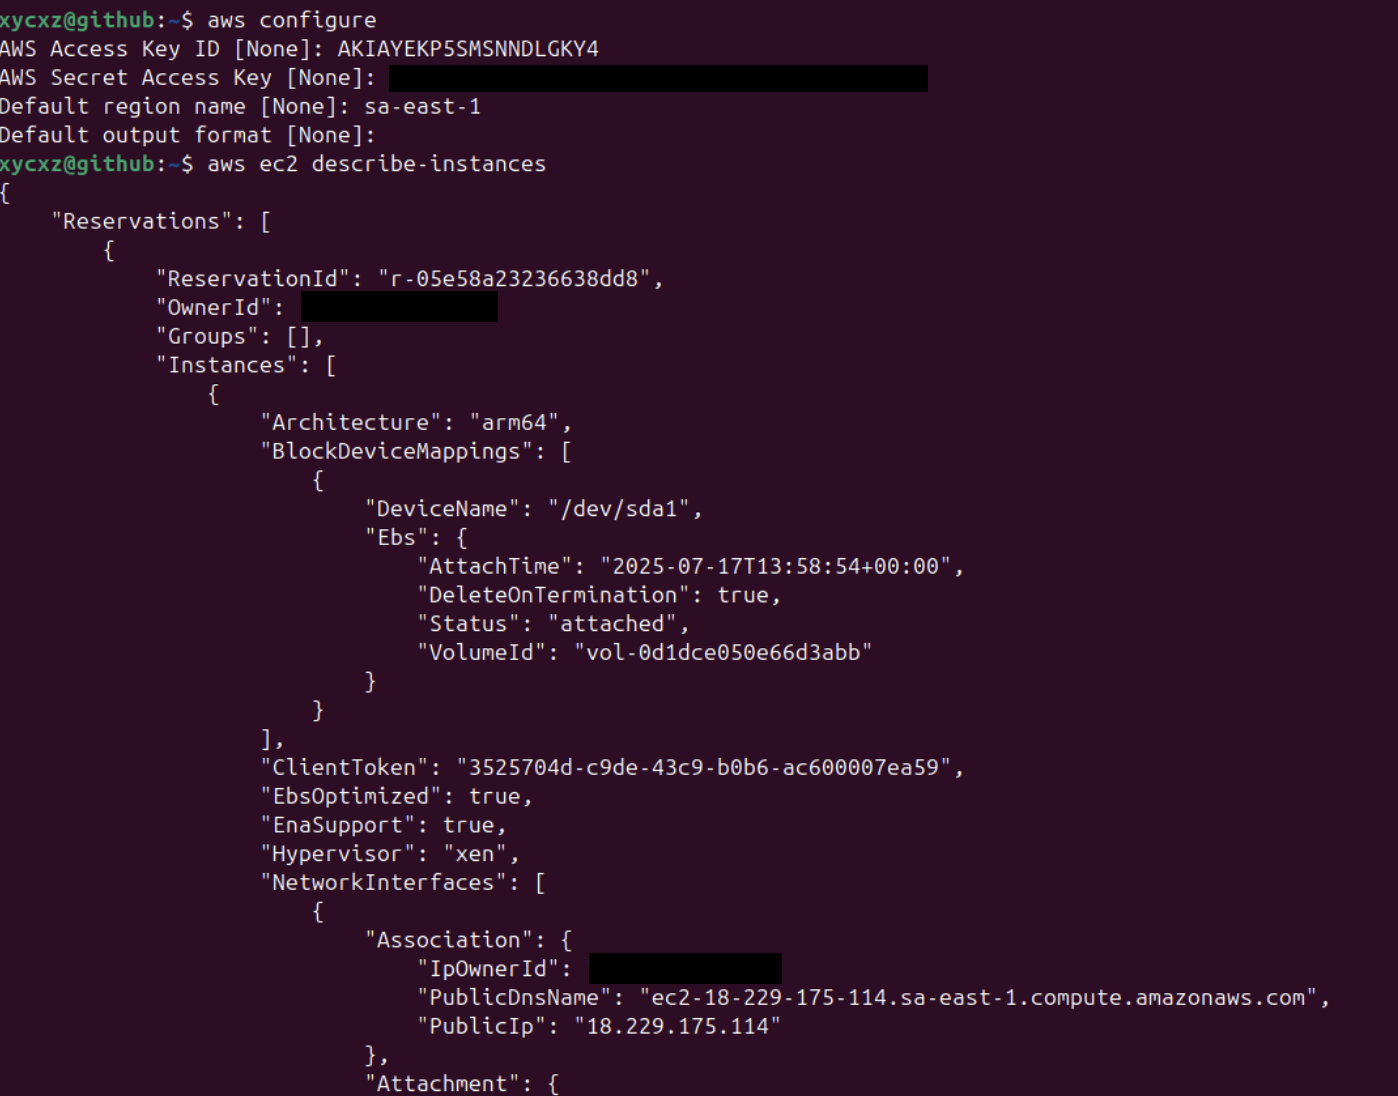
The other approach (more secure), is running a command that will prompt us to pass all the information needed for authentication. This won’t store anything in our shell history!
1
aws configure
Note: This command stores the credentials in a file located at ~/.aws/.
Creating a more Realistic User
So far, we already learnt how to create a user and we also had a short overview of some terminologies that we will be using in this project. This time, I will be creating a user that could be more common to find in the real world.
Let’s say we wanted to grant read-only access to our EC2 instances to a shell script which could enable us to automate the monitoring of the status of our instance(s). This access should be limited to our EC2 instance only.
To achieve this, we will follow the same steps I showed before with some modifications, especially the policies, which are used to manage permissions.
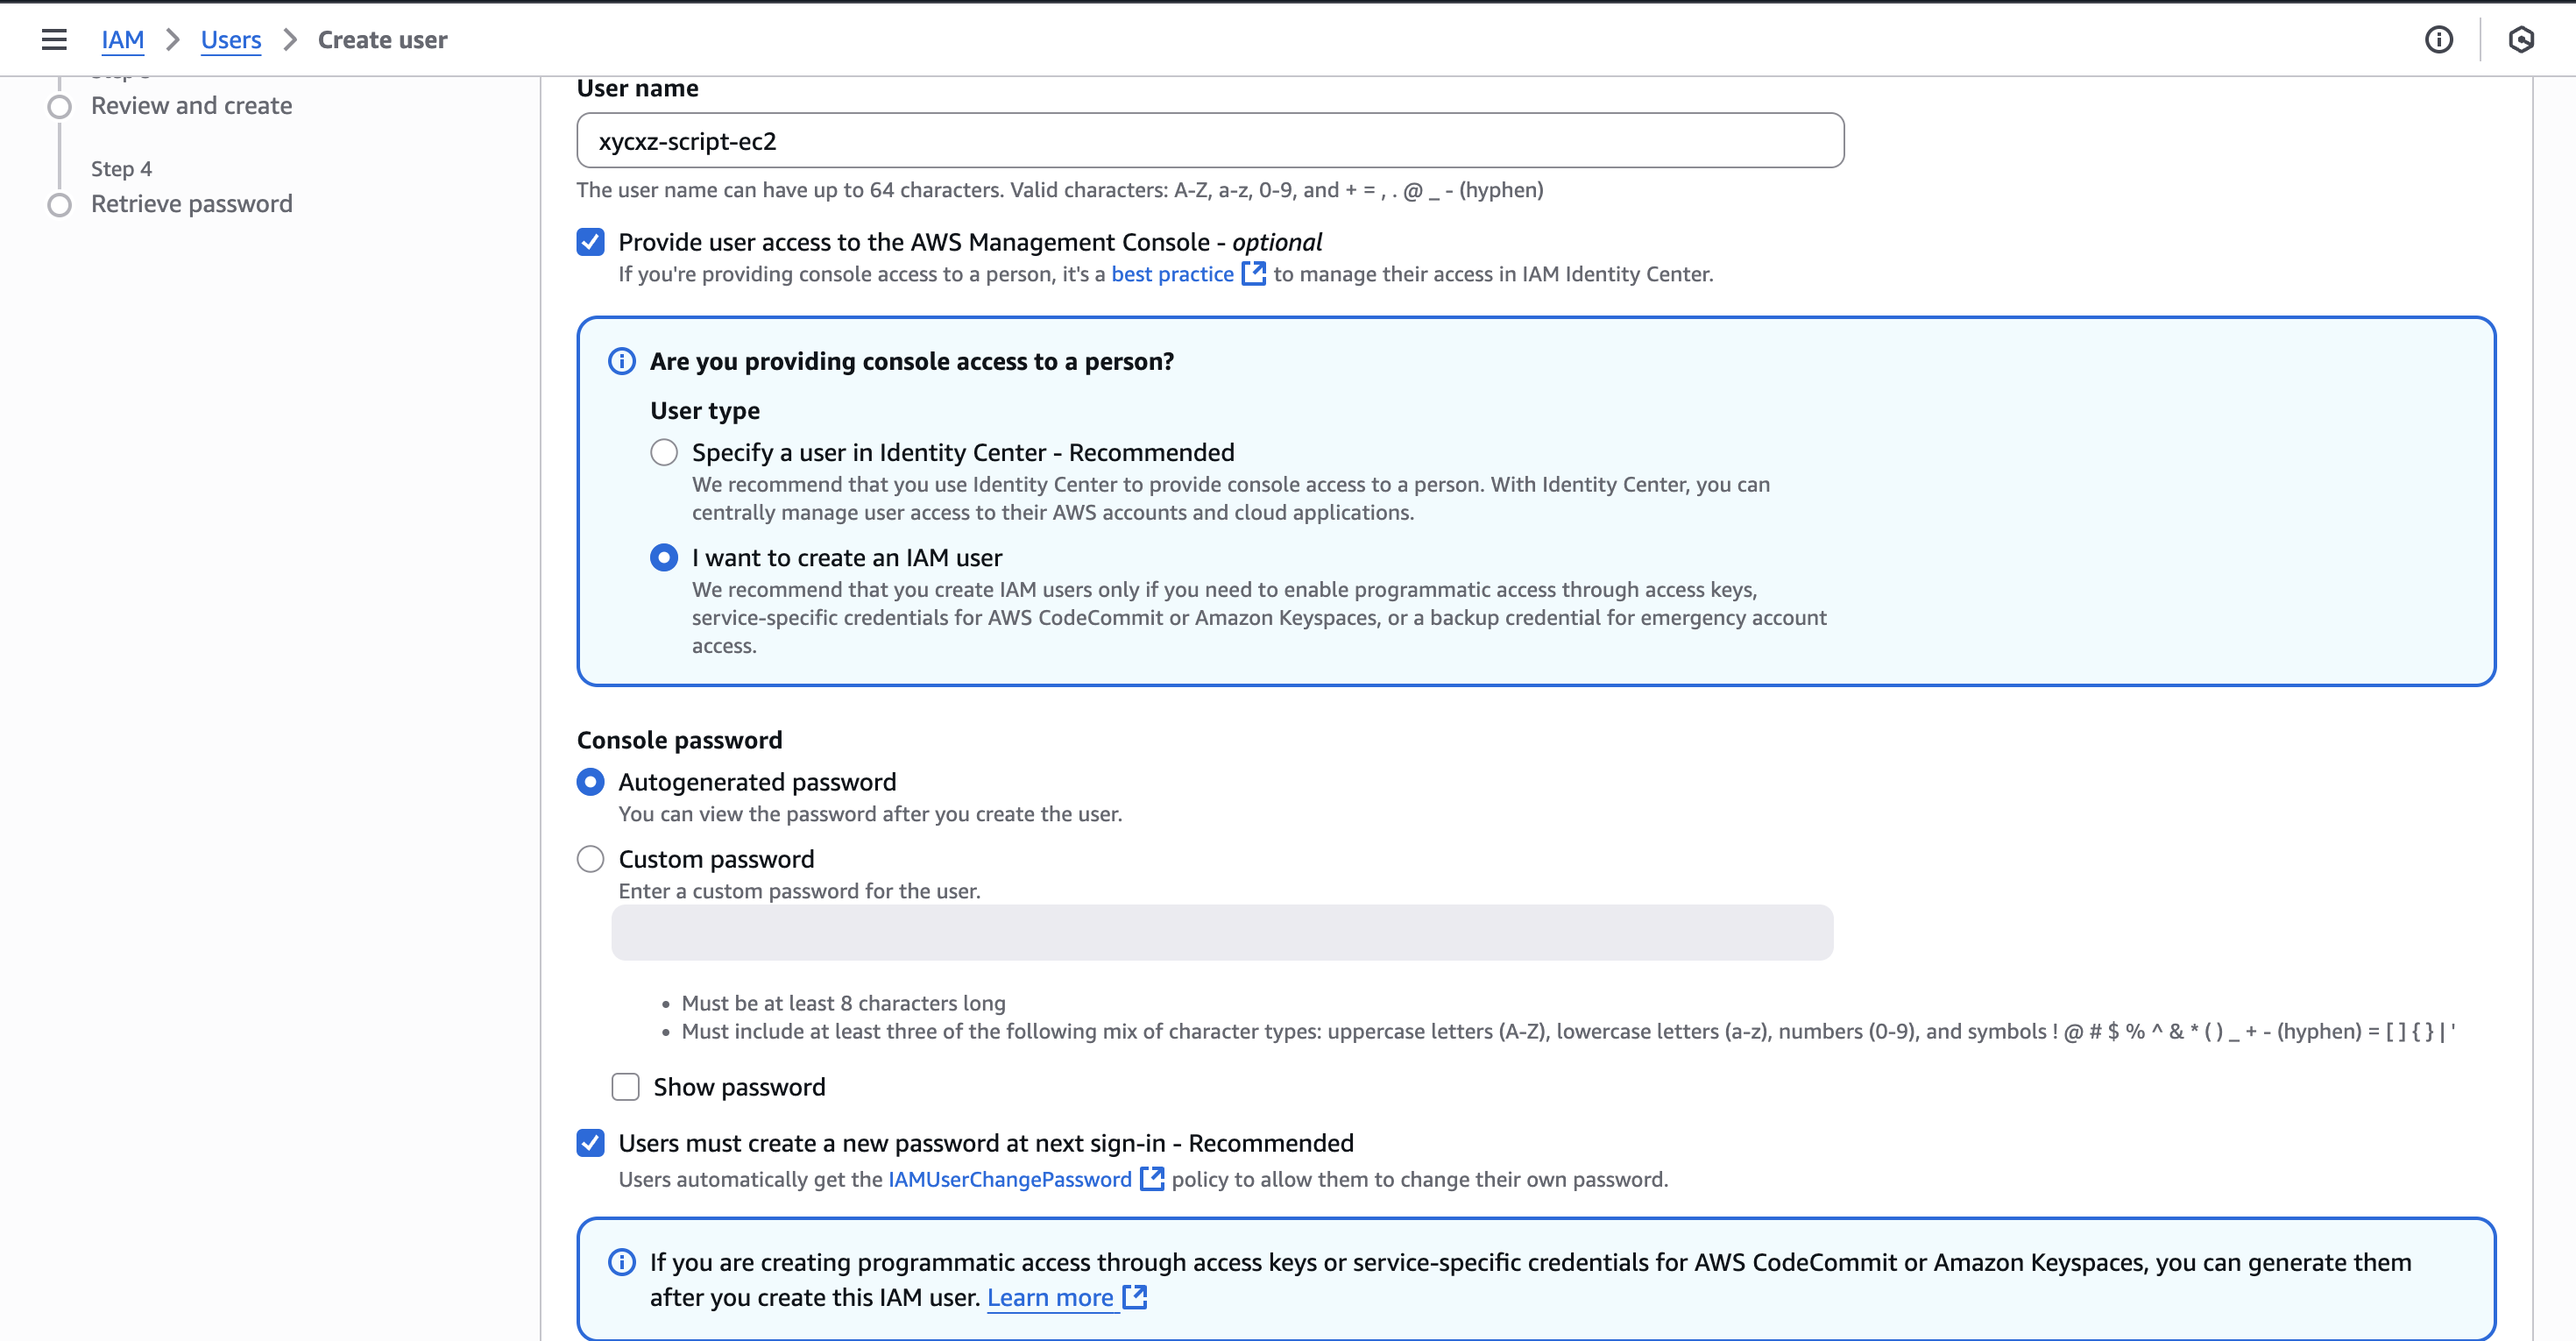
Note: We should not give access to a script account to the management console because it is not necessary (principle of least privilege). However, I do this (again) for demonstration purposes!
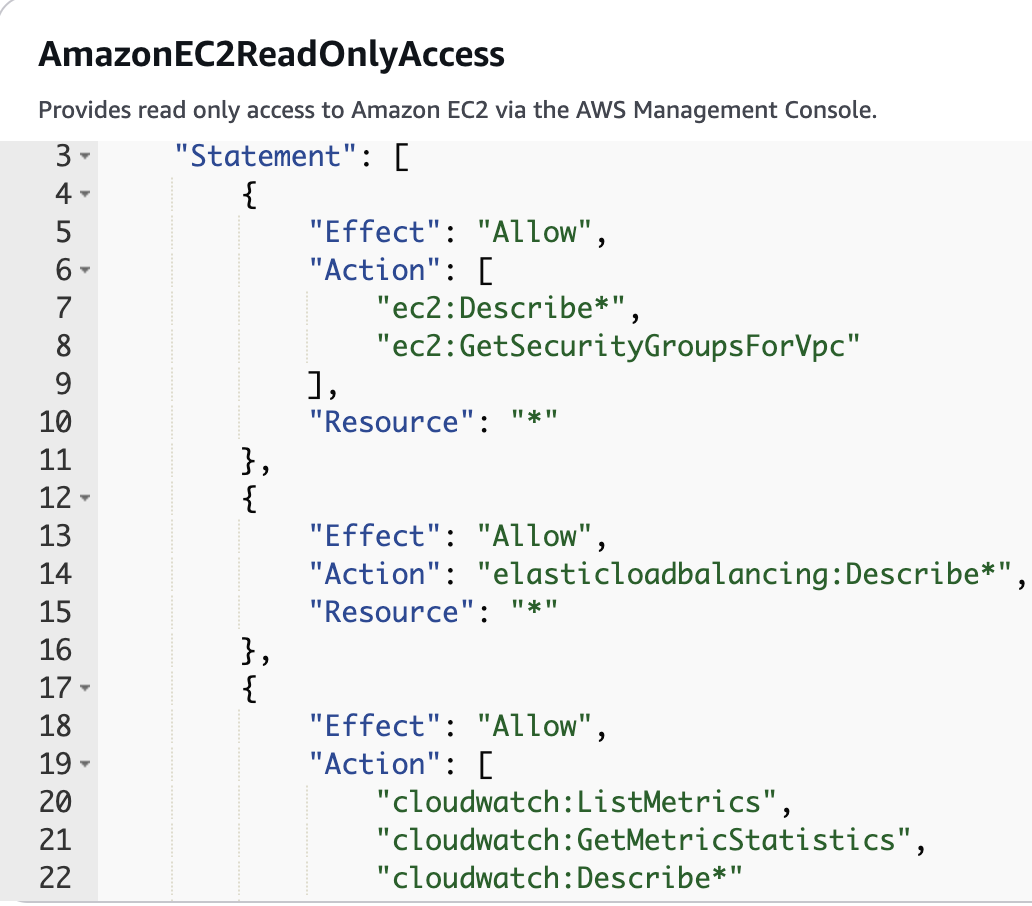
We will attach to this user a built-in AWS policy called AmazonEC2ReadOnlyAccess because it would be enough for what we want to do. Once we are finished with that, we will see the following:
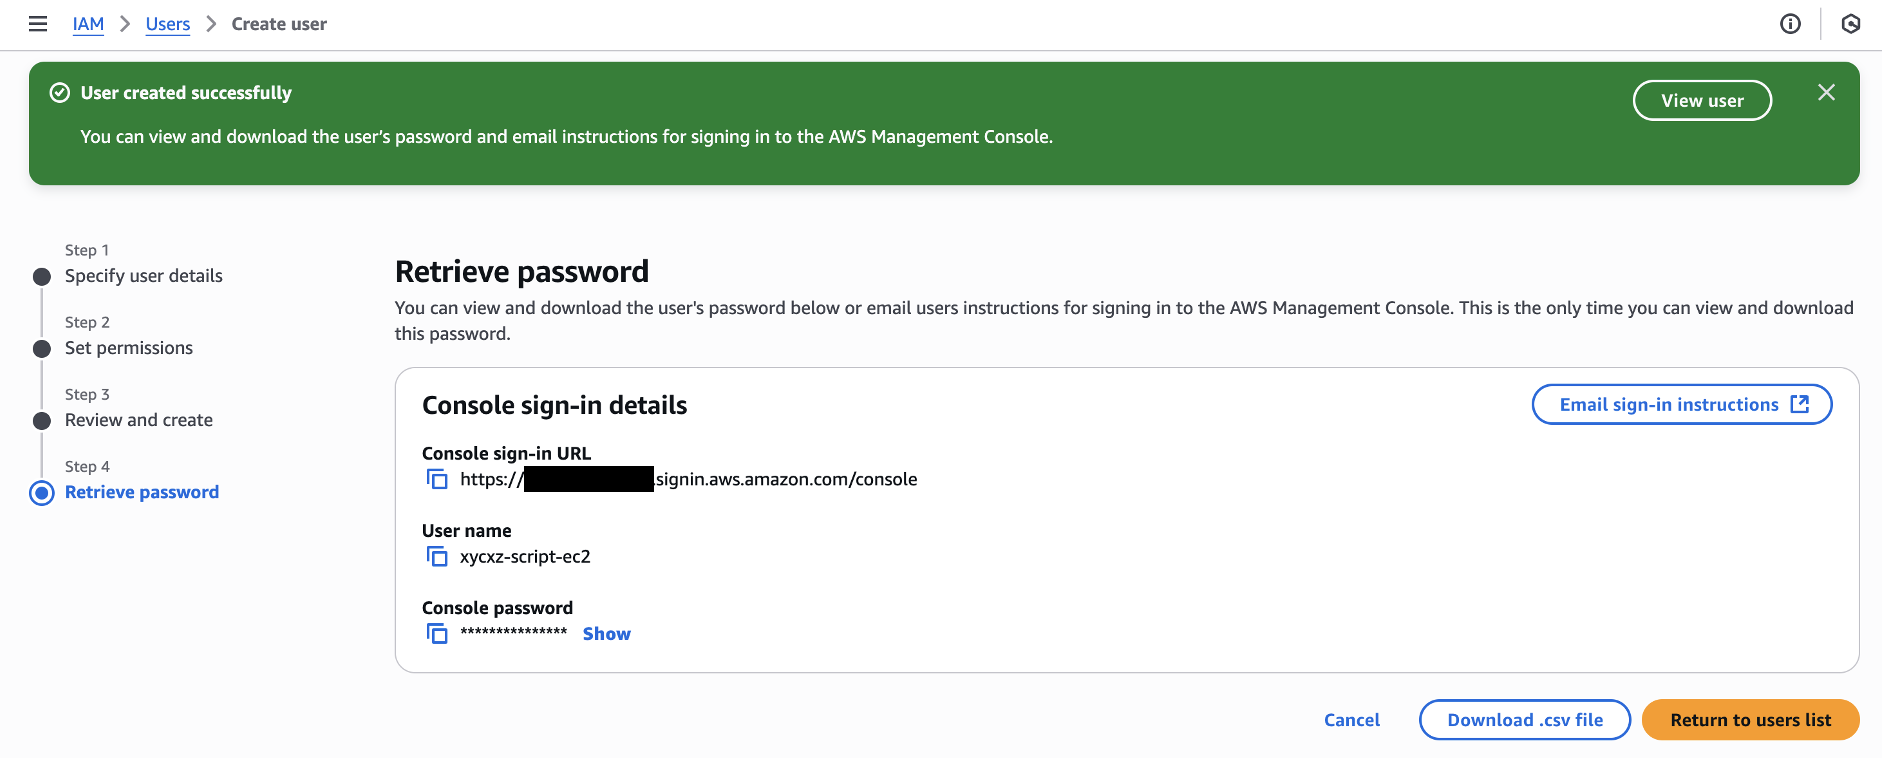
Let’s try signing in to this console and navigate to the EC2 dashboard (make sure you are in the right region). Then, we can see if we are able to start our instance:
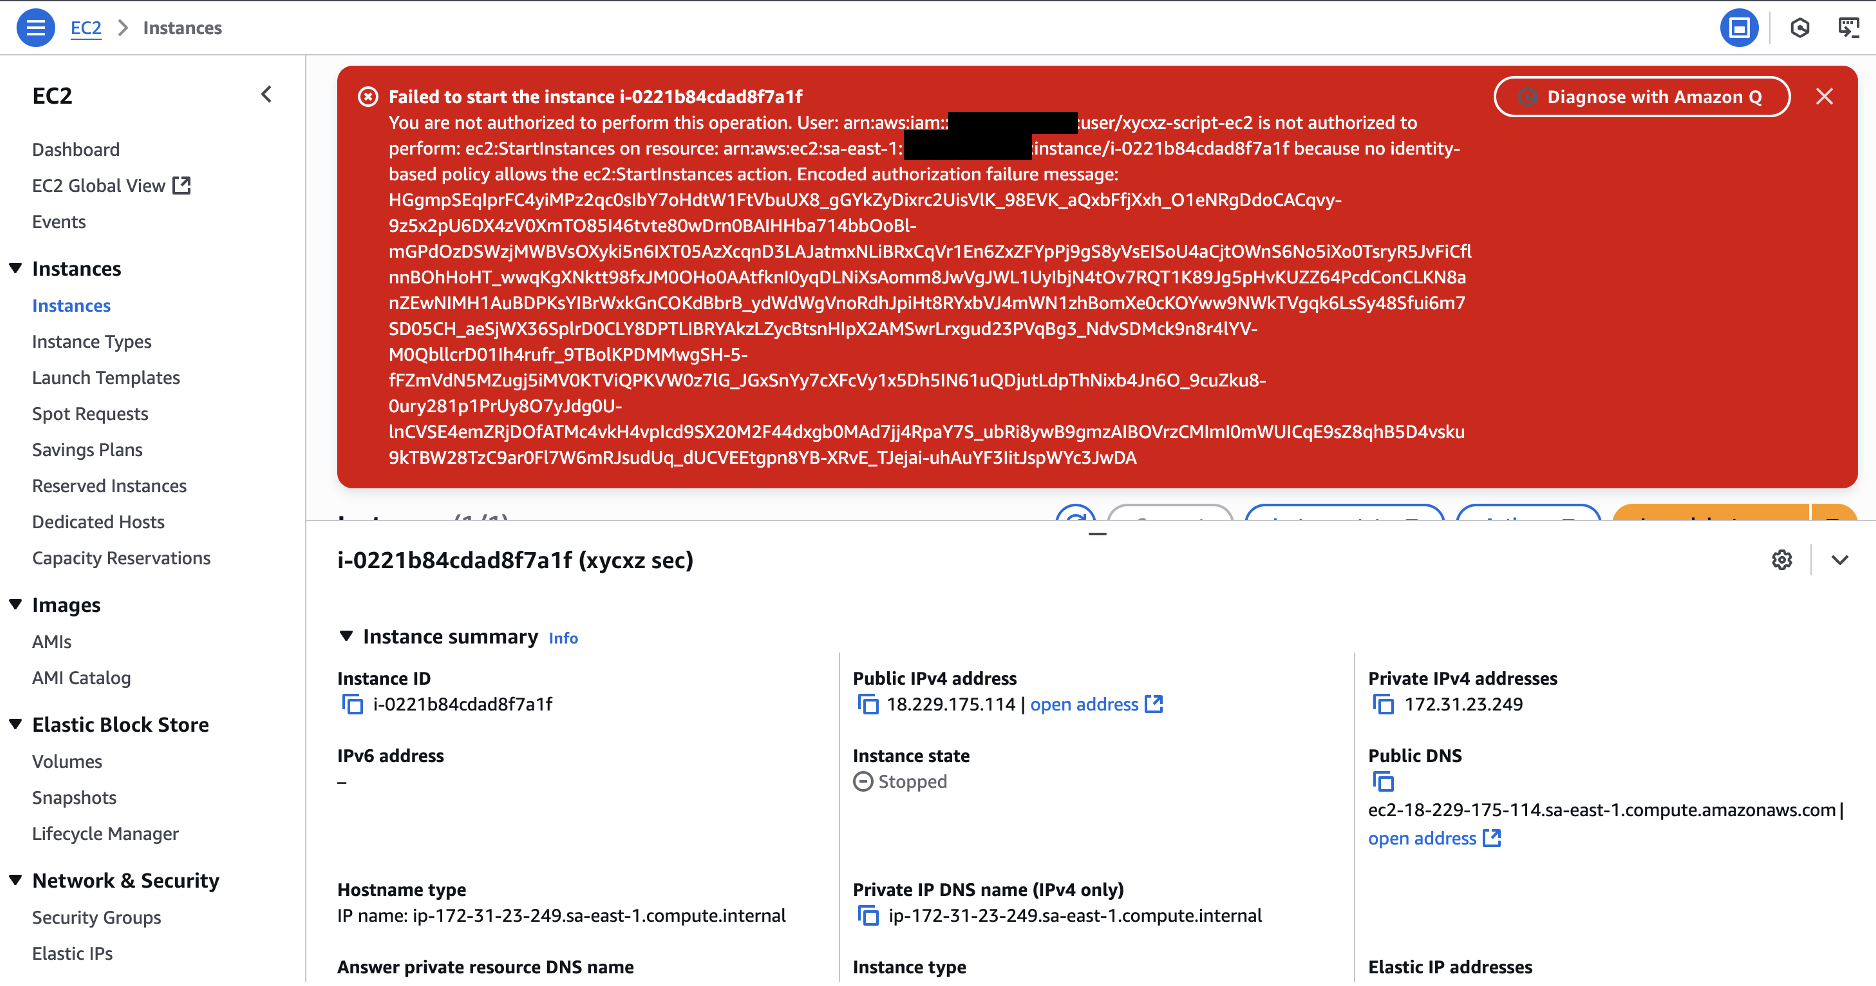
As we can see, the policy applied to the user works perfectly because it prevent us from performing any kind of functionality to the instance. Even if we try to connect through the console we will get access denied:
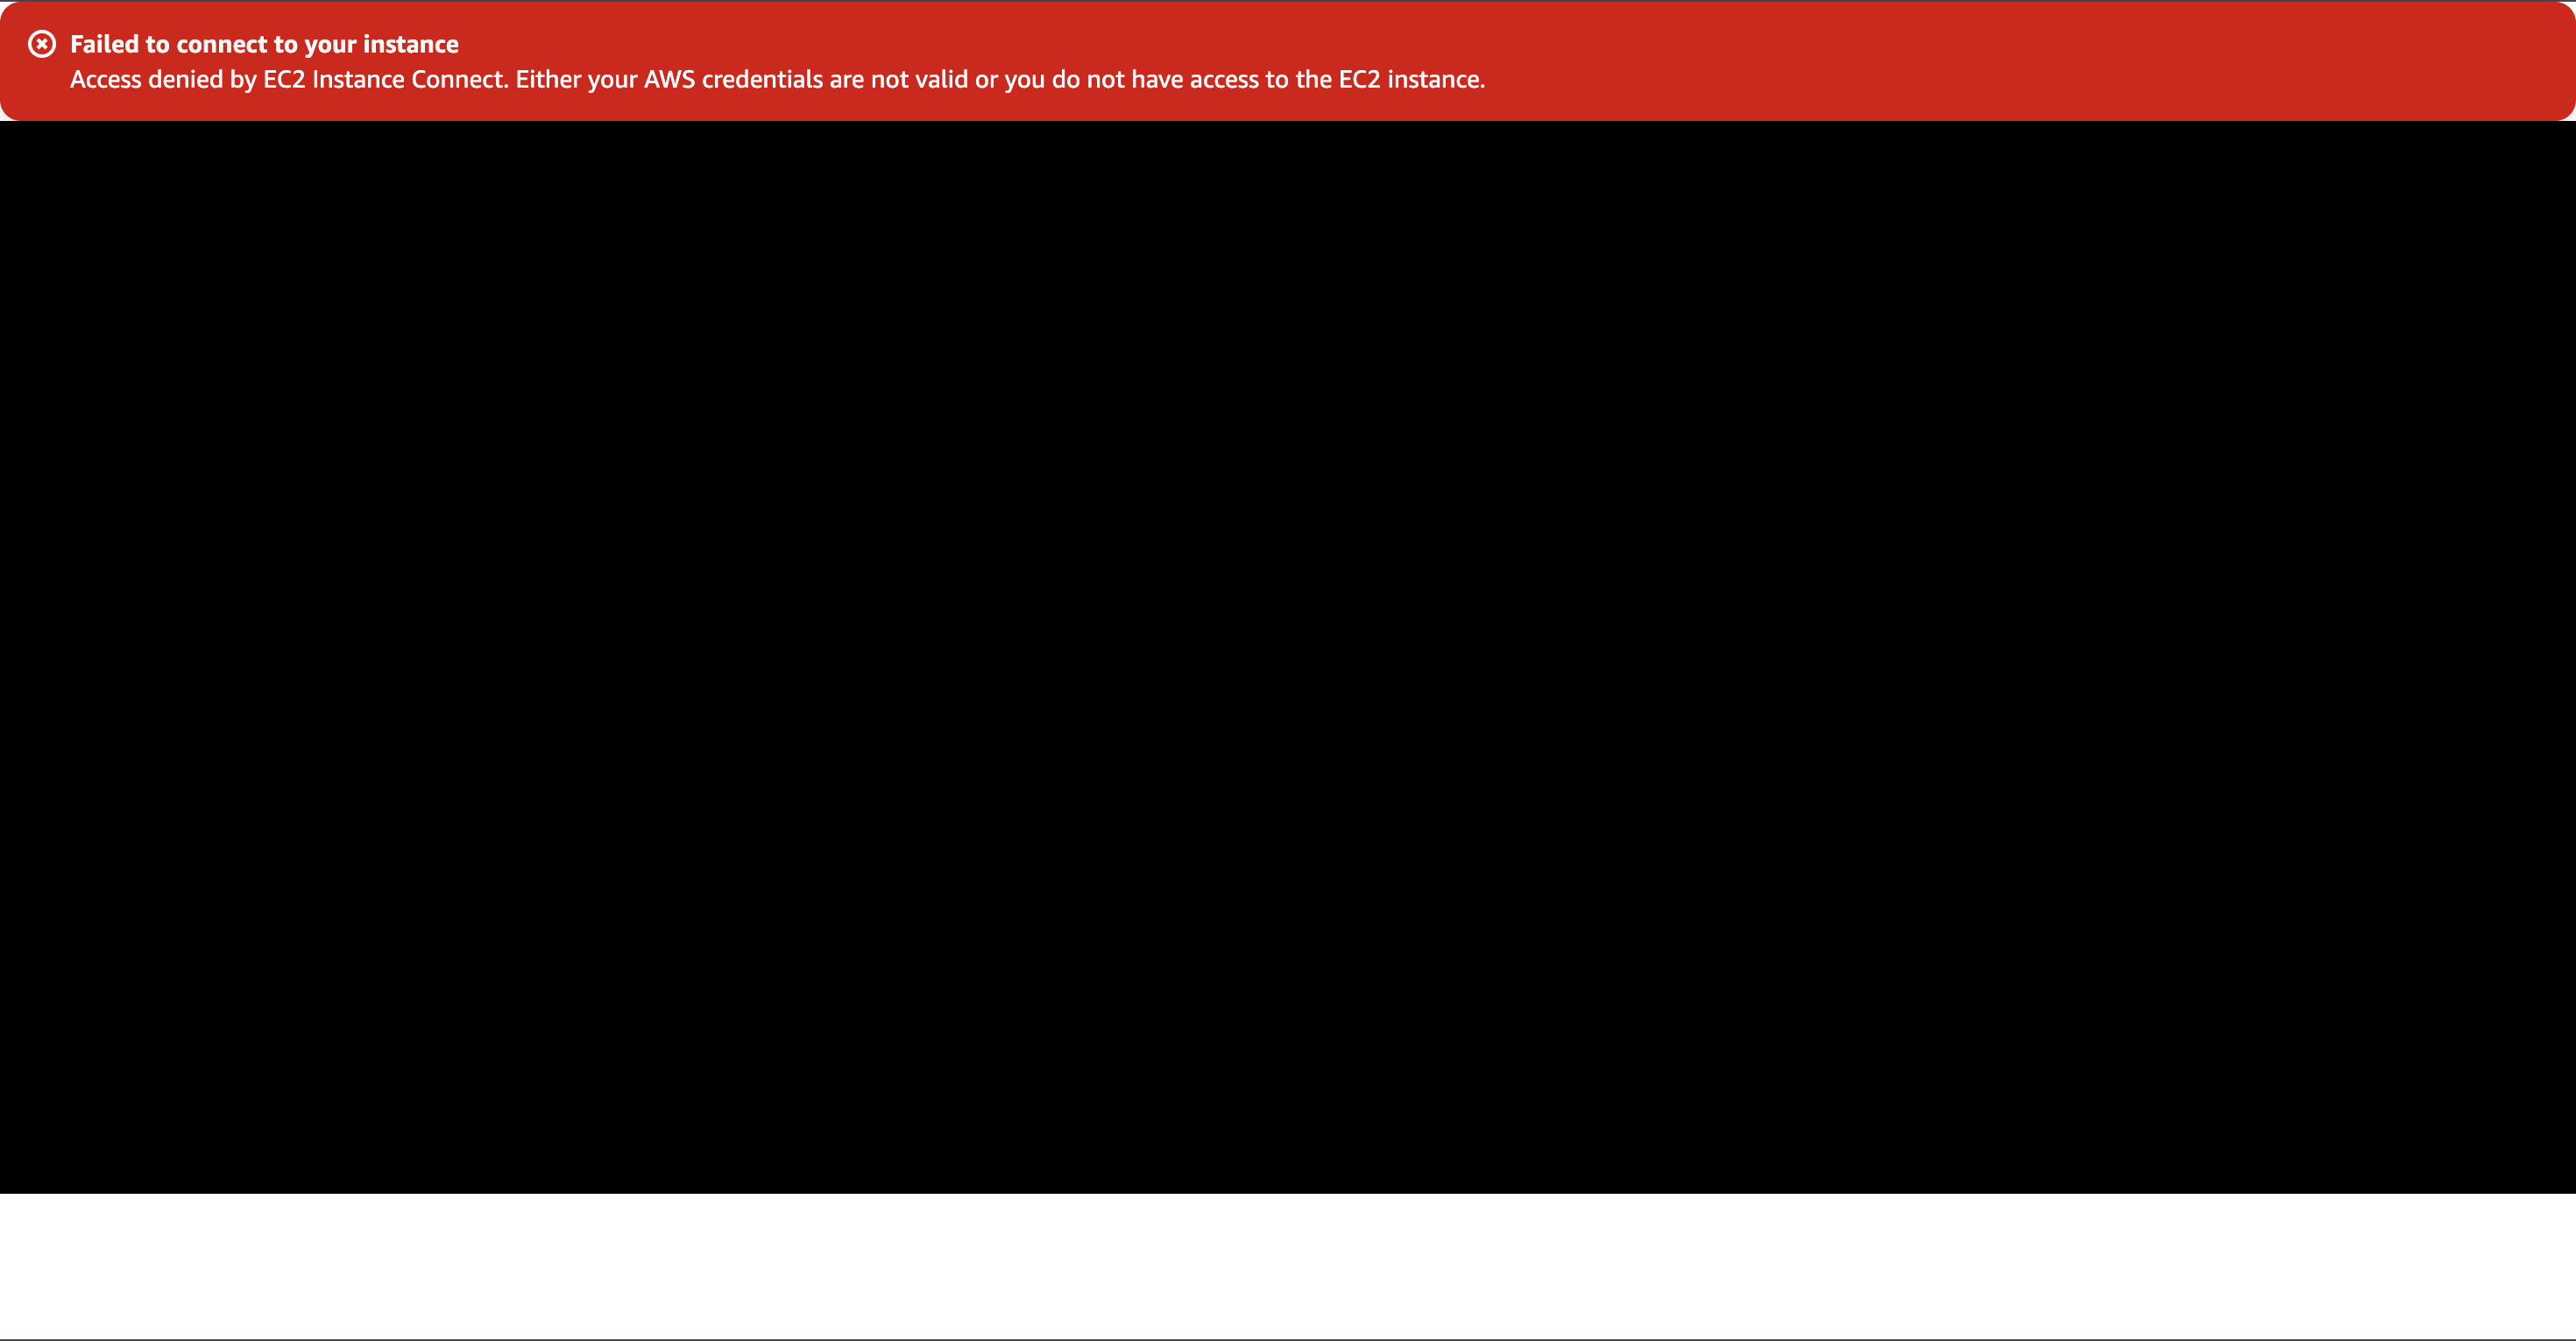
To use the AWS CLI, we need an access key pair. Since the user we just created only has a password for console access, it cannot use the CLI yet. However, we can create this key pair like we did with our user before.
Before getting into that, let’s explore the AWS CLI a bit and see what can we do with it. I will also do a quick mention about ARNs.
Using the AWS CLI
Personally, I found the documentation to be well structured on this point. There is a command reference guide that we could use for every service we want inside AWS, although I will use commands mainly for the created EC2 instance.
aws, like most commands, has a help menu in case we want a quick access or check the available commands. This can also help us see what are the available services, for example:
1
2
3
4
5
6
7
8
9
10
11
12
13
14
15
16
17
18
19
20
21
22
23
24
25
26
27
28
29
30
31
32
33
34
35
36
37
38
39
40
41
42
xycxz@github:~$ aws help

<SNIP>

AVAILABLE SERVICES
       o accessanalyzer

       o account

       o acm

       o acm-pca

       o aiops

       o amp

       o amplify

       o amplifybackend

       o amplifyuibuilder

       o apigateway

       o apigatewaymanagementapi

       o apigatewayv2

       o appconfig

       o appconfigdata

       o appfabric

       o appflow

       o appintegrations

       o application-autoscaling

<SNIP>
Once we found the service we wanted, we can run the following command in order to get a list of available commands of that specific service:
1
2
3
4
5
6
7
8
9
10
11
12
13
14
15
16
17
18
19
20
21
22
23
24
25
26
27
28
29
30
31
32
33
34
35
36
37
38
xycxz@github:~$ aws <service> help

EC2()                                                                    EC2()

NAME
       ec2 -

DESCRIPTION
       You  can  access  the  features of Amazon Elastic Compute Cloud (Amazon
       EC2) programmatically. For more information, see the Amazon EC2  Devel-
       oper Guide .

AVAILABLE COMMANDS
       o accept-address-transfer

       o accept-capacity-reservation-billing-ownership

       o accept-reserved-instances-exchange-quote

       o accept-transit-gateway-multicast-domain-associations

       o accept-transit-gateway-peering-attachment

       o accept-transit-gateway-vpc-attachment

       o accept-vpc-endpoint-connections

       o accept-vpc-peering-connection

       o advertise-byoip-cidr

       o allocate-address

       o allocate-hosts

       o allocate-ipam-pool-cidr

<SNIP>
We can still do the same one more time to see what flags are available for the specific command. The good thing is that we also get a detailed description every time we do this:
1
aws <service> <command> help
Now, let’s say we wanted to list App Runner services and see if there are any running or not. We can follow the workflow I presented to discover the exact command we need for this purpose:
1
aws apprunner list-services
Note: In my case I was not able to connect because the service is not available in South America, where my EC2 instance is actually hosted. However, in your case, results might be different.
The last example I want to show is how to turn on our EC2 instance from the CLI. Let’s take a look at the help menu and see what is the command needed for this:
1
2
3
4
5
6
7
8
9
10
11
12
13
14
15
16
17
18
19
20
21
22
23
xycxz@github:~$ aws ec2 help

<SNIP>

       o search-transit-gateway-multicast-groups

       o search-transit-gateway-routes

       o send-diagnostic-interrupt

       o start-declarative-policies-report

       o start-instances # <----- Here!

       o start-network-insights-access-scope-analysis

       o start-network-insights-analysis

       o start-vpc-endpoint-service-private-dns-verification

       o stop-instances

<SNIP>
I will take a guess and suppose start-instances is the correct option here. Let’s check the help menu of this and see the options available:
1
2
3
4
5
6
7
8
9
10
11
12
13
14
15
16
17
18
19
20
21
22
23
24
xycxz@github:~$ aws ec2 start-instances help

<SNIP>

OPTIONS
       --instance-ids (list) # <---- Here!
          The IDs of the instances.

          (string)

       Syntax:

          "string" "string" ...

       --additional-info (string)
          Reserved.

       --dry-run | --no-dry-run (boolean)
          Checks whether you have the required permissions for the  operation,
          without actually making the request, and provides an error response.
          If  you have the required permissions, the error response is DryRun-
          Operation . Otherwise, it is UnauthorizedOperation .

<SNIP>
The --instance-ids flag seems the correct one to me. I will look for my instance ID and then pass the flag to the command to see what happens:
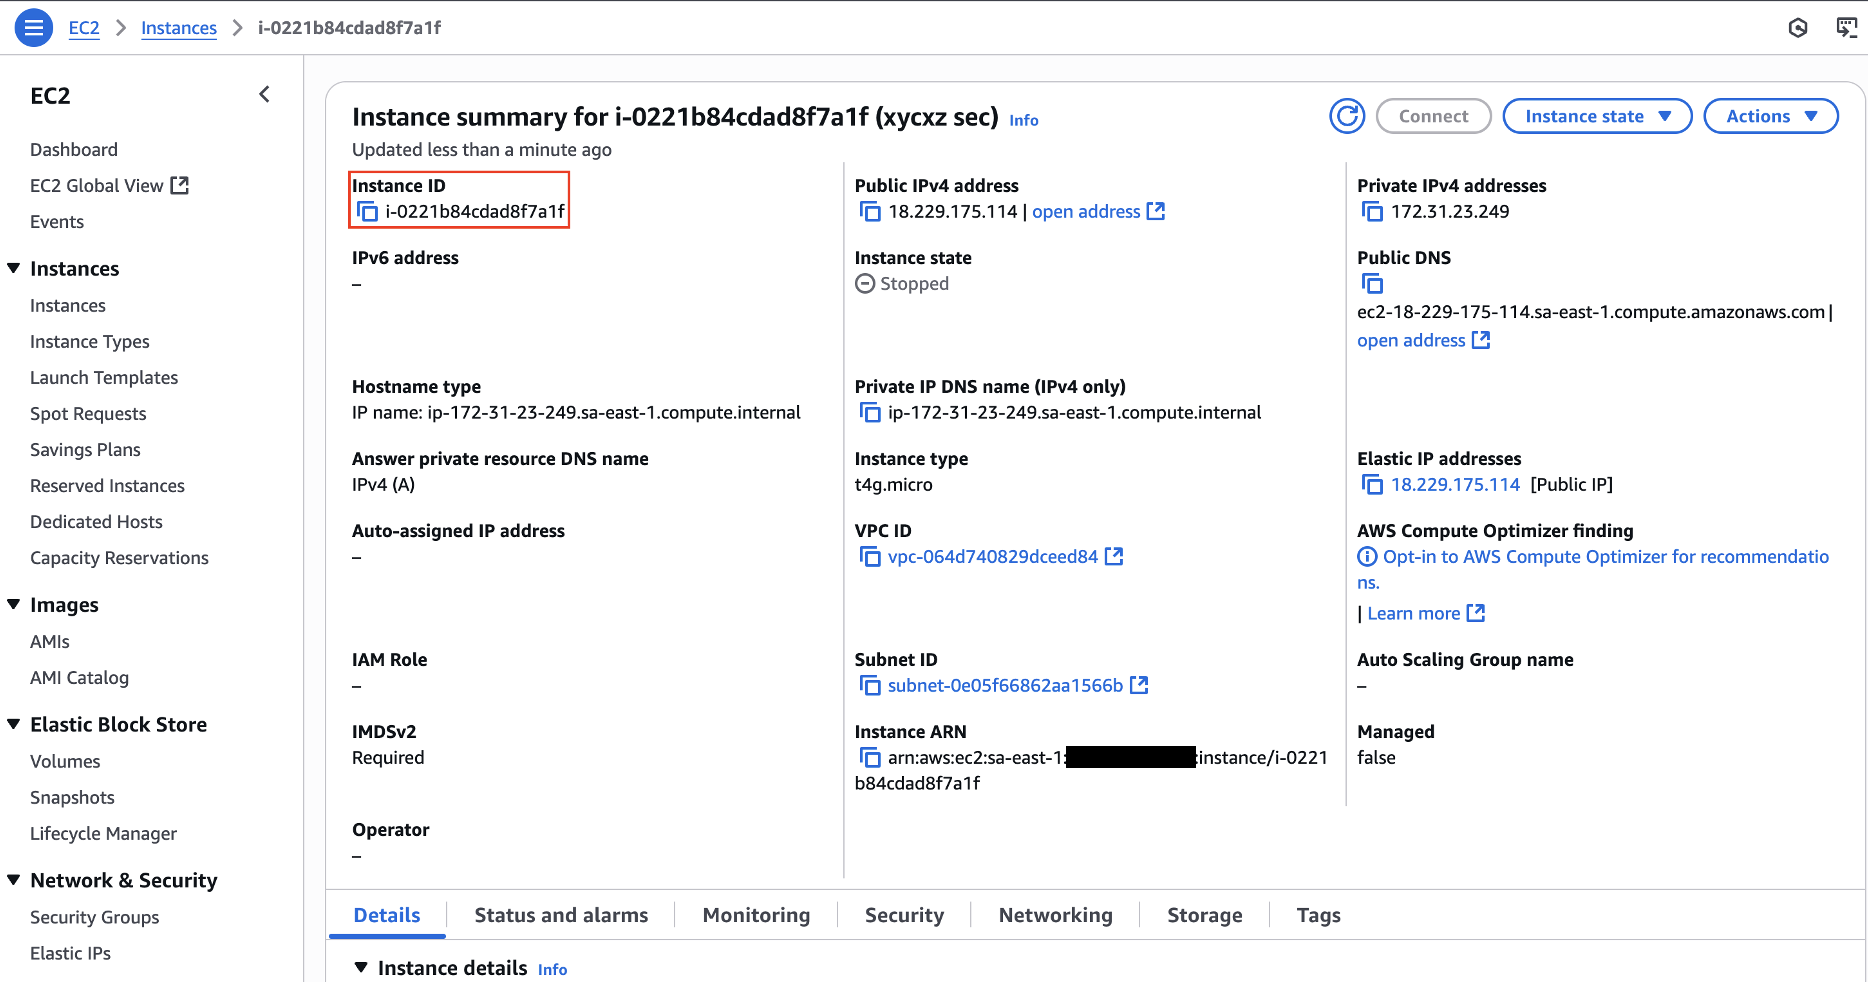
Note: It is important to check the details about the service we are using in the AWS cloud. Here we can find data needed to run the commands from the CLI!
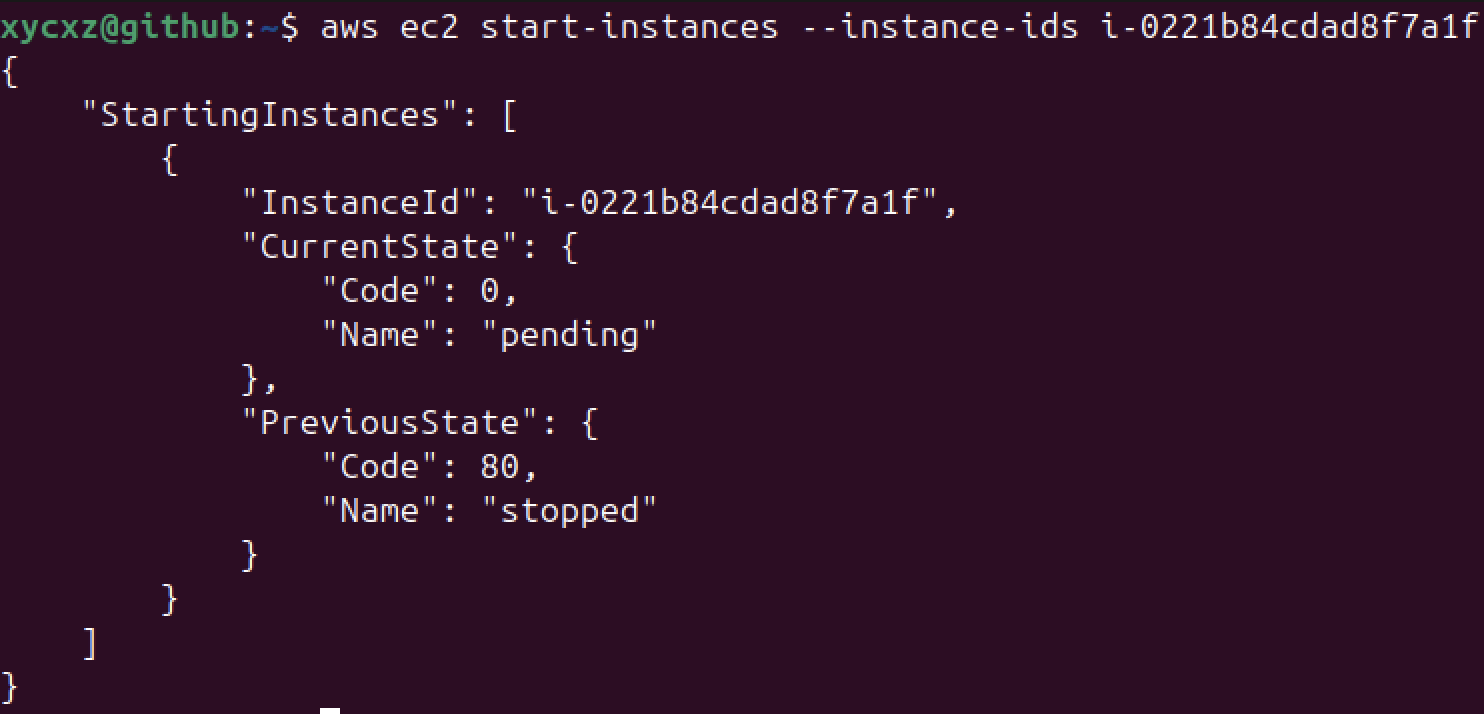
Let’s check if our instance is now active:
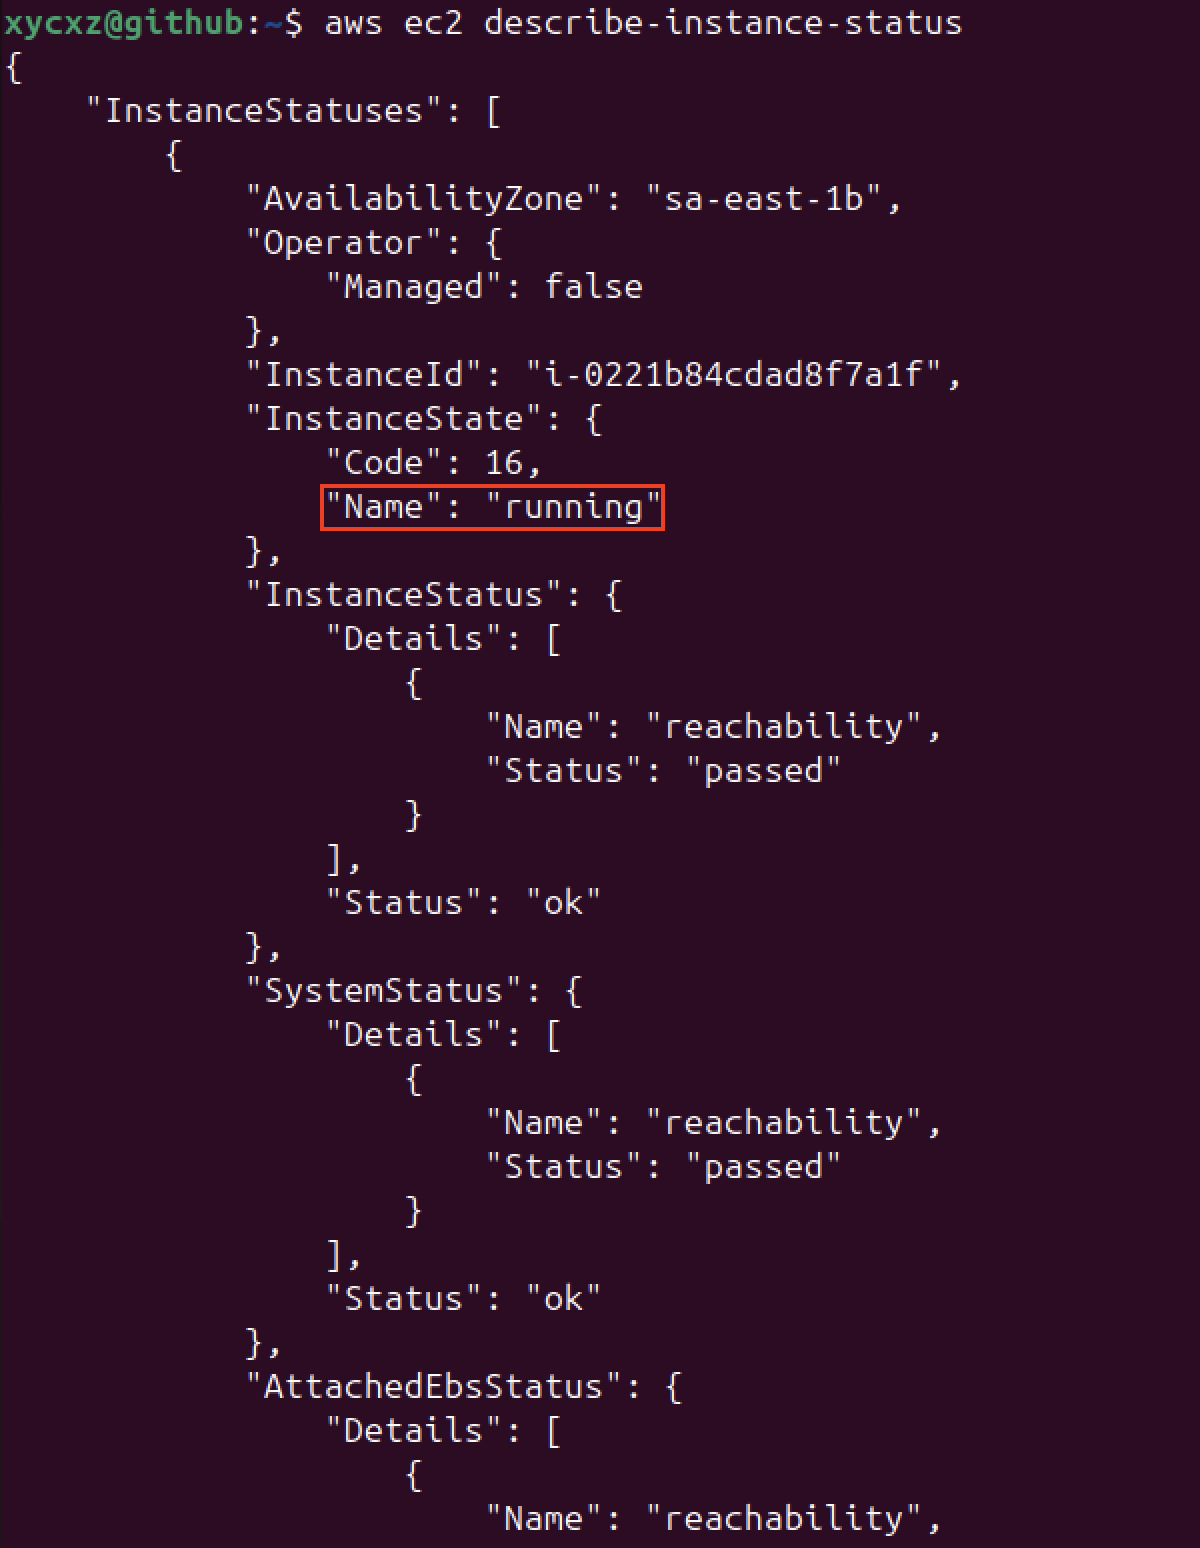
We could confirm that our instance is up and running! This is definitely a new and very powerful way to have control over our cloud services with AWS and, in my opinion, something we should really learn to use in order to become better at managing, configuring, and even testing the security of our projects.
Identifiers: ARN
In our example, we used the instance ID which functions as an identifier of our instance. However, there is another type of identifier that can be found in many services, such as S3 bucket, IAM users, or EC2 instances as well. This identifier is called Amazon Resource Name (ARN) and it can be used to reference a specific service/object within the AWS cloud.
There isn’t a specific format for every single ARN. Nonetheless, I will present one format that should represent a good blueprint for the variations that it can have since there could be elements in common:
1
2
3
4
5
6
7
8
9
10
11
12
13
arn:partition:service:region:account-id:resource-type:resource-id

# Partition: Where the service is located

# Service: Service that identifies the AWS product

# Region: The region in which the resource is running (optional)

# Account id: The account id of the AWS root user (always the same)

# Resource type: The type of resource (for example, instance, user...)

# Resource id: The resource identifier
Back to our User
Now that we have explored how the CLI works a bit, let’s get back to the user with restricted permissions (xycxz-script-ec2). After generating an access key pair, we can get temporary access to the AWS CLI by providing environmental variables (not recommended!), because we just want to execute a single command:
1
AWS_ACCESS_KEY_ID="..." AWS_SECRET_ACCESS_KEY="..." AWS_DEFAULT_REGION="..." aws ec2 describe-instances
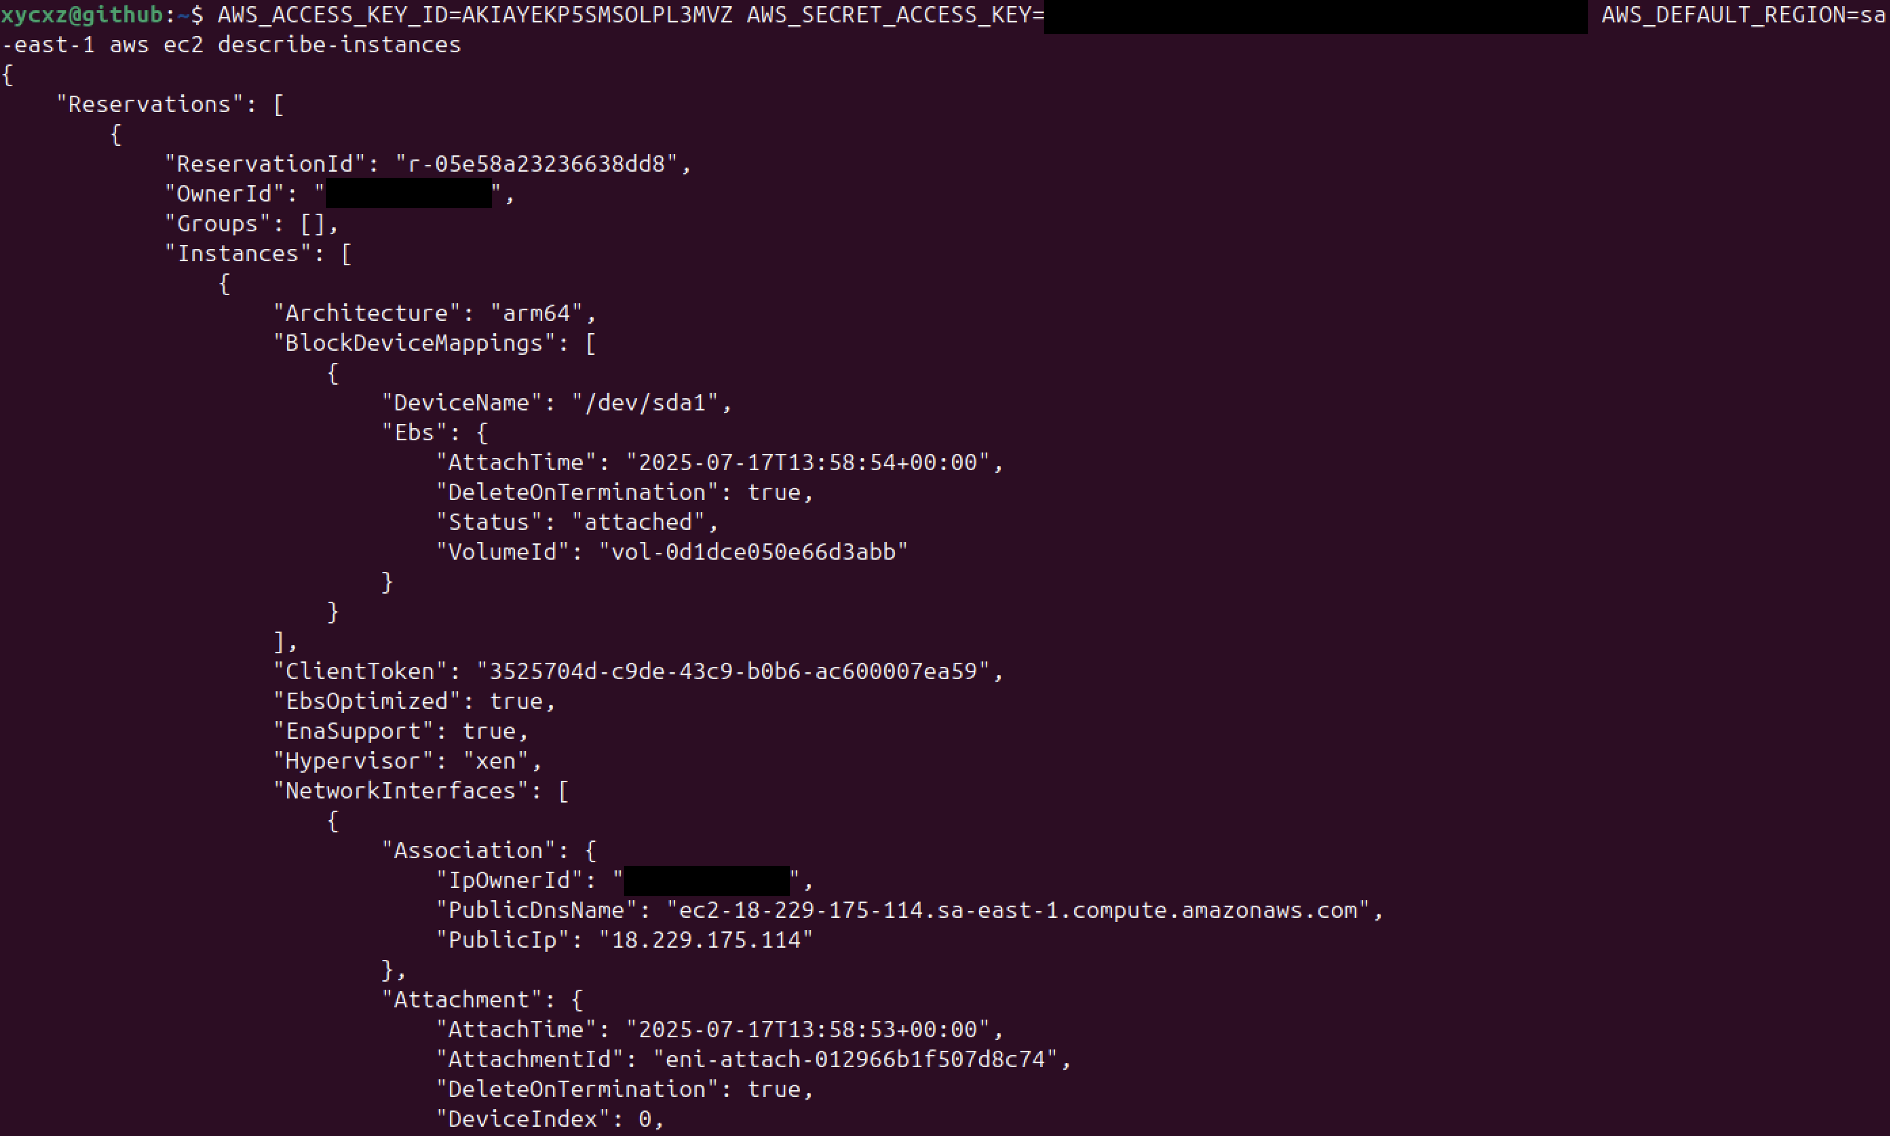

As we can see, we can just do what the policy allow us to perform with this user. However, there is some sensitive information we are still able to retrieve. We will see how to customise policies to restrict this even more.
Modifying Policies
Let’s go back to our user and explore the policy we attached to it in a more detailed way:
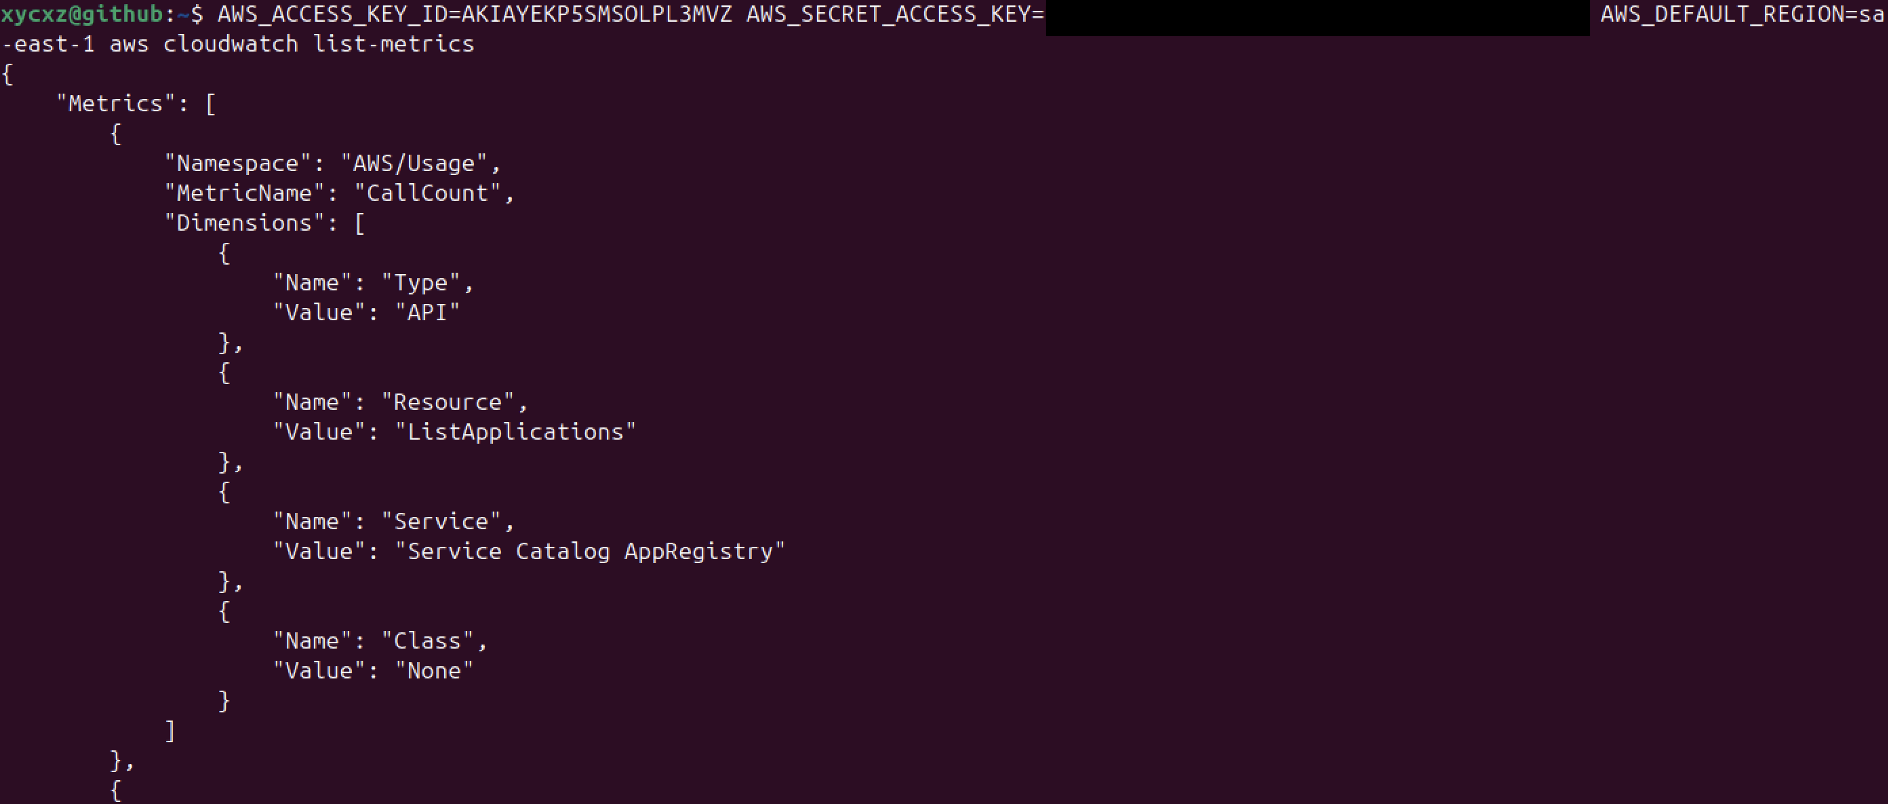
We see that for cloudwatch, for example, we are still able to perform some actions that are not really needed for this user:
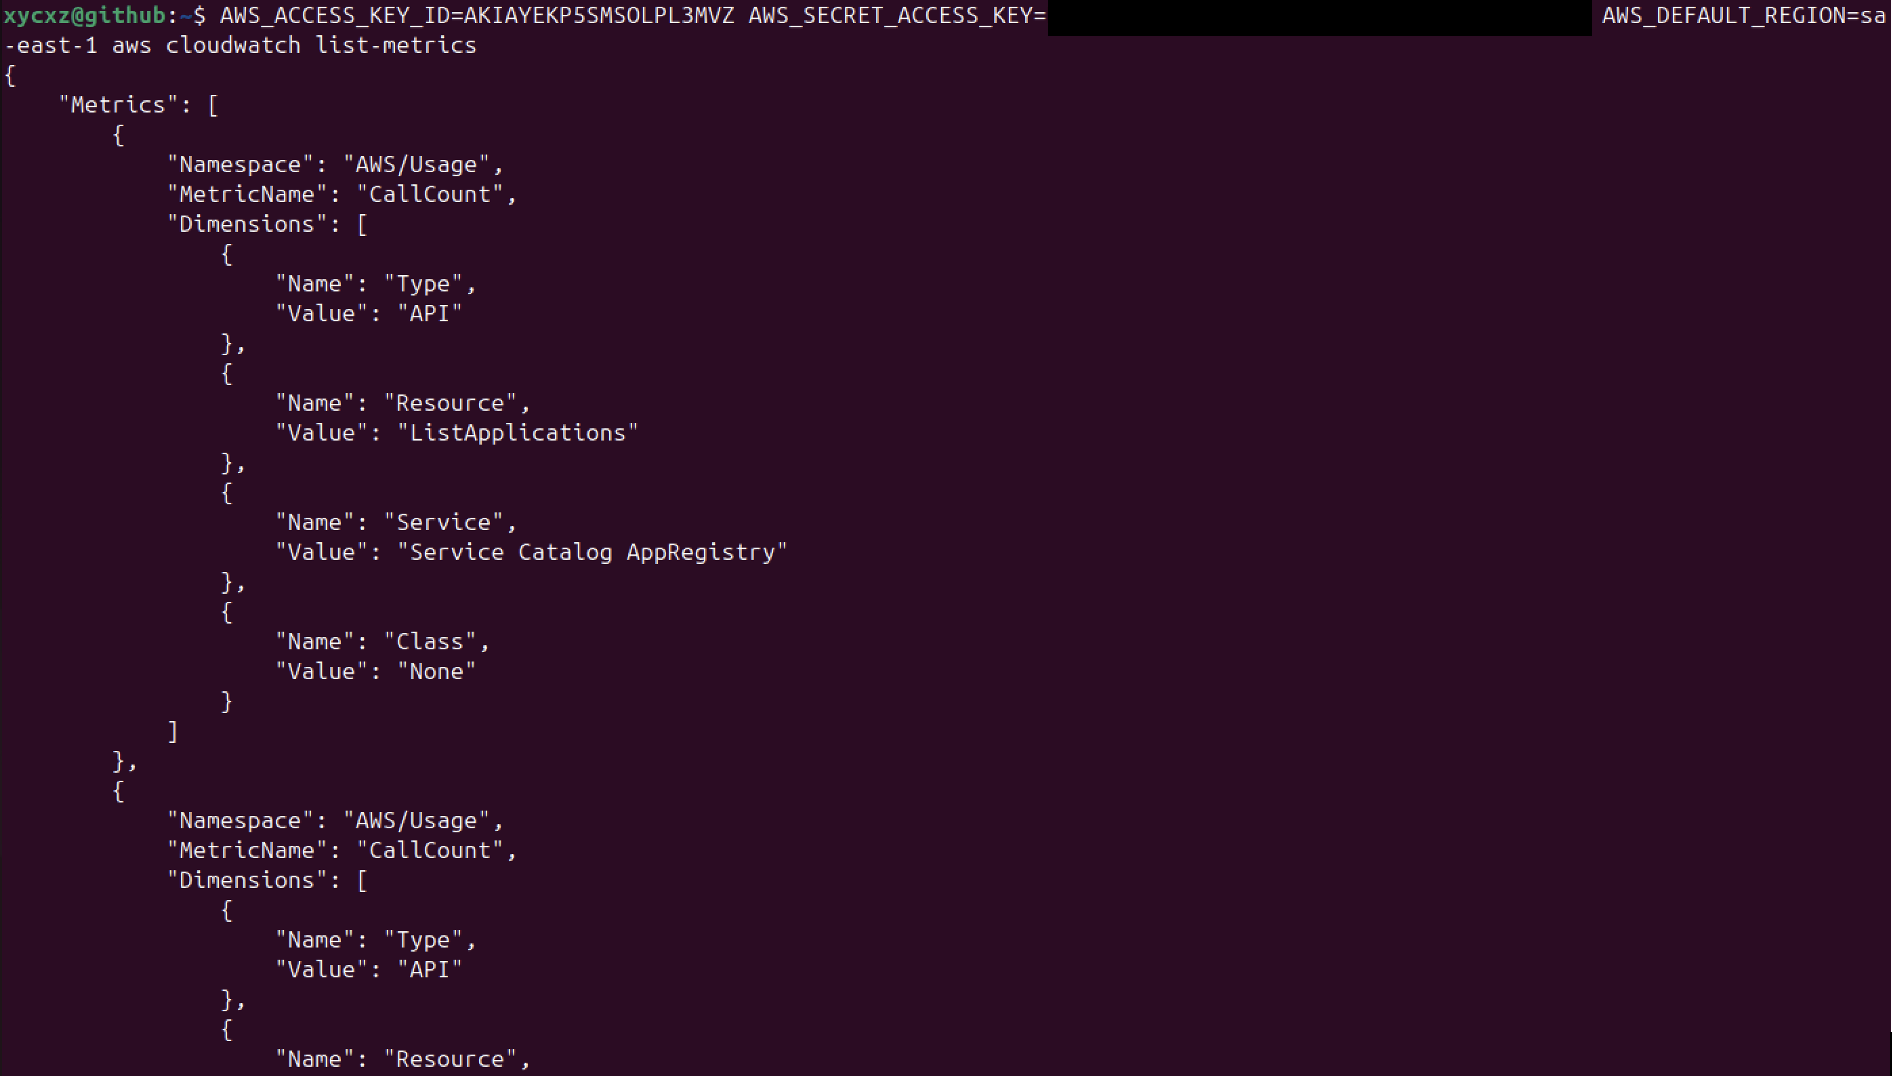
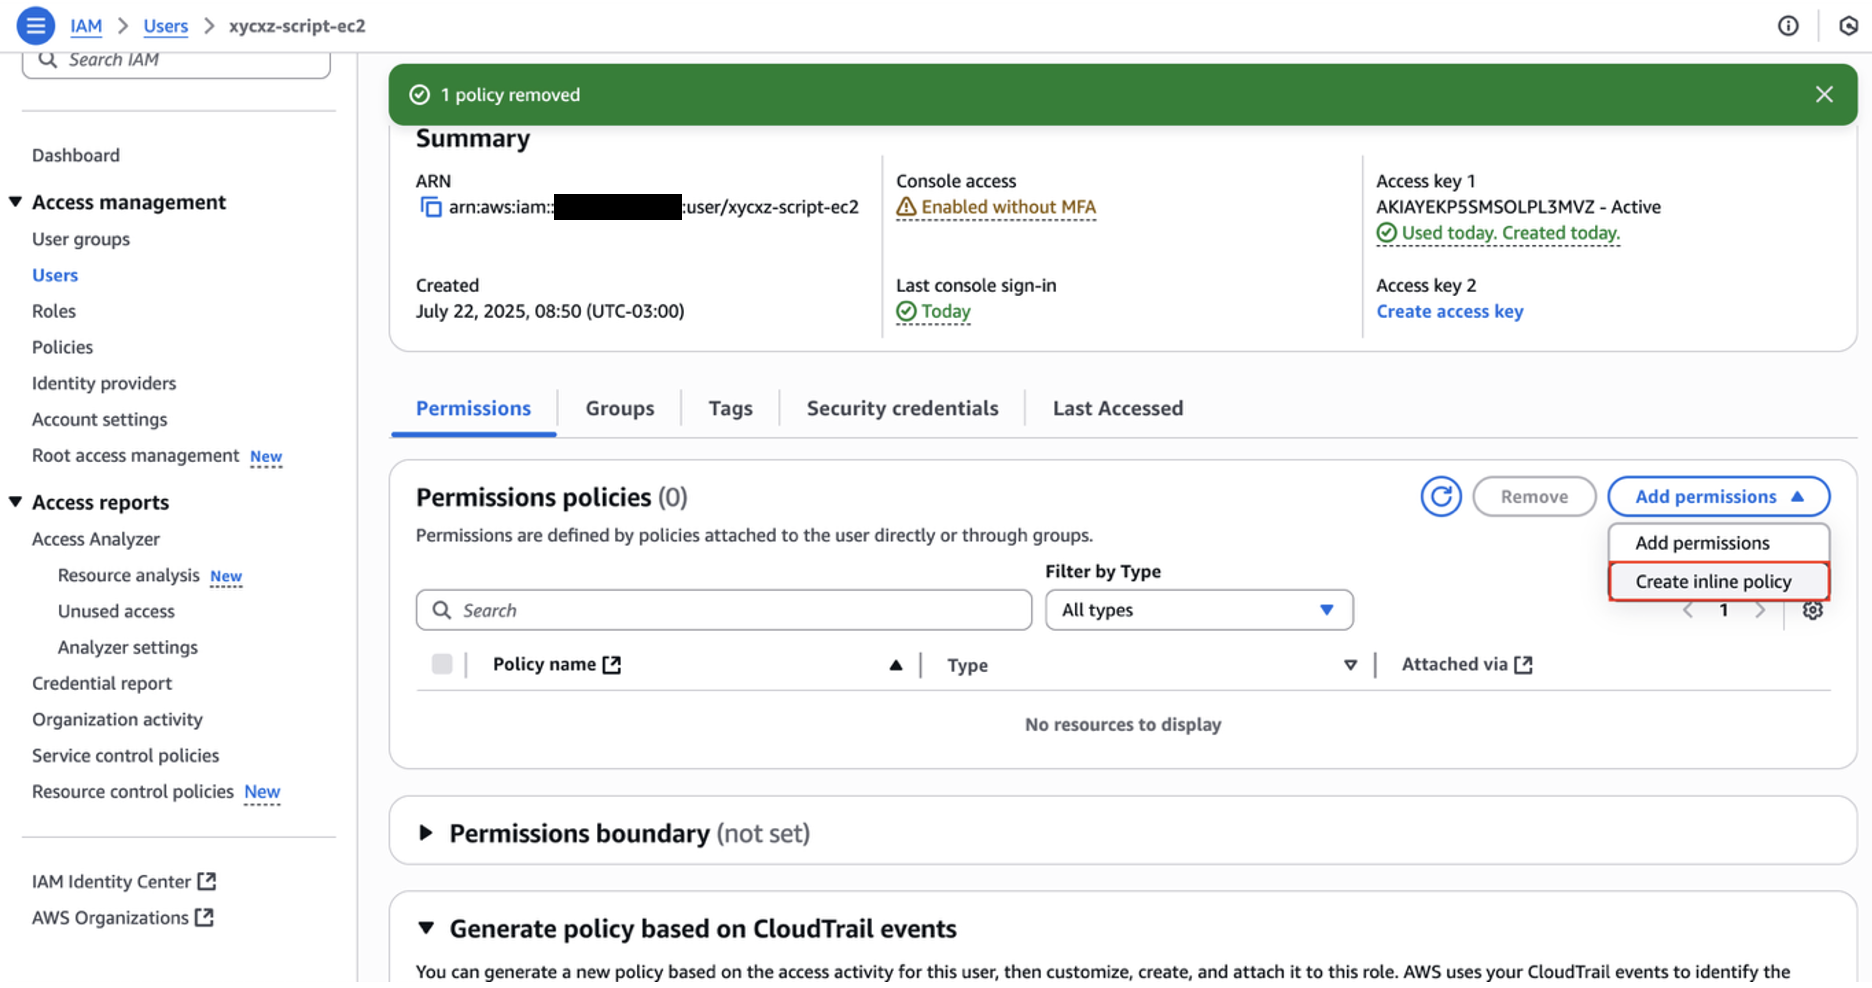
This is something that we may don’t want to happen. So, we would have to configure the policy we applied to the user to only describe the EC2 instance. For that, we can go to our user settings and remove the current policy. Afterwards, we can click on Create inline policy to create a custom policy:
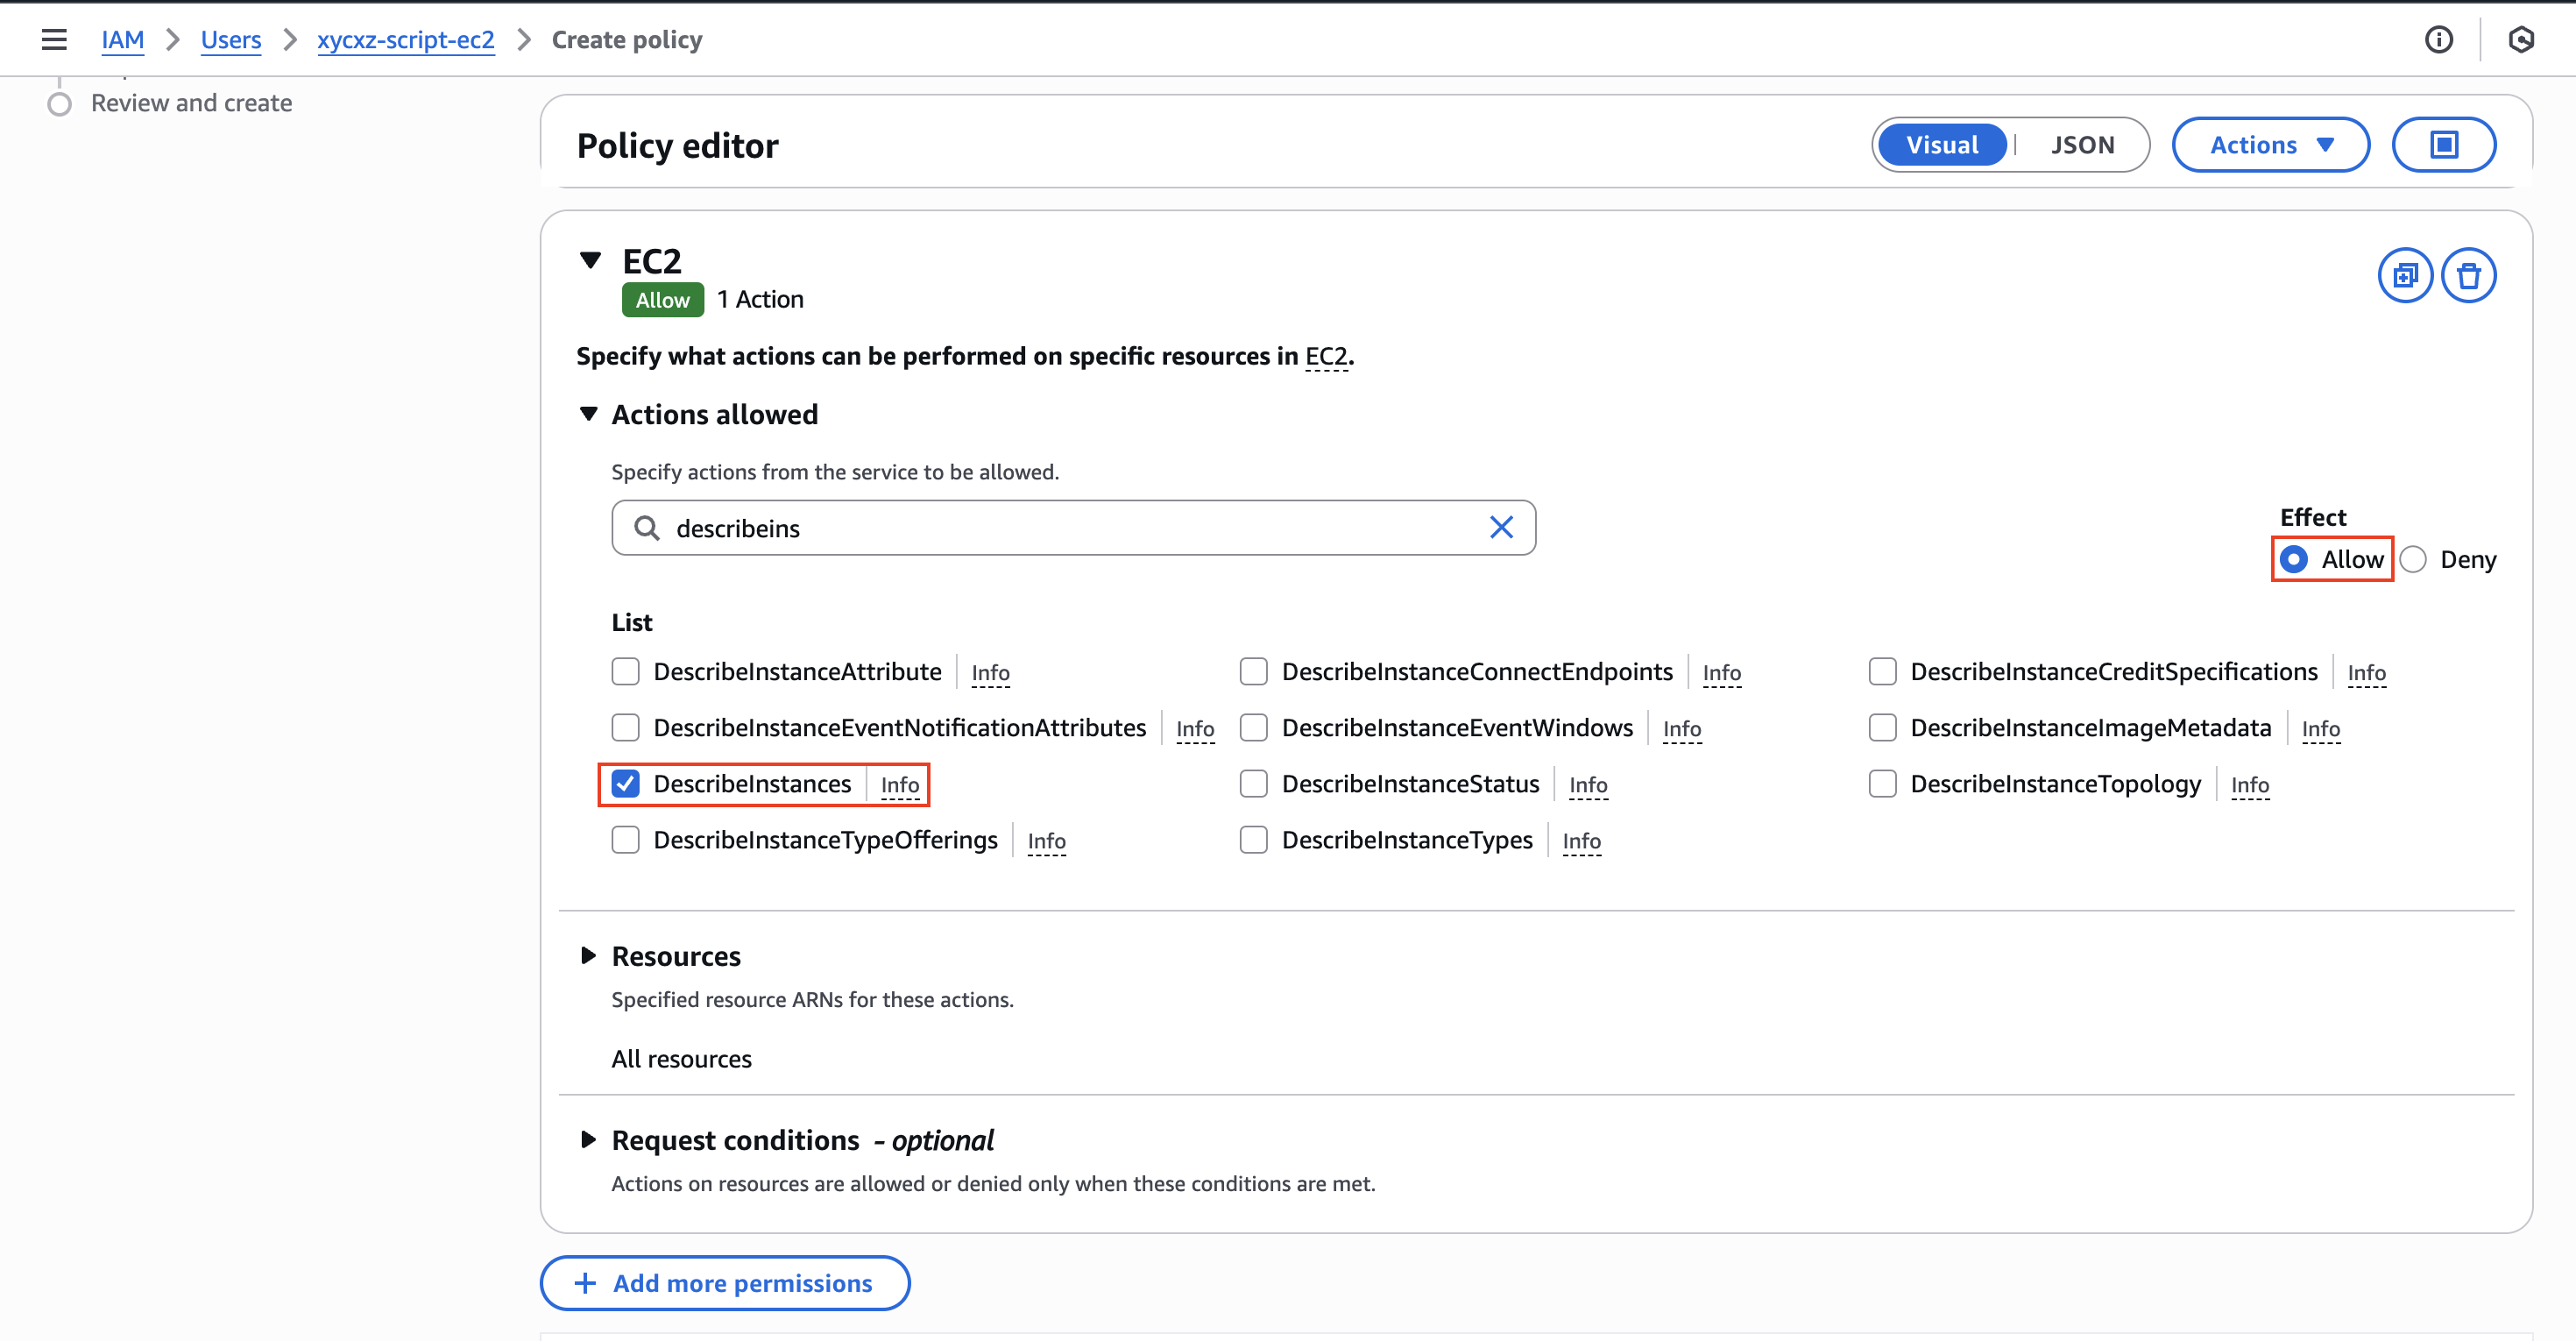
Once we click there, we can choose the EC2 service and look for DescribeInstances action. We will select that and click on Next and then Create policy:
If we check the policy, we will see the following:
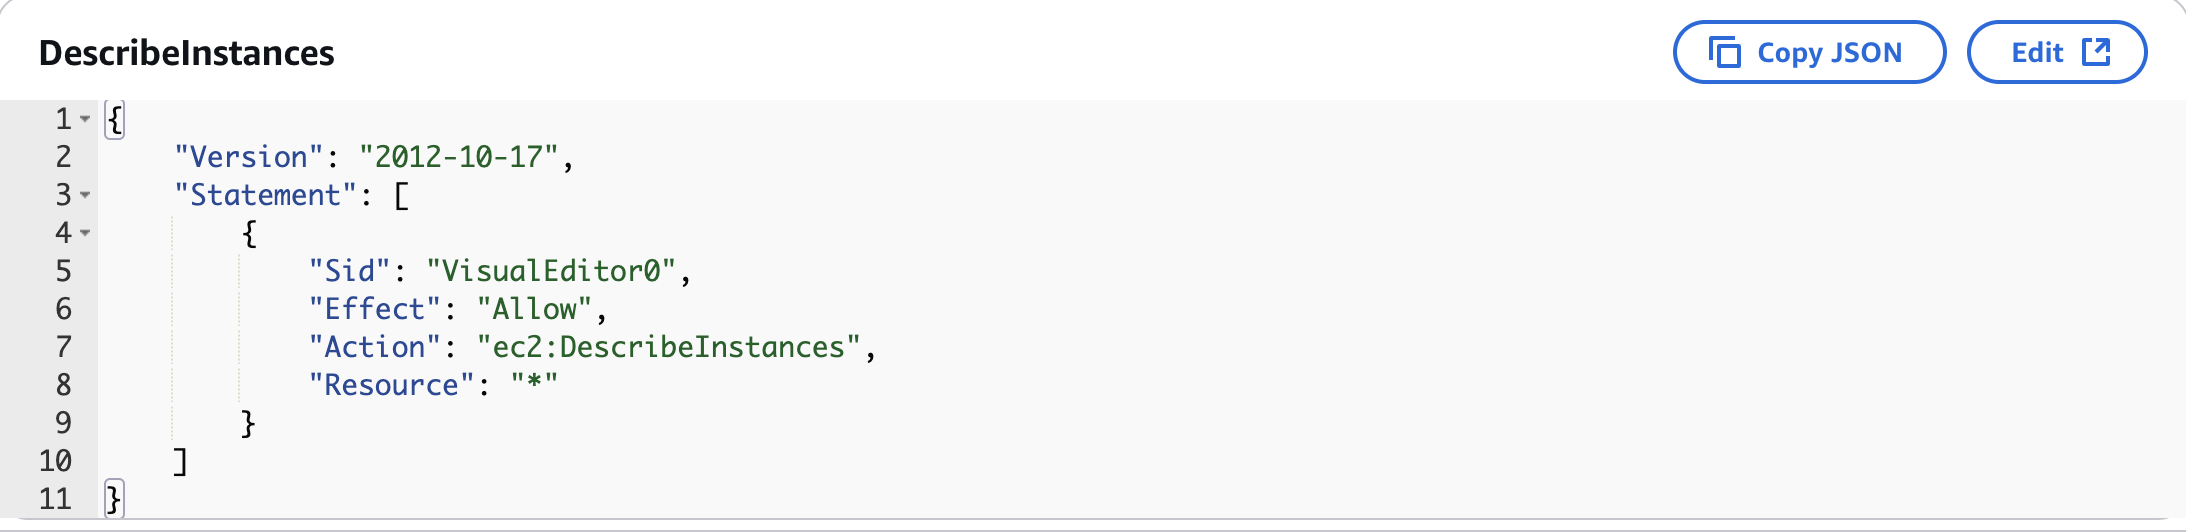
Let’s try running the command we were not supposed to be able to run once again:

As we can see, it is no longer possible to perform this action for our current user but we still be able to perform the DescribeInstances action.
In case we wanted to add more actions to our custom policy, we just have to edit it by clicking on Edit and adding the desired action:
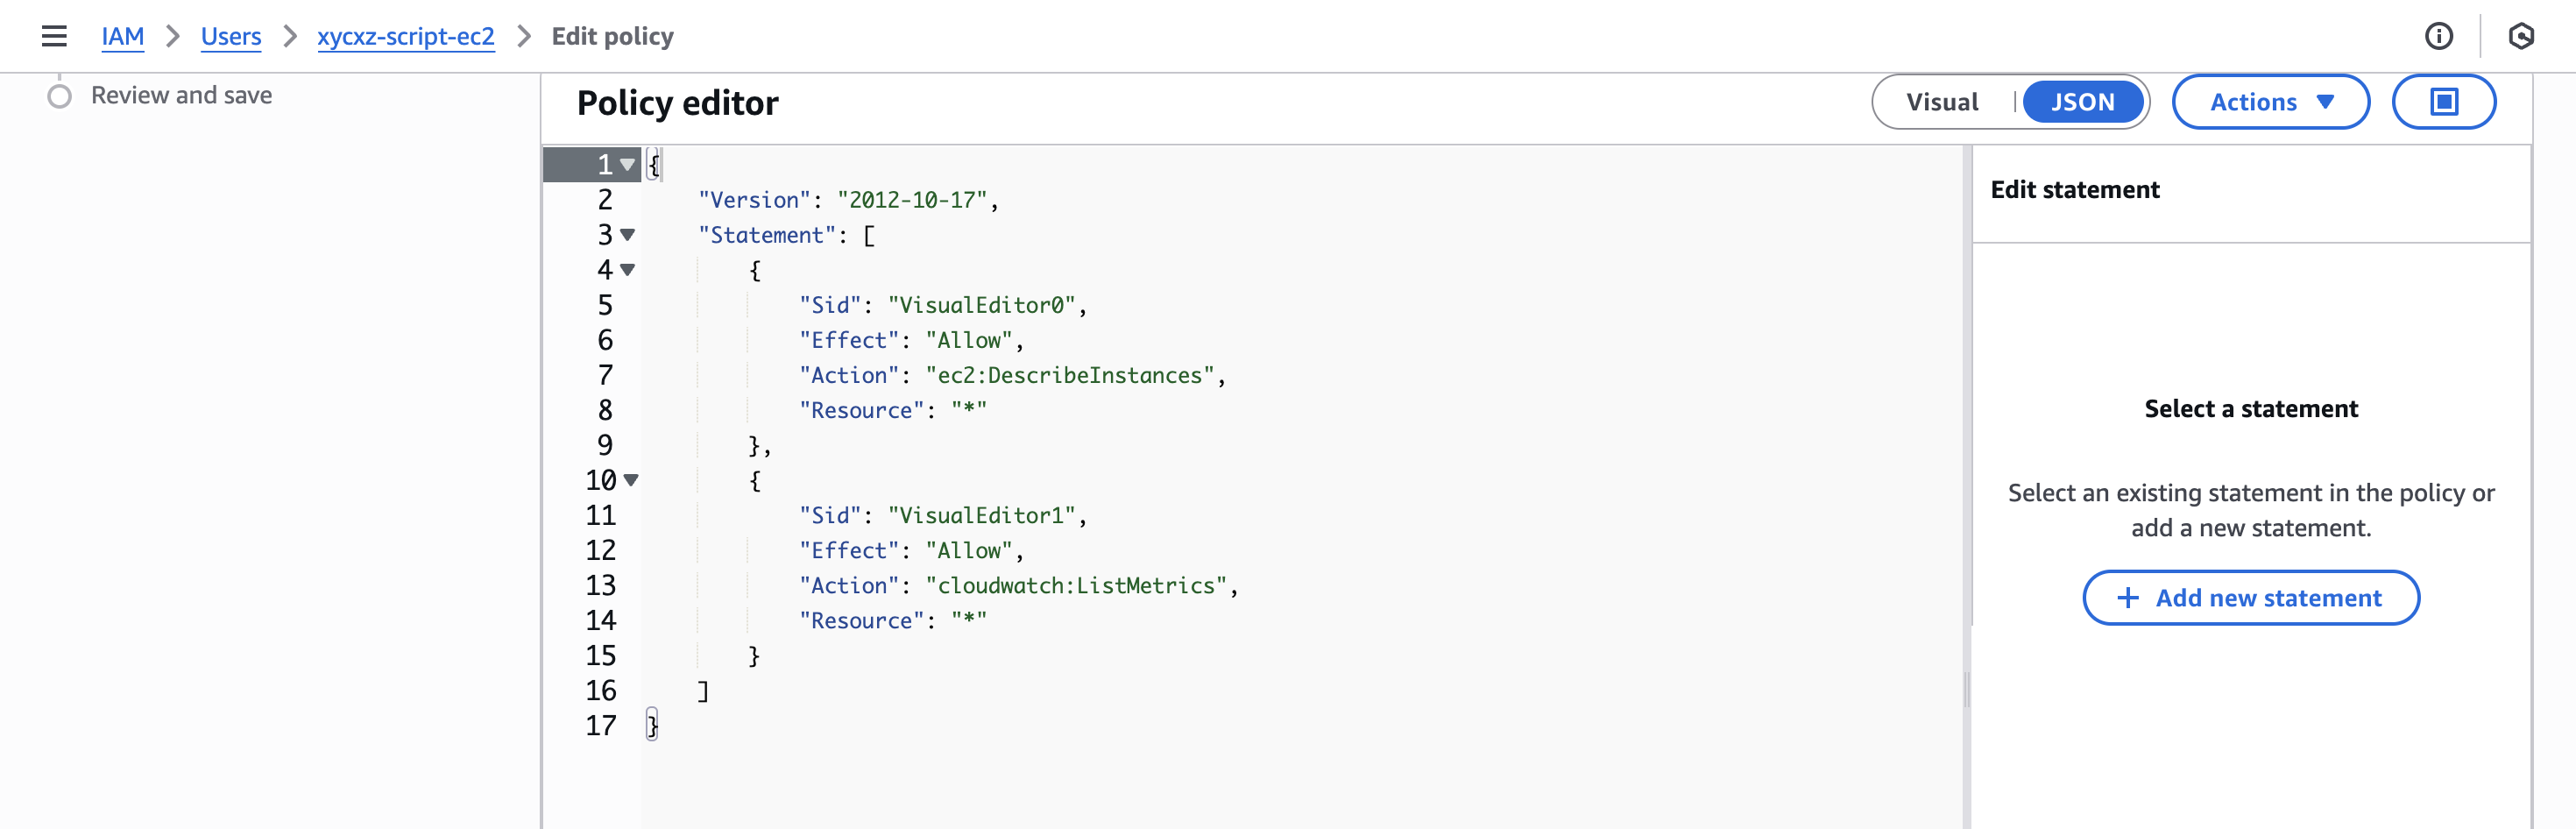
We can then click on Next and then on Save to save the changes. Now, let’s try executing the command again:
We could also merge policies inside an array like this:
1
2
3
4
5
6
7
8
9
10
11
{
    "Version": "2012-10-17",
    "Statement": [
        {
            "Sid": "VisualEditor0",
            "Effect": "Allow",
            "Action": ["ec2:DescribeInstances", "cloudwatch:ListMetrics"],
            "Resource": "*"
        }
    ]
}
Now, what if we wanted to allow our script to also start and stop an instance but, for example, just one specific instance? This will lead us to explore the Resource element.
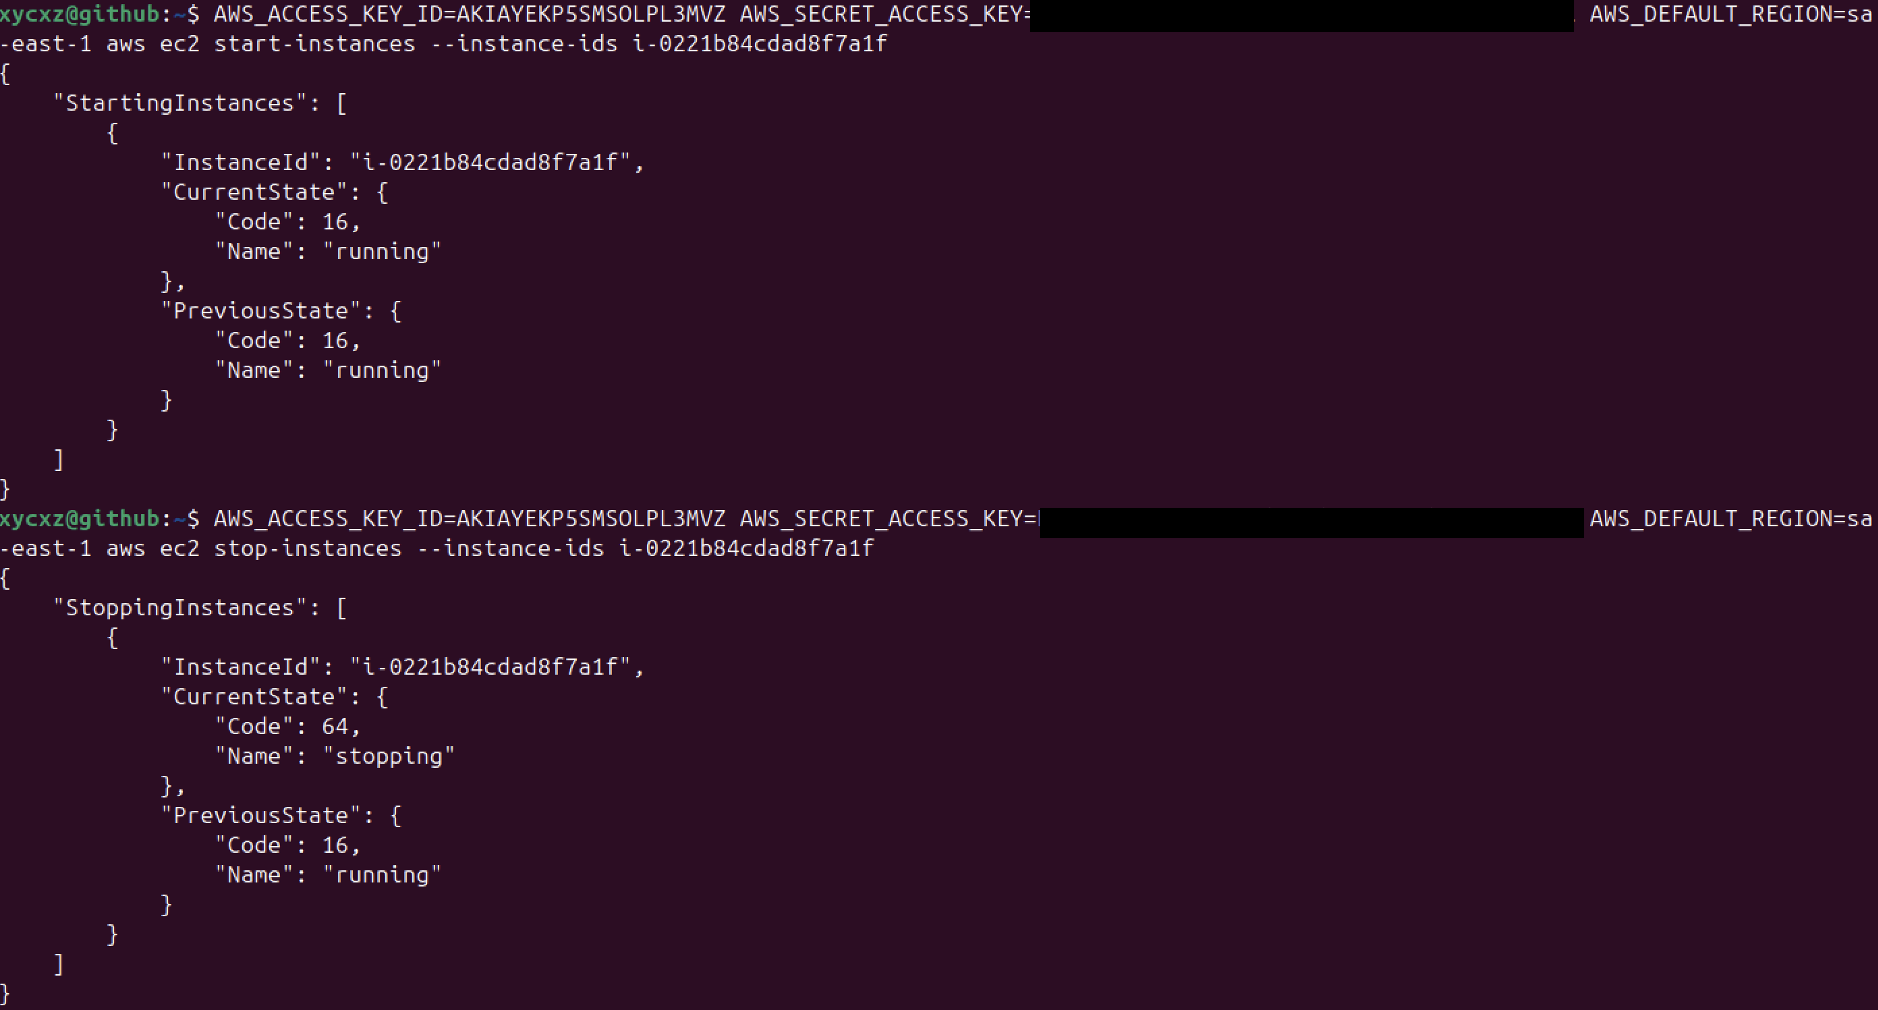
Being more Specific with Policies
An easy way to discover what is the policy we need to apply to our user is by executing the command we would like to have permissions on. Let’s read the output message:
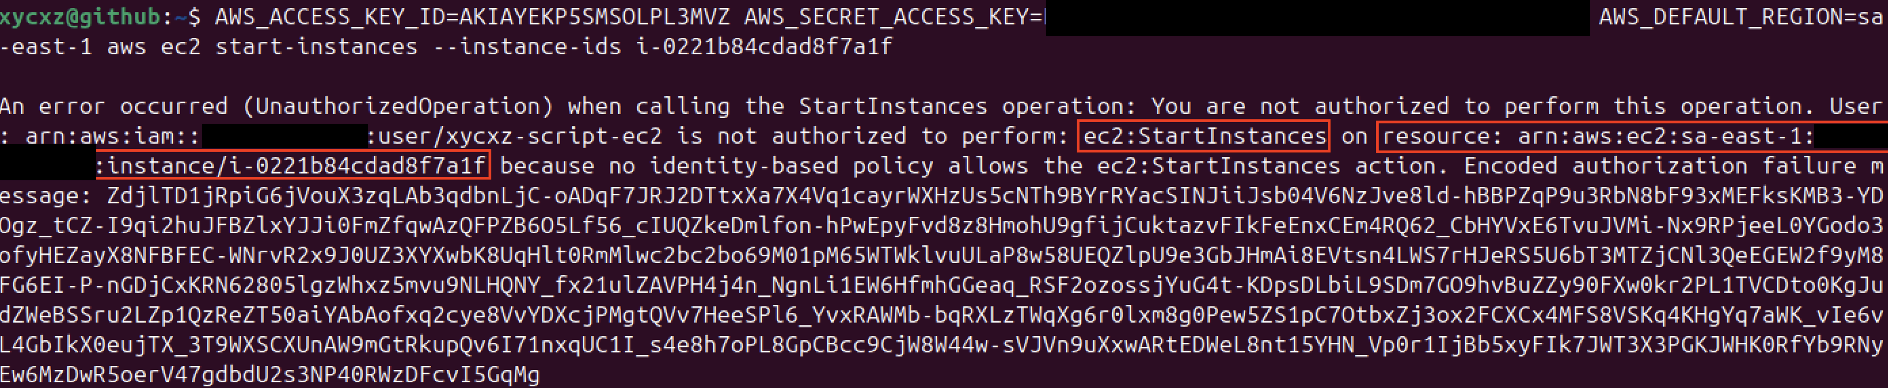
Here we could identify the Action and the Resource as well. We will use this information to edit the policy.
1
2
3
4
5
6
7
8
9
10
11
12
13
14
15
16
17
18
19
20
21
22
23
{
    "Version": "2012-10-17",
    "Statement": [
        {
            "Sid": "VisualEditor0",
            "Effect": "Allow",
            "Action": [
                "ec2:DescribeInstances",
                "cloudwatch:ListMetrics"
            ],
            "Resource": "*"
        },
        {
            "Sid": "StartStopInstance",
            "Effect": "Allow",
            "Action": [
                "ec2:StartInstances",
                "ec2:StopInstances"
            ],
            "Resource": "arn:aws:ec2:sa-east-1:<REDACTED>:instance/i-0221b84cdad8f7a1f"
        }
    ]
}
Note: Bear in mind that this filtering option (Resource) does not exist with every single action. For example, the DescribeInstances action does not support this filter. We have to make sure and read about filters before trying to apply them!
It is worth mentioning that instead of filtering by resource identifier (ARN), we could also filter by other elements, for example, conditions. If we go to our EC2 instance they could have tags associated to them that we could use to filter as well. However, for now, we will leave this as is.
Now we would like to re-use this policy. For that we will have to refactor the policy from an inline policy into a real policy.
Creating a Managed Policy
So far, we have been working with inline policies that are only directly attached to our user. That means that the policy can be used only by the specific user. Let’s explore how to create a general policy that can be applied to more things than just one user!
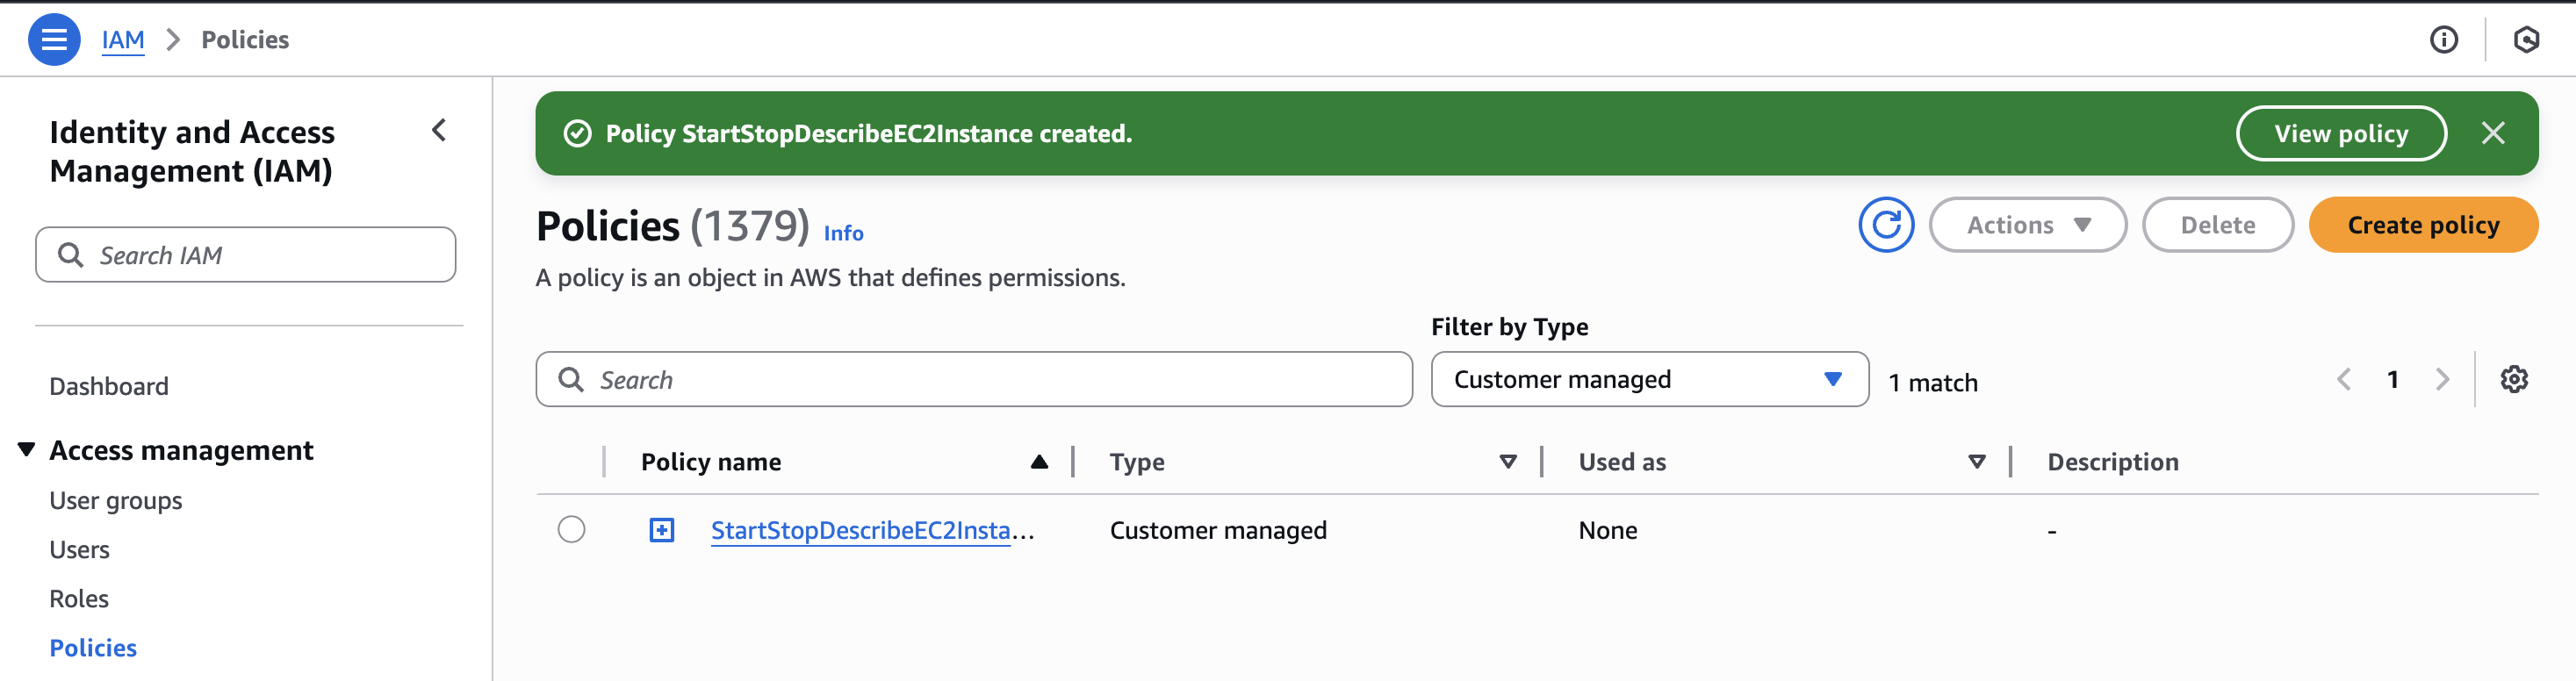
Fortunately, this can be done pretty easily. We just have to copy our inline policy instructions (JSON), and then go to create a new policy by clicking on Policies -> Create policy in our IAM dashboard. In there we are going to click on JSON and then paste our policy. Then we can click on Next.
We can choose whatever name we want and then click on Create. We can then filter by Customer managed to filter our created policies:
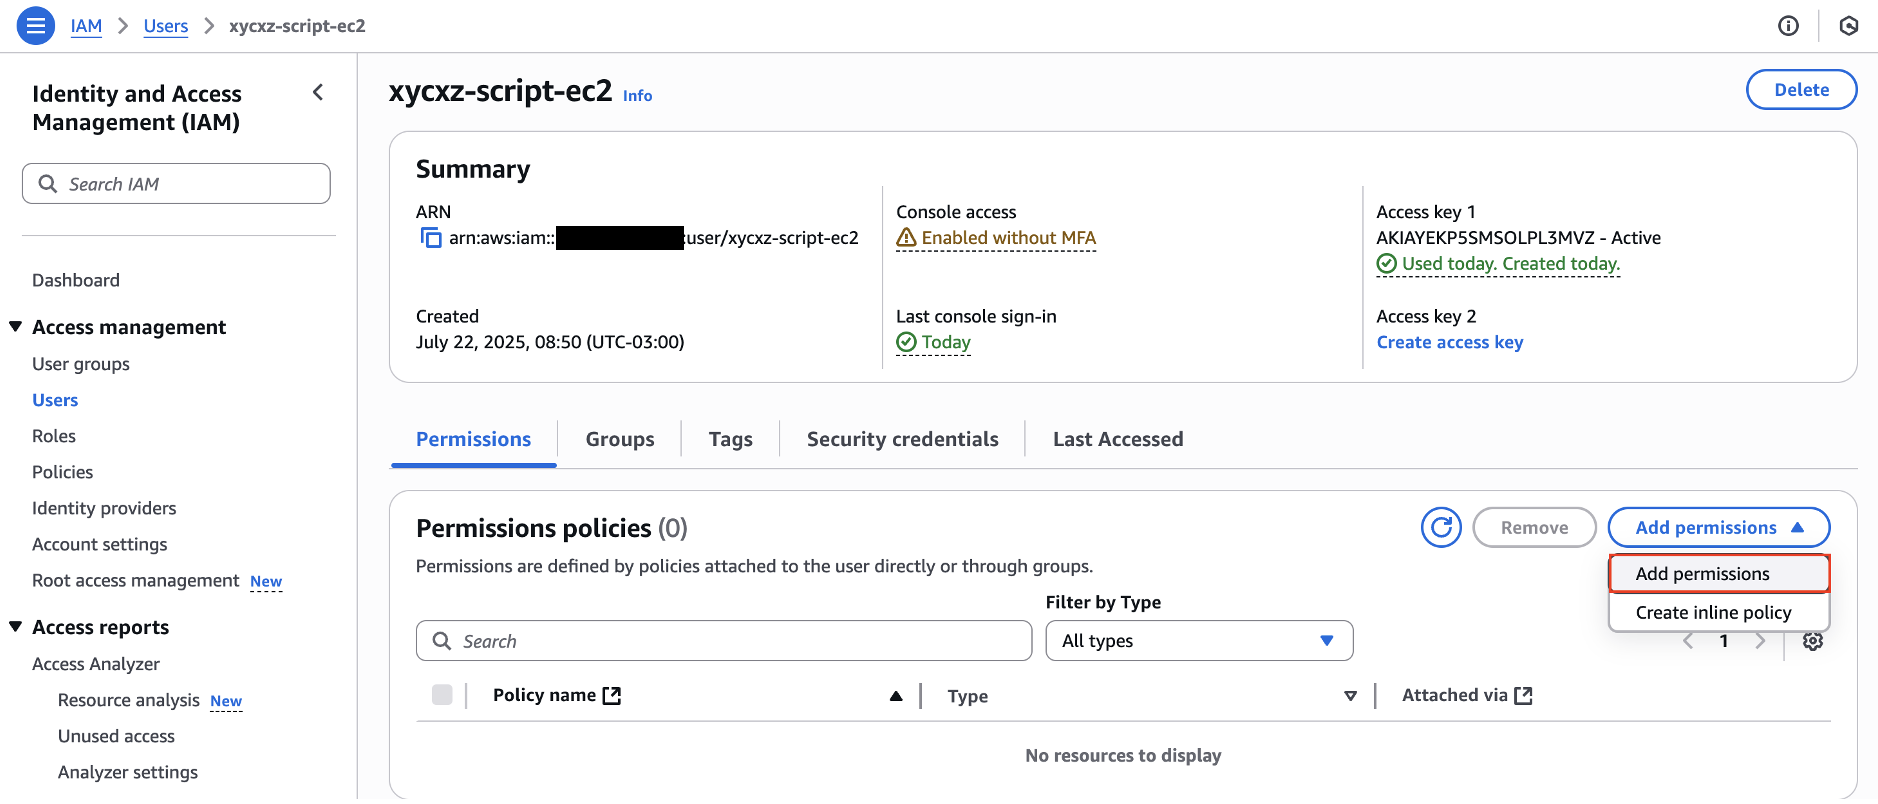
After this, we can remove the inline policy from our user and directly apply the one we just created to it. This time we will click on Add permissions and then look for our policy:

Great! This is nice progress so far. However, we still have a problem when we consider running these commands from our EC2 instance. We can SSH to it or use the terminal in our EC2 dashboard, but we would have to store the API key on the instance (access and secret keys) or use the temporary (not recommended) method shown above.
Let’s say we wanted to do this or automate this with a hundred instances that should have access to certain things in the AWS cloud. Creating all the API keys on so many instances would get tedious, specially because we would have to come up with a mechanism to properly manage the keys or revoke them when access is no longer needed.
Nevertheless, instead of having us to automate all of this, how about AWS doing it for us? This is where the Roles concept shines.
IAM Roles
Roles allows us to automate the provisioning of policies to resources in the AWS cloud. A resource (such as our EC2 instance) can automatically assume a specific role after which it can then use it to access AWS resources, such as for example describing all available EC2 instances.
Note: “An IAM role is similar to an IAM user, in that it is an AWS identity with permission policies that determine what the identity can and cannot do in AWS”. We attach permission policies to an IAM role to define what it can do. We also attach a trust policy to define who can assume it. Then, a trusted identity (like a user or service) can assume the role to receive temporary credentials and perform actions using only the permissions granted to that role.
If configured properly, our EC2 instance no longer needs to store any AWS tokens or API keys because this can automatically fetch them. In addition, Tokens and API keys are automatically managed for us and renewed regularly, which enhances security and we don’t have to deal with them anymore.
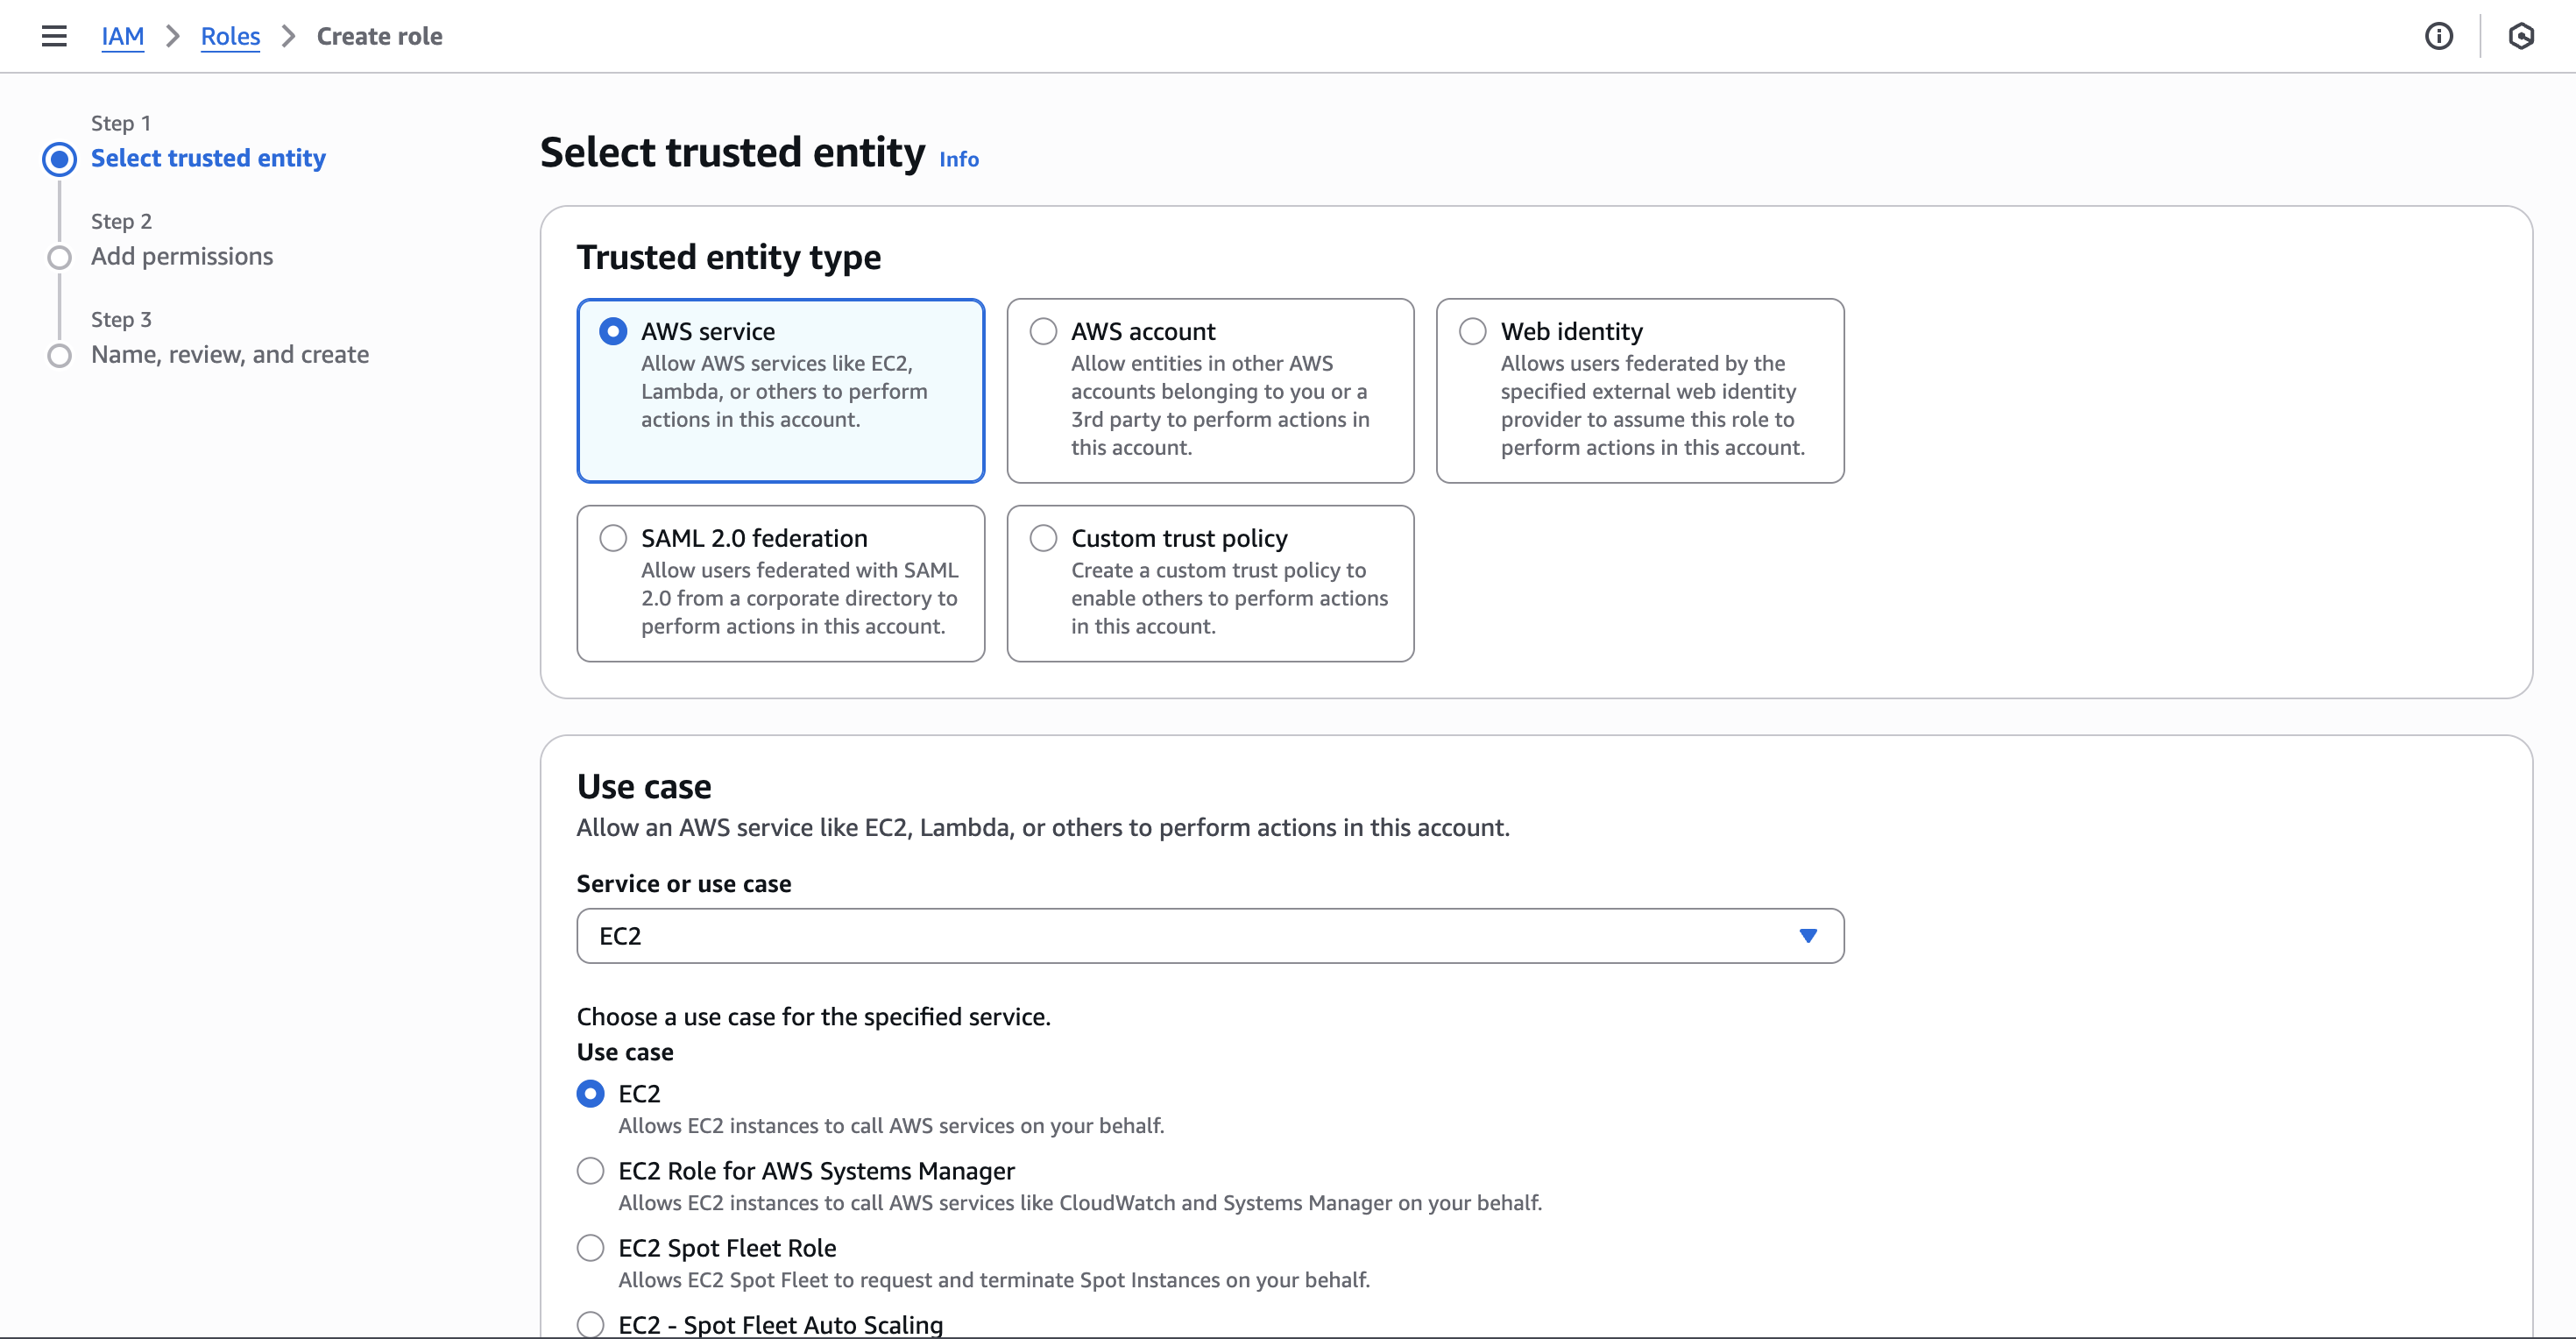
Let’s go and create our first role. For that we have to be on our IAM dashboard and then click on Roles -> Create role. We have to indicate who would be able to use this role. In our case we would choose AWS Service and then select EC2 to be able to become this role:
Then we can click on Next and attach our custom policy. Afterward, we will be presented with a Trust policy that will look something like this:
1
2
3
4
5
6
7
8
9
10
11
12
13
14
15
16
{
    "Version": "2012-10-17",
    "Statement": [
        {
            "Effect": "Allow",
            "Action": [
                "sts:AssumeRole"
            ],
            "Principal": {
                "Service": [
                    "ec2.amazonaws.com"
                ]
            }
        }
    ]
}
Note: Of course, we could manually write this and also add conditions to it.
In simple terms, what this policy means is that stuff that we run in EC2 can become the role we are creating here so it can assume the role and act accordingly. Let’s now go to our instance and apply what we just learned.
We will first try to run a command and check the output:

As we can see, we are missing credentials. To fix this, we can attach the role we created to the instance. For that, we have to go to our instance dashboard and then click on Actions -> Security -> Modify IAM role and then update the corresponding role:
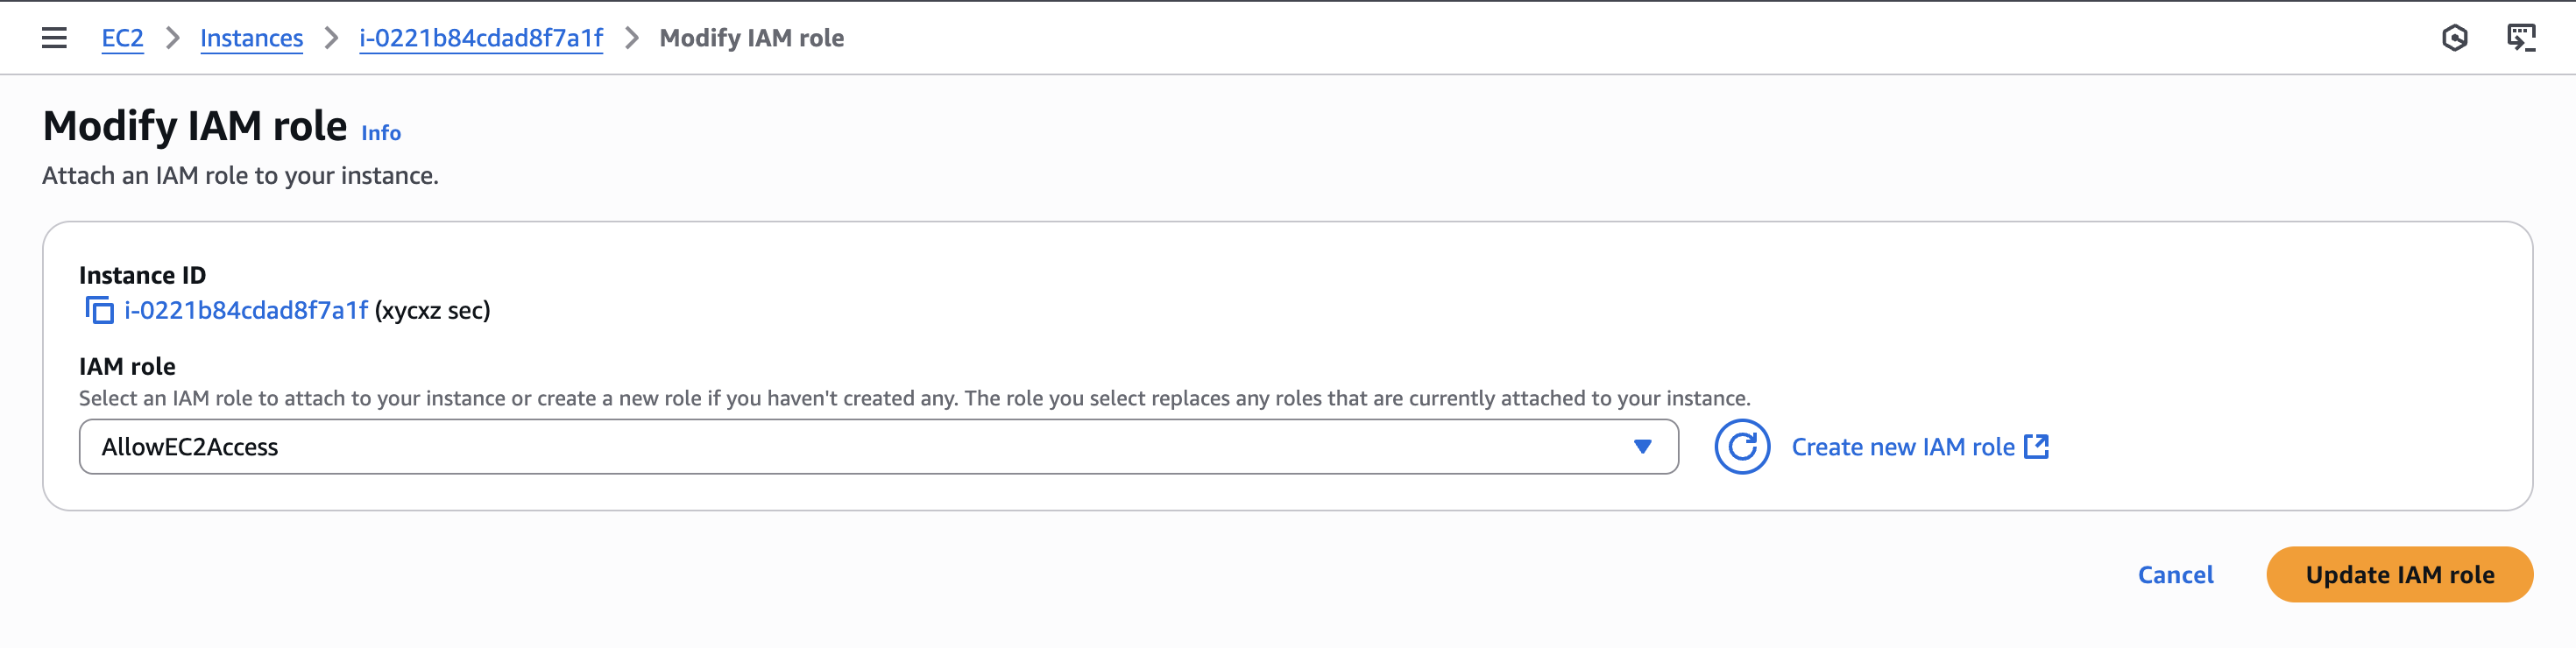
Note: We will have this options when we create a new instance as well if we go to Advanced details.
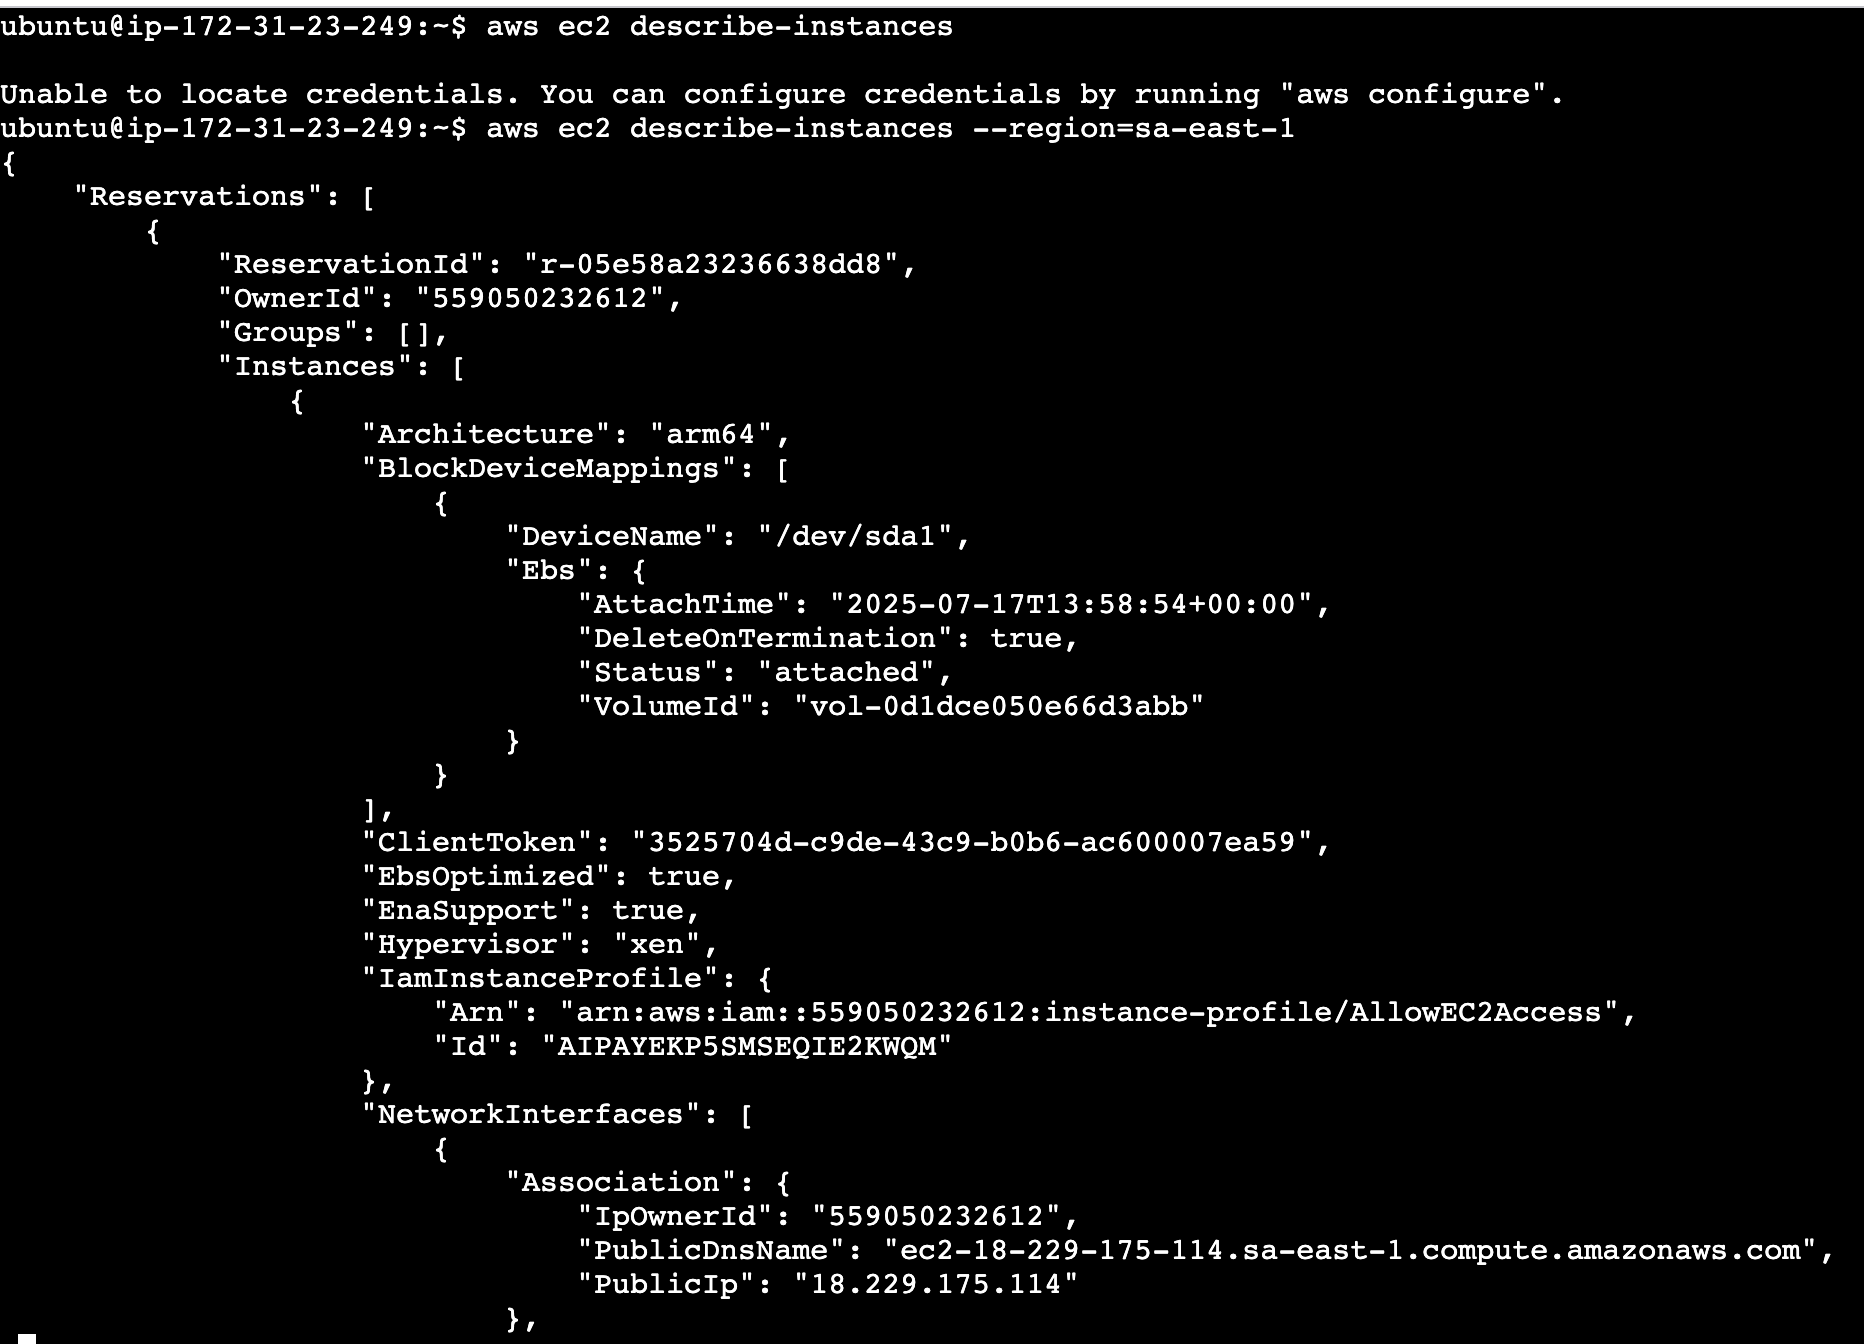
Now we are able to list the instances thank to the roles feature! I would like to point out that this is not something exclusive to EC2 instances, but I used them as an example because I think it illustrates roles better.
Next Steps
I have presented some important concepts that we need to know before moving on with the project. Make sure to understand each of them to not get lost on the upcoming posts!