FTP - Docker

Objective
My goal is to create a realistically configured FTP server that will become the initial point of compromise in our upcoming chained exploit demonstration.
Building the Foothold
To kick off and start our configuration journey today, we will begin by creating a Docker container with the required image for our lab. In my case, I will download the official Ubuntu image that can be found here. I’ll pick the latest version at the time of writing this post.
1
docker run ubuntu:latest
If this is your first time downloading a Docker image, you will probably get a message similar to the following:
1
2
3
4
5
Unable to find image 'ubuntu:latest' locally
latest: Pulling from library/ubuntu
69c262fc30fc: Pull complete
Digest: sha256:b59d21599a2b151e23eea5f6602f4af4d7d31c4e236d22bf0b62b86d2e386b8f
Status: Downloaded newer image for ubuntu:latest
As the message states, the image could not be found locally and had to go over the Registry to be able to download it. However, what is this Registry exactly? This is where all the images are stored, which is in the official Docker Hub page.
Let’s do a quick analysis to understand what our command is doing when it does not find a Docker image locally on our computer. For this, I will be using a tool called Wireshark, which will help us monitor the network and check for data packages.
Because I am using a clean Linux Ubuntu distro inside a Virtual Machine, I will run the ip a command that comes installed by default to check the correct interface of where my web traffic is moving. Once we have that, I will run the following command:
1
sudo wireshark
This will open up a GUI for us. Here, we will simply double click on the interface we identified before (enp0s1 in my case). We will probably see a lot of packets going back and forth, but don’t worry about this noise for now.
Let’s run the following command to pull an image that does not exists on our computer locally and check what is happening on the network:
1
2
3
4
5
6
7
8
9
10
# Command
docker pull ubuntu

# Output
Using default tag: latest
latest: Pulling from library/ubuntu
d69d4d41cfe2: Pull complete
Digest: sha256:8a1f59ffb675680d47db6337b49d22281a139e9d709335b492be023728e11715
Status: Downloaded newer image for ubuntu:latest
docker.io/library/ubuntu:latest # Here we have a clue of the site our image is getting downloaded from
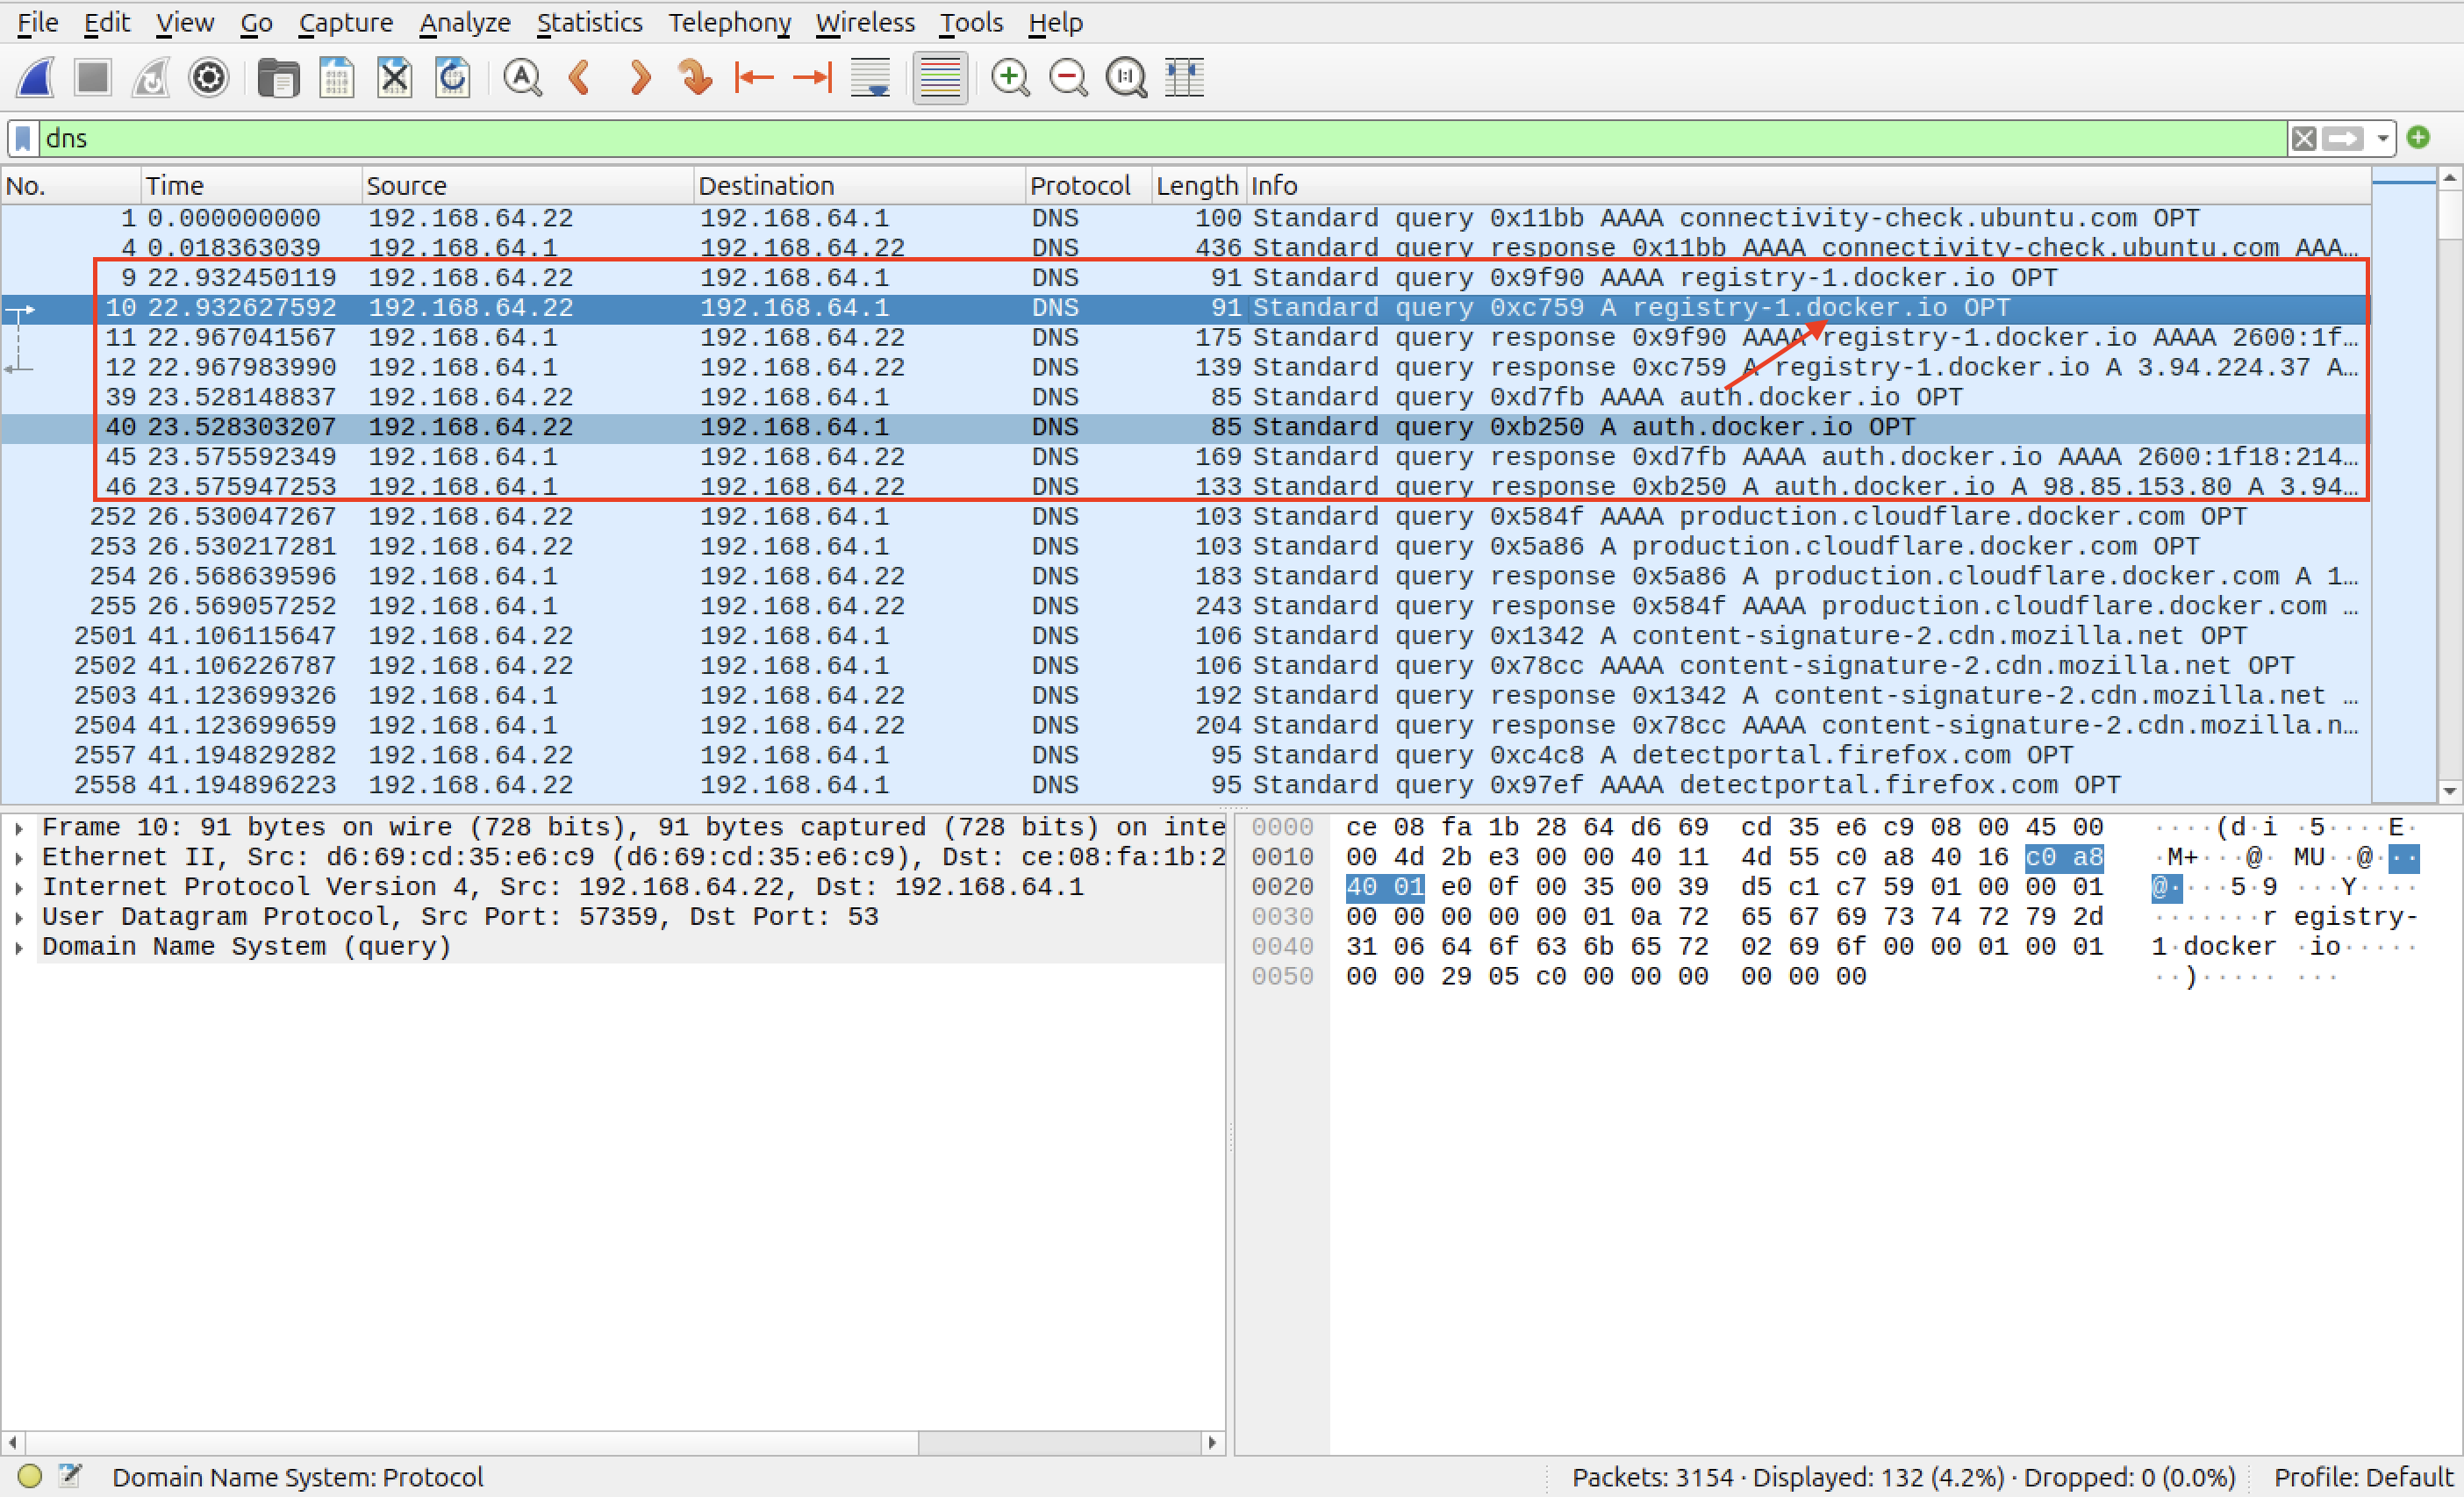
I applied the dns filter to demonstrate the moment my computer asks for the IP address of the Docker’s servers. Because communication with the servers uses TLS encryption (for security reasons), I’ll apply the tls filter to show the handshakes:
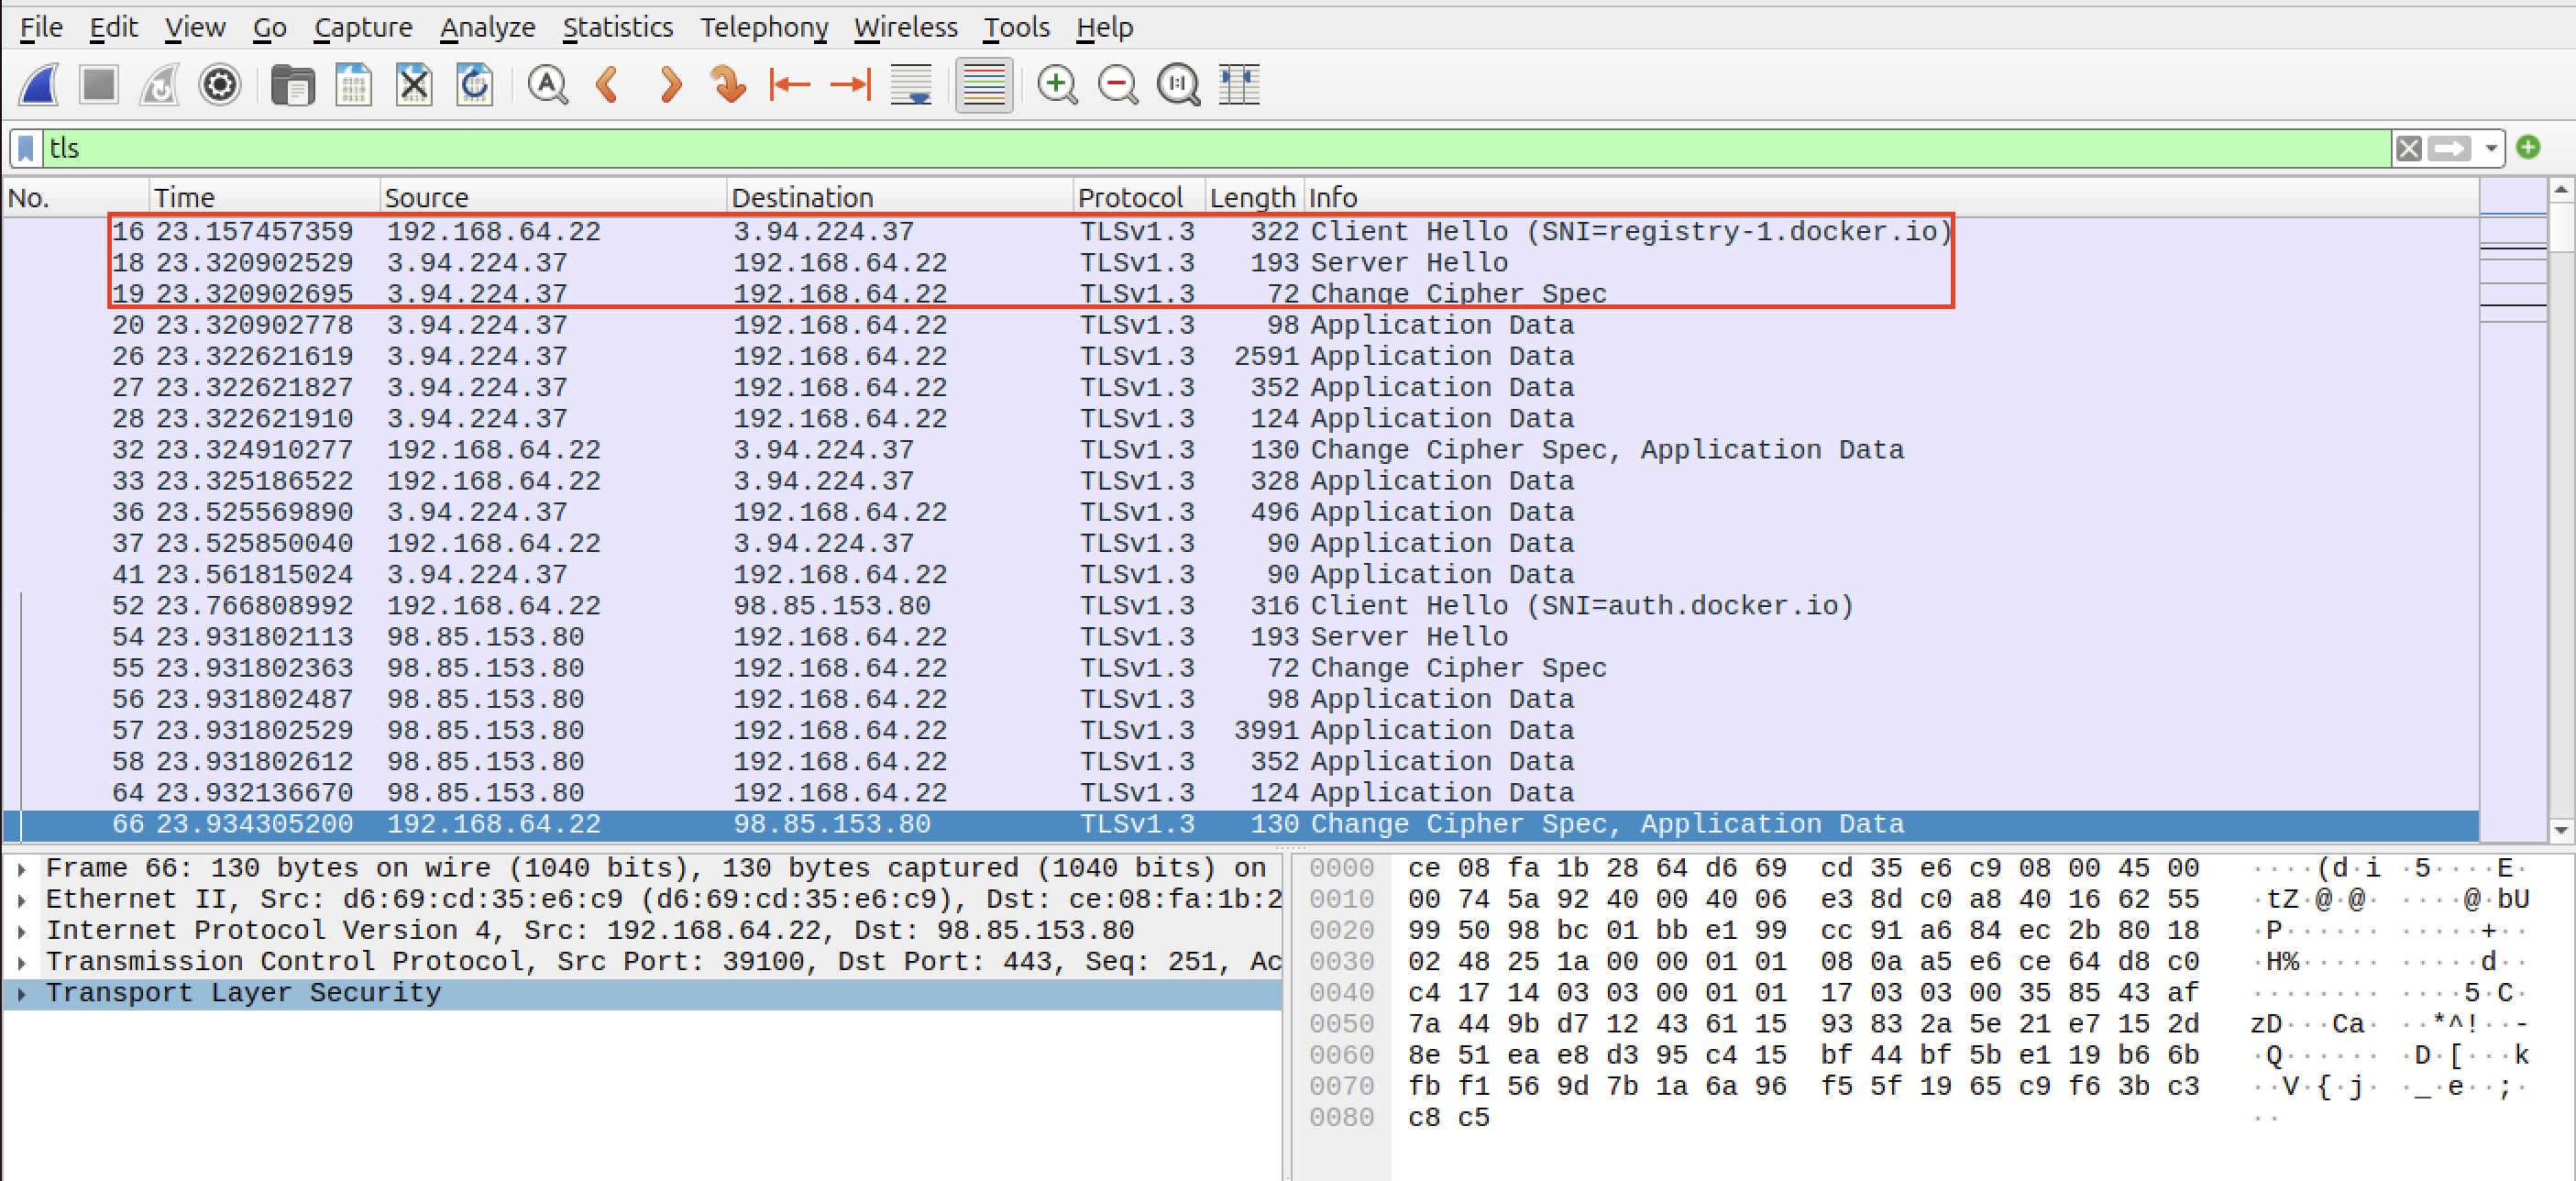
This is the final proof that shows the place where Docker gets the images when it does not find them locally. This is a trivial and short demonstration useful to emphasize to always try to understand what you are doing and why it is working. This is the key to master any area of the cybersecurity landscape (and any career).
We will continue on building our image. We can check that we have installed it successfully by running the following command:
1
2
3
4
5
6
# Command
docker images

#Output
REPOSITORY    TAG       IMAGE ID       CREATED        SIZE
ubuntu        latest    9d45648b4030   2 weeks ago    101MB
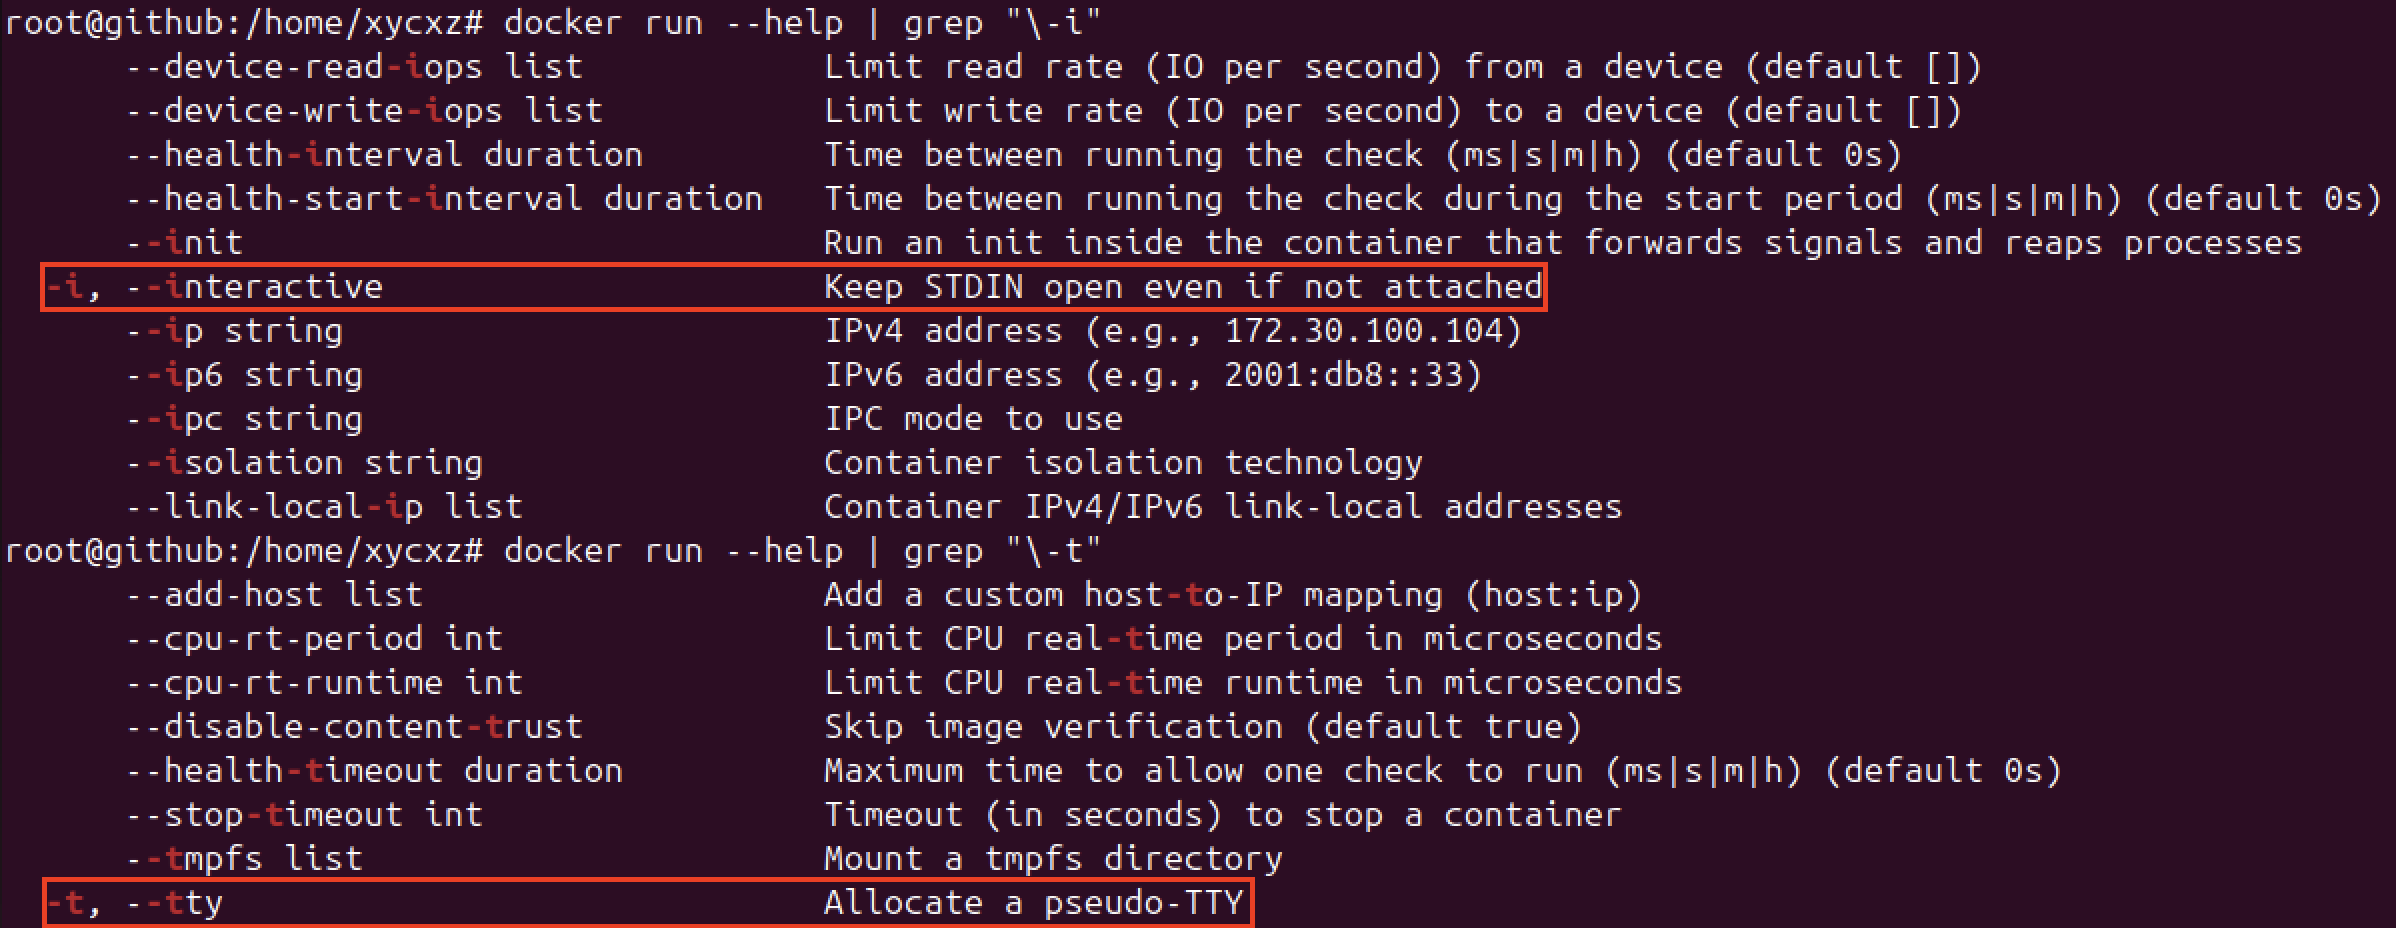
In order to be able to configure our container and install everything what we need in a more comfortable way (meaning on a shell inside the container), we have to run it in interactive mode and allocate a pseudo-TTY. We will need the following flags for that:

I’ll also assign a custom name (with the --name flag) to it to keep ourselves organised:
1
docker run -it --name ftp-lab ubuntu bash
It is very important to remark that containers are not prepared to work in the same way as an OS would work normally. We can prove that when trying to run commands like ip or ifconfig.
This happens because containers are (likely) used for something very specific and it would not make any sense to install a bunch of tools we won’t be using. Instead, we will be choosing exactly what we need and do it in a manual way so we can understand things better.
Note: I will be leaving a script that perform the same actions at the end of the post. You can use them to automate the whole process. However, I’d highly recommend going through the manual process first to understand the concepts.
Before starting, I will point out that this is NOT the ideal way of starting containers. In the best scenario, we would like to have our personalised images already configured so we can skip this whole process. However, since this is our first time, we have to build it from scratch.
Note: Do not forget to run apt upgrade && apt update inside the container as soon as you create it. This will allow us to install the tools we need.
Getting Started with FTP
Active and Passive Modes
I’ll start by explaining a core concept when it comes to FTP: Passive and Active connections.
When interacting with FTP protocol, we (the client) always send a connection request to port 21, which always work. However, in Active mode what happens is that the client is the one telling the server to deliver files to him (the server will accept this and deliver the files from its port 20 to the client). The problem here is the client computer’s internet router: it will block this file delivery because it will consider it as an unknown connection (incoming traffic) trying to get in (this would be a firewall). As a result, the client won’t get the files.
To solve this, Passive Mode was invented. Once again, the client will make the initial connection on port 21, but the server instead of trying to deliver the files to the client (using port 20), it will open a port (say, 21100) so the client can connect to it and get the files. Since firewalls usually don’t have trouble with outgoing traffic, this would not suppose a problem to it (unless configured differently).
Exploring FTP Configuration Options
One of the most used FTP servers on Linux-based distros is vsFTPd. We can install this with the following command:
1
apt-get install -y vsftpd
We will be prompted twice to choose our geographical area. Of course, in a real scenario we would have to put the corresponding data. However, since this is just a demonstration, we will choose whatever we want.
The configuration file can be found in /etc/vsftpd.conf. Let’s take a look at the different options we can find here and give a small description of what they are for:
1
cat /etc/vsftpd.conf | grep -v "#" # We exclude "#" to skip comments
| Setting | Value Example | Description |
|---|---|---|
listen | NO | When YES, vsftpd runs in standalone mode, listening directly on a port. If NO, it expects to be launched by another service (like inetd or systemd socket activation). |
listen_ipv6 | YES | Enables vsftpd to listen for incoming connections on IPv6 addresses. |
anonymous_enable | NO | Enables/Disable anonymous access. |
local_enable | YES | Allows/Denies local users to log in via FTP. |
dirmessage_enable | YES | Users will/won’t see the contents of a .message file (if present) when they enter a directory. Useful for providing welcome messages or notices. |
use_localtime | YES | If YES, all directory listings will show timestamps in the server’s local time zone. If NO, timestamps will be in GMT/UTC. |
xferlog_enable | YES | Enables/Disables logging of all FTP uploads and downloads to /var/log/vsftpd.log (or a custom path). Essential for auditing. |
connect_from_port_20 | YES | vsftpd will/won’t use port 20 for active mode data connections. This is a security measure and is often required by FTP clients for active mode to work. |
secure_chroot_dir | /var/run/vsftpd/empty | Specifies an empty directory that vsftpd will “chroot” into (change its perceived root directory to) before processing requests. This is a strong security measure, preventing vsftpd from accidentally breaking out of the user’s isolated directory. |
pam_service_name | vsftpd | Specifies the PAM (Pluggable Authentication Modules) service name that vsftpd will use for authentication. |
rsa_cert_file | /etc/ssl/certs/ssl-cert-snakeoil.pem | Specifies the path to the RSA certificate file for SSL/TLS (FTPS) encryption. Used when ssl_enable is YES. |
rsa_private_key_file | /etc/ssl/private/ssl-cert-snakeoil.key | Specifies the path to the RSA private key file corresponding to the certificate. Used when ssl_enable is YES. |
ssl_enable | NO | Enables/Disables SSL/TLS encryption. For any production or sensitive use, this should be YES and proper certificates should be used. If NO, connections are unencrypted (plain FTP). |
These are default settings that comes with vsftpd installation. Of course, there are other optional settings that can be found here. Since there are a lot of them and it would take a long time to explain all of them, we are gonna tackle the ones that would imply a critical security flaw:
| Setting | Value | Description |
|---|---|---|
anonymous_enable | YES | Allows anonymous login |
anon_upload_enable | YES | Allows anonymous user to upload files |
anon_mkdir_write_enable | YES | Allows anonymous user to create directories |
no_anon_password | YES | Do not ask anonymous for password |
anon_root | /home/username/ftp | Directory for anonymous. |
write_enable | YES | Allows anonymous user to perform write operations on the server (if it is combined with anonymous_enable=YES) |
However, these misconfigurations are NOT common to find, specially in the external network. This is why I don’t see a point on configuring this wrongly on purpose. The only scenario I can think of that is possible to find those is on a forgotten FTP server, or one that it is running on a legacy system.
In a more realistic scenario, an FTP security flaw would likely be part of a chain of exploits. For example, imagine the FTP service is linked to a web server like Nginx. In that case, we might be able to write files inside the webroot of the web application, which could potentially lead to Remote Code Execution (RCE).
We will first create our own customised Docker image and configure it to run FTP on a Ubuntu server. The idea here is learning how to do this and be able to expose it inside our local network. Later we will also explore commands to use with FTP. Let’s see how this is done.
Docker Container Configuration
Our Dockerfile will look like the following:
1
2
3
4
5
6
7
8
9
10
11
12
13
14
15
16
17
18
19
20
21
22
23
24
25
26
FROM ubuntu:22.04

ENV PASV_ADDRESS=127.0.0.1
ENV PASV_MIN_PORT=21100
ENV PASV_MAX_PORT=21110

RUN apt-get update && \
    apt-get install vsftpd -y && \
    useradd -m xycxz && \
    mkdir -p /var/run/vsftpd/empty && \
    mkdir -p /etc/vsftpd && \
    rm /etc/vsftpd.conf

RUN --mount=type=secret,id=xycxz_pwd \
    echo "xycxz:$(cat /run/secrets/xycxz_pwd)" | chpasswd

COPY vsftpd.conf /etc/vsftpd/vsftpd.conf.template

COPY passive.sh /usr/local/bin/
RUN chmod +x /usr/local/bin/passive.sh

ENTRYPOINT ["/usr/local/bin/passive.sh"]

EXPOSE 20 21 21100-21110

CMD ["/usr/sbin/vsftpd", "/etc/vsftpd/vsftpd.conf"]
Let’s explain this in a more detailed way. We start by importing the official Ubuntu image (we will use version 22.04 in our case):
1
FROM ubuntu:22.04
Next, we will define some environmental variables that will have some default values in case the user does not supply any. These will be linked to the script passive.sh, which we will see soon.
Allow me to do an important clarification on this point. The PASV_ADDRESS is the address the server tells the external client to connect back to when performing passive connections. If it tells the client to connect to localhost, the client will try to connect to itself, not to the server.
Let’s imagine we successfully connect to FTP through port 21. If we try to run a command such as ls, the vsftpd server will prepare for a passive connection. It looks at its configuration (vsftpd.conf), sees PASV_ADDRESS=localhost, and sends a message back to the client saying: “Okay, to get the file list, please open a new connection to localhost on port 21100 (in this case).”
The FTP will receive the instruction being sent by the server. Because the localhost always makes reference to the machine we are currently on, our machine (client) will try to connect to itself on port 21100. This connection will eventually fail because we are trying to connect to an FTP service that is not running in our computer, but on a remote host.
So, to be able to connect to the actual server hosting the FTP server, we need the address of that server host. This is why this value needs to be dynamic, since in our tests we will be finding different IP addresses.
Lastly, when we talk about the ports used by passive connections, it’s important to say that they have to be higher than 10000 (unprivileged port range), be exposed, and don’t have any type of mismatch when running the docker container (docker run) and setting up the vsftpd configuration file (because the FTP server reads its config file to know which ports it is allowed to use for data transfers. Docker needs to know which of those ports to expose to the outside world. If the ranges don’t match, the server might try to use a port that Docker hasn’t exposed, causing the connection to fail).
1
2
3
ENV PASV_ADDRESS=127.0.0.1
ENV PASV_MIN_PORT=21100
ENV PASV_MAX_PORT=21110
After this, we run the commands that we need in order to install the service and make it function properly. Apart from this, we will be also creating a user to be able to connect to FTP since the root user is disabled by default.
1
2
3
4
5
6
7
8
9
10
11
RUN apt-get update && \
    apt-get install vsftpd -y && \
    useradd -m xycxz && \
    mkdir -p /var/run/vsftpd/empty && \
    mkdir -p /etc/vsftpd && \
    rm /etc/vsftpd.conf

RUN --mount=type=secret,id=xycxz_pwd \
    echo "xycxz:$(cat /run/secrets/xycxz_pwd)" | chpasswd

COPY vsftpd.conf /etc/vsftpd/vsftpd.conf.template
Here, we create a folder named empty because we will pretty much use a default configuration file and, if you can recall, secure_chroot_dir points to that directory which is NOT created automatically in our case. We also create a vsftpd folder just to keep ourselves organised and copy a template file and our desired configuration file inside of it.
Note: The template file is used so it does not modifies the configuration file every time we start a container, because of what our passive.sh script is doing.
However, the most interesting part of this set up is how we manage the user password in order to not hardcode the credentials. It is important to clarify that we are doing this in the build phase of the container, which means that we need to pass some special arguments to our docker build command. We won’t be using the basic --build-arg method since the value of the argument is recorded and easily visible in the image’s history and metadata. We can easily see this by running docker history <IMAGE>.
The superiority of RUN --mount=type=secret over --build-arg and ENV comes down to one critical concept: Docker Build Secrets.
A “secret” is a file that we temporarily make available to a single RUN command during the build. It is the only method that leaves absolutely no trace of the secret in the final Docker image or its history. Both ENV and --build-arg leave behind artifacts that can be discovered by anyone who gets a copy of your image.
To make this work, first we need to create a file with out password:
1
echo "<password>" > ftp_password.txt
Note: The ftp_password.txt file needs to be in the SAME place of our Dockerfile archive. We attach the ID used in the Dockerfile (xycxz_pwd) to reference this file when running docker build --secret id=<ID>,src=./<ftp_password.txt> ..
Then, we have to use RUN --mount=type=secret,id=xycxz_pwd, which will tell Docker to mount a secret (we can choose any ID for it). Inside the RUN command’s environment, the secret is available as a file. We use $(cat /run/secrets/xycxz_pwd) to read the content of the secret file (which is our password) and use it with chpasswd to set it up.
1
2
3
4
COPY passive.sh /usr/local/bin/
RUN chmod +x /usr/local/bin/passive.sh

ENTRYPOINT ["/usr/local/bin/passive.sh"]
The previous lines just get our script ready to run once the blueprint of our image is finished. The last line simply executes the script.
Note: Remember that every command we pass after RUN here will be used to create the image. This also applies when we define the ENV variables.
1
2
3
EXPOSE 20 21 21100-21110

CMD ["/usr/sbin/vsftpd", "/etc/vsftpd/vsftpd.conf"]
The remaining lines are used to expose the ports that FTP uses to be able to connect to it (and use passive communication), not only with the host machine, but with different machines in the local network. Don’t forget this is just a reference, which means we still need to map the ports when running the container. The final CMD commands executes the FTP service.
Now, I will show the configuration/script files used:
vsftpd.conf
1
2
3
4
5
6
7
8
9
10
11
12
ftpd_banner=Welcome to xycxz awesome FTP Server!
listen=YES
listen_ipv6=NO
anonymous_enable=NO
local_enable=YES
write_enable=YES
dirmessage_enable=YES
use_localtime=YES
xferlog_enable=YES
connect_from_port_20=YES
secure_chroot_dir=/var/run/vsftpd/empty
pam_service_name=vsftpd
passive.sh
1
2
3
4
5
6
7
8
9
10
11
12
13
14
15
16
17
18
19
20
21
22
23
24
25
#!/bin/sh

set -e # Used if any command fails to stop the entire script immediately

cp /etc/vsftpd/vsftpd.conf.template /etc/vsftpd/vsftpd.conf # Copies the template configuration file. We use this because every time we start a container the script will run and, if we don't specify this, the properties will be added every time

# The tee command adds the properties and we also make sure to use the ENV variables defined in our Dockerfile

tee -a /etc/vsftpd/vsftpd.conf <<EOF

# This will make it run in the foreground so the container does not stop
background=NO
# Enables passive mode, useful when the server is behind a firewall or NAT
pasv_enable=YES
# Docker already runs the container in a secure sandbox. We set this to don't have any weird issues
seccomp_sandbox=NO
# Best practice for compatibility with modern users
utf8_filesystem=YES
# Used to manage passive communications
pasv_address=${PASV_ADDRESS}
pasv_min_port=${PASV_MIN_PORT}
pasv_max_port=${PASV_MAX_PORT}
EOF

exec "$@" # This is used to indicate the script is done running so Dockerfile can run the last CMD command
Note: This script is what makes our container dynamic since it requires environmental variables that are used on the creation of the blueprint the container will use.
Final Touch
We will try to simulate a real world scenario and mount a directory with different helpdesk tools that can be found in companies. Let’s start by creating a folder and set the necessary permissions so our created user can write and read the contents of it:
1
2
3
4
mkdir helpdesk

# Docker containers have their own internal user IDs. To allow our user inside the container (UID 1000) to write to the "helpdesk" folder on the host machine, we need to make sure the folder on the host is also owned by UID 1000.
sudo chown -R 1000:1000 helpdesk
Now that we have this set, we will run our container once again but including the corresponding flag to mount our directory. But before that, we need to build our image with the Dockerfile we just created. Because we are using a secret to set our new user password, we will run the following:
1
2
# This is required to run the build command
export DOCKER_BUILDKIT=1
1
docker build --secret id=<ID GIVEN>,src=<FILE WITH OUT PASSWORD> -t <IMAGE TAG> .
--secret: This flag tells Docker we are providing a secret.id=ftp_user_pass: Thisidmust match theidused in theDockerfile’sRUN --mountcommand.src=ftp_password.txt: This points to the source file on your local machine that contains the password.
Now that our image is ready, we can run a container:
1
docker run -d --name <NAME> -p 21:21 -p 20:20 -p 21100-21110:21100-21110 -v /home/xycxz/helpdesk:/home/xycxz -e PASV_ADDRESS=<VM IP> -e PASV_MIN_PORT=21100 -e PASV_MAX_PORT=21110 <IMAGE>
I’ll shortly explain what is this command doing:
-d: Run in detached mode--name: Give it a custom name-p: Used for port mapping (21 for command, 20 for active data, 21100-21110 for passive data)-e: Used to pass the necessary environmental variables for our script-v: Used to mount a volume (bind mount) from our host inside the container. This way we can modify our directory on our host and it will apply the changes to the container as well.
Finally, we will put some files which contain tools that can be found in the context of a helpdesk team. We will run the following commands inside our helpdesk folder on the host VM for that:
1
2
3
4
5
git clone https://github.com/awesome-foss/awesome-sysadmin.git
git clone https://github.com/Sysinternals/sysinternals
mkdir -p documentation/bookstack_setup
cd documentation/bookstack_setup
git clone https://github.com/BookStackApp/BookStack.git
These will leave us with the following:
1
2
xycxz@ftp:/home/xycxz/# ls
awesome-sysadmin  documentation  sysinternals
Automating the Lab
I will create a Python script in the future on this section! For now, make sure to understand the process :)
Next Steps
We are finished setting up our FTP service. Now, we will continue working on this project configuring the other two containers.