ECR & AppRunner - AWS
Objective
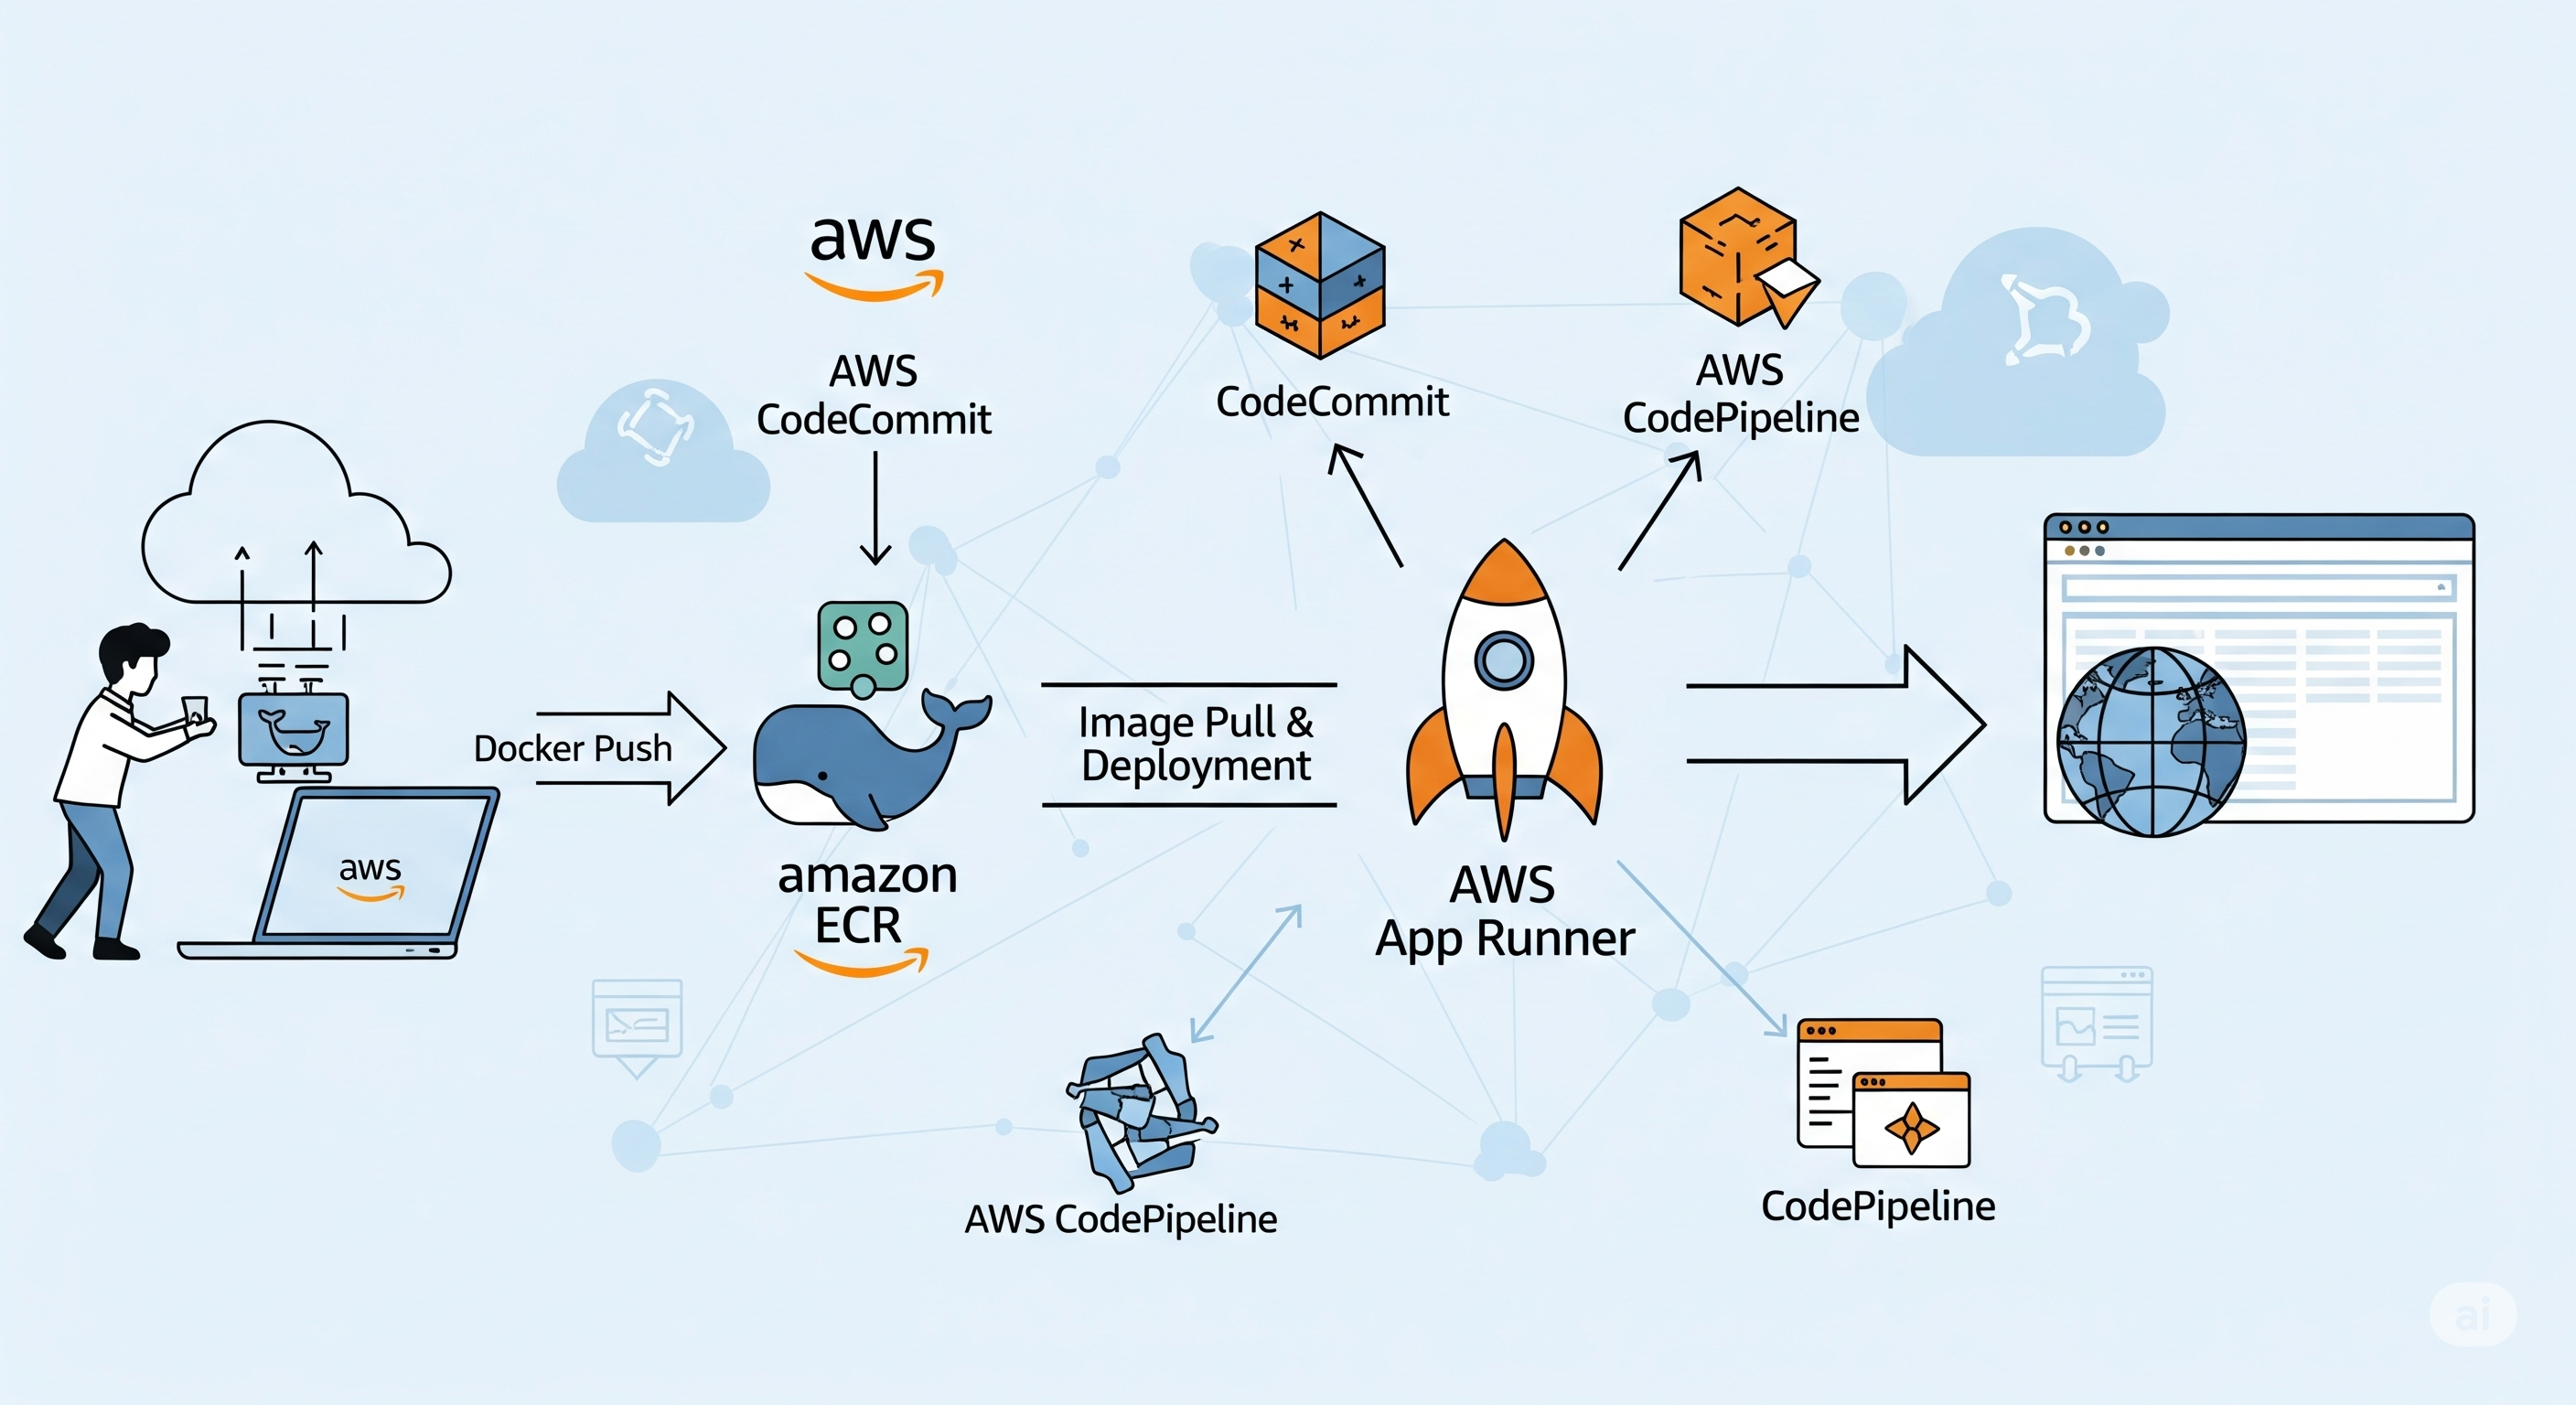
In this post, I’ll show how to host Docker images in Amazon ECR and automatically deploy changes using AWS AppRunner.
Additionally, I’ll demonstrate how to automatically build Docker images in the AWS cloud based on changes in a GitHub repository. The idea here is that if we make changes to a GitHub repository, Amazon AWS will get notified about that and then through AWS CodeBuild we’re going to build a new image that will be stored in our ECR. A change in ECR will automatically trigger a deployment in AppRunner, resulting in a fully automated deployment setup.
Creating an ECR Repository
Amazon Elastic Container Registry (ECR) is a container registry service in which the underlying infrastructure for hosting our registry is handled by AWS. Some benefits that we can have by using this service are the following:
- Automatically scales
- Integrates into AWS IAM for permission control
- Integrated into AppRunner, ECS, EKS…
We can say it reduces the complexity of managing our own container registry, which is what we’ve been doing so far in a previous post.
To access the ECR service, we have to go to the search feature in our AWS dashboard and search for that service. Then we have to click on Create to create the repository. We will have to configure it, although we should know that a general rule is that one repository should be used for one application (or a part of it).
In this case, I’ll create a repository for the web server I configured earlier, just to demonstrate the process:
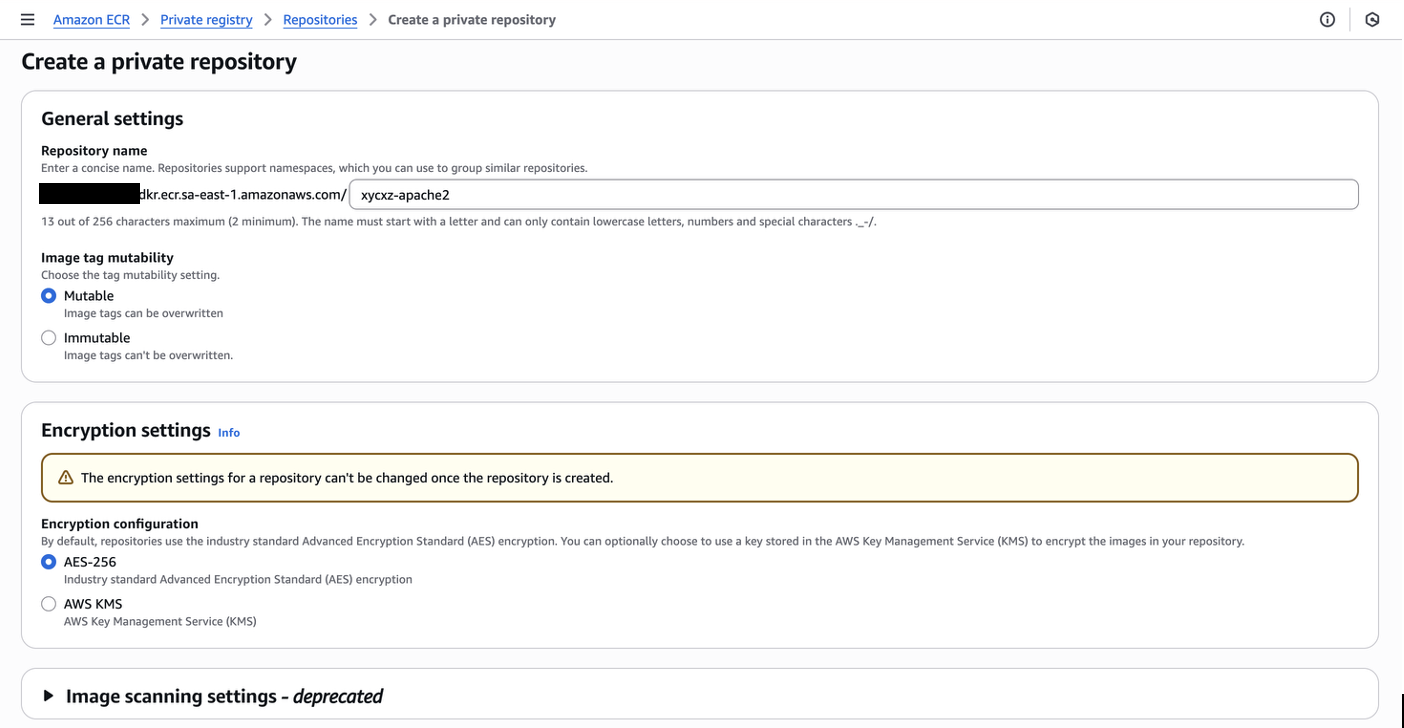
Note: I will leave the repository to be Mutable because this will allow us to push or overwrite existing images (essential for CI/CD pipelines). This is key if we want to automatically deploy something in AppRunner.
Make sure you have the same settings as I do and then click on Create repository.
A repository holds all the images that we push to it. For example, we can push our current version of the web server, but then we want to push another updated version of it. In that case, both will be stored within the repository.
We can even say that the repository we created is pretty much equivalent to what we see in DockerHub (although this one is public, while ECR is private) when we navigate to a page like this. Even though this is labeled as “Docker Official Image”, technically speaking this would be an example of a repository that contains all the nginx images whereas the whole DockerHub together would be the registry.
In the AWS case, all our custom containers together are the registry and each individual application is a repository which can hold multiple images through tags.
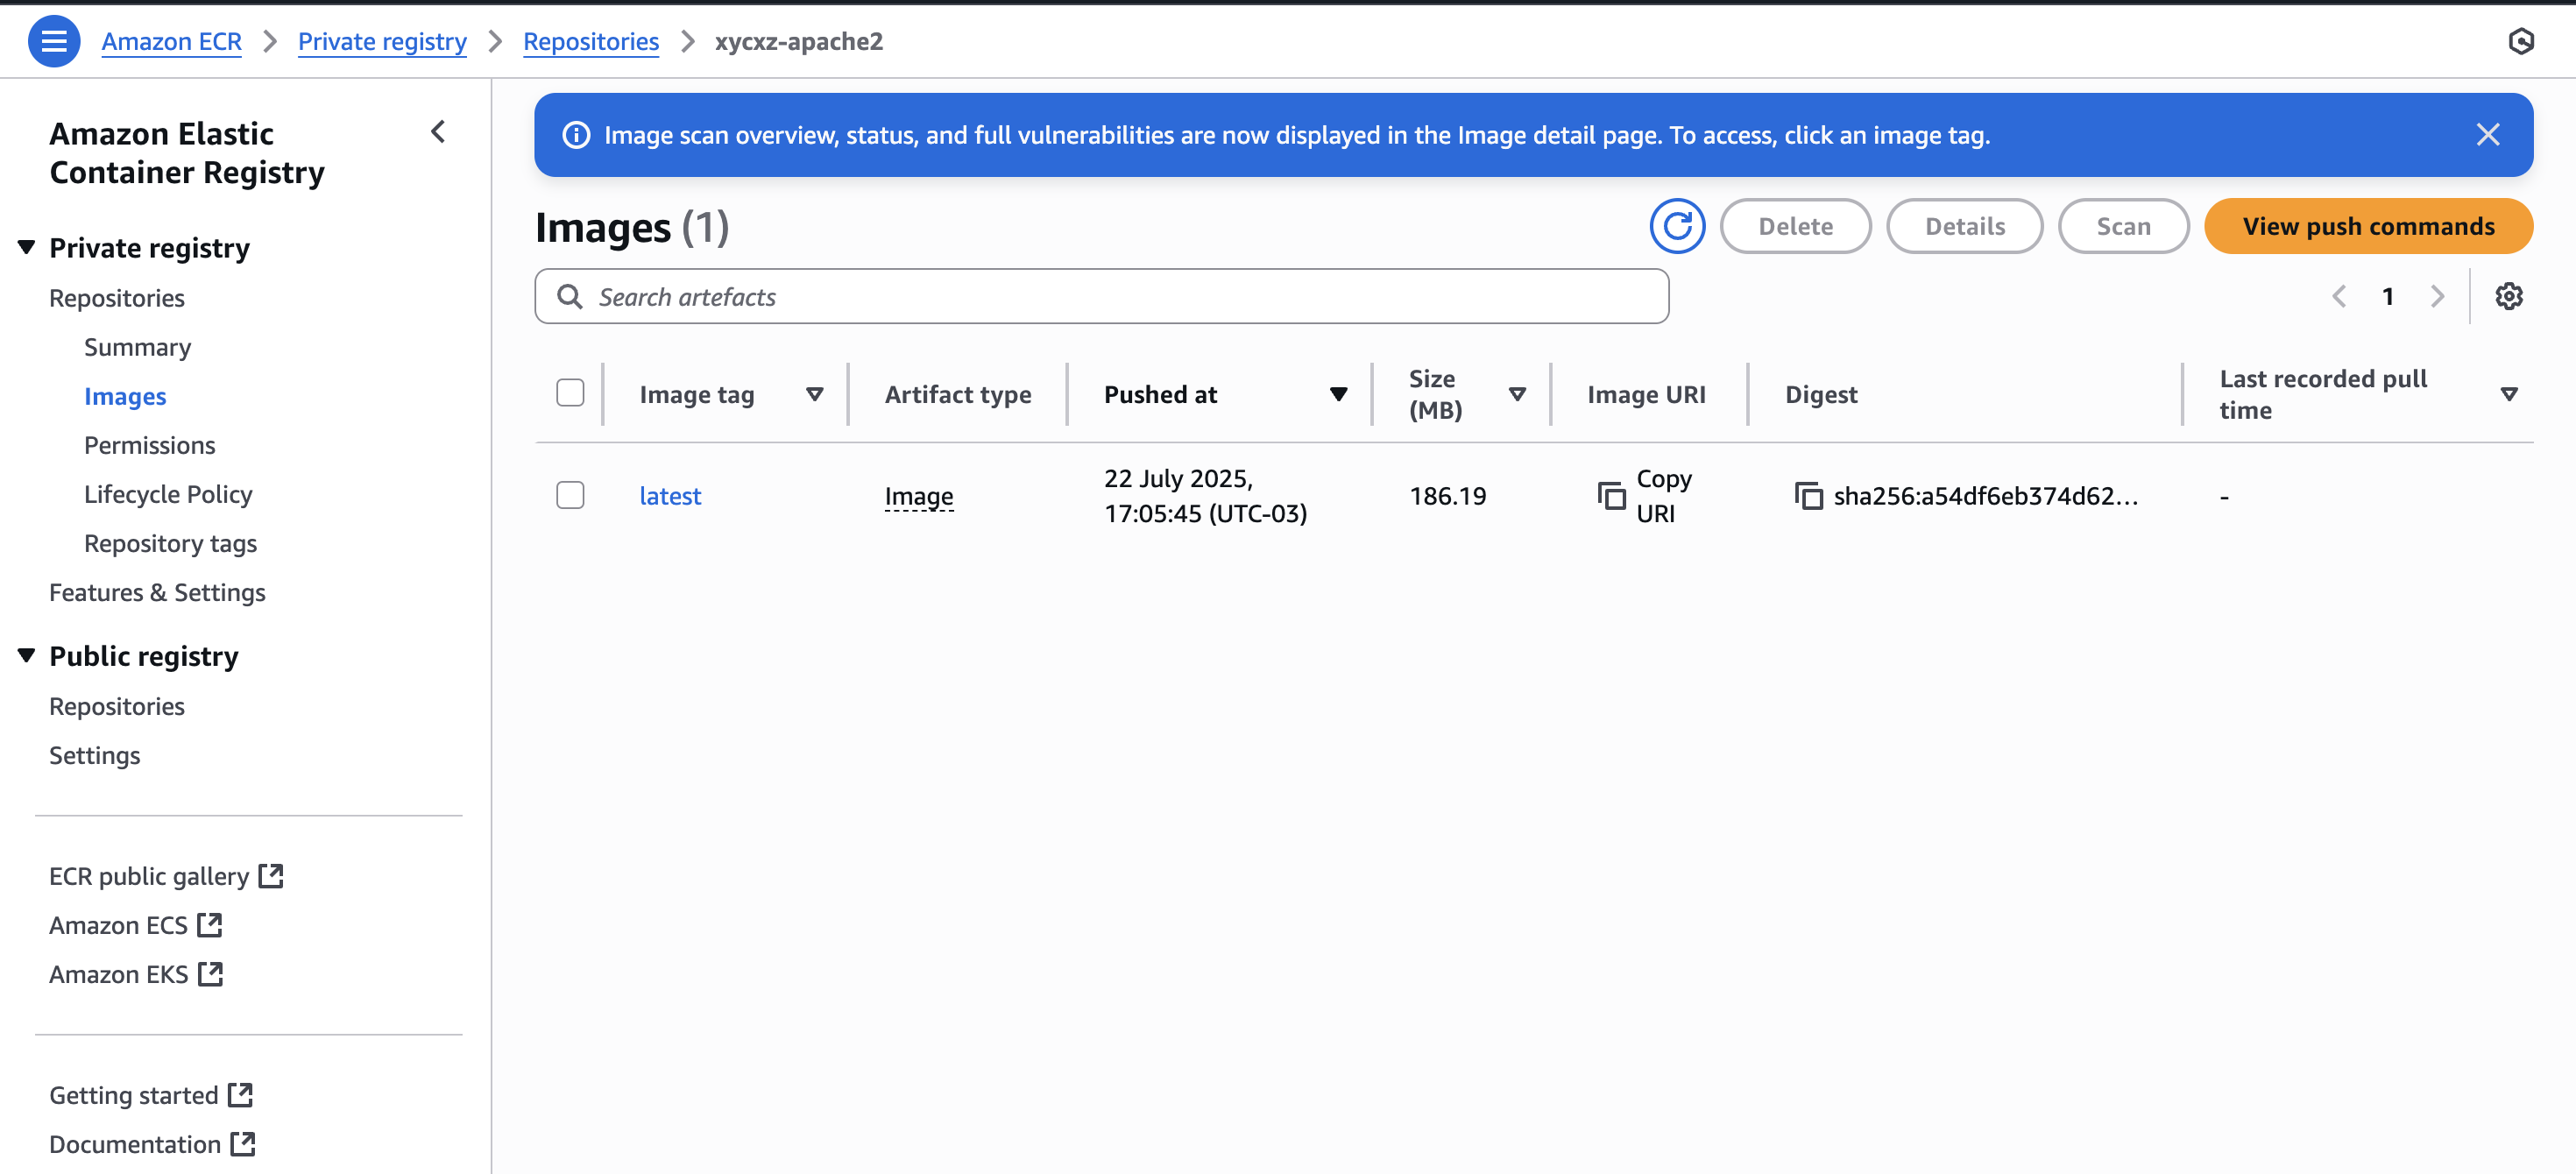
With that being said, now we want to push an image to the created repository. For that, we can go to Private registry -> Images -> View push commands (make sure to fulfil all the requirements):
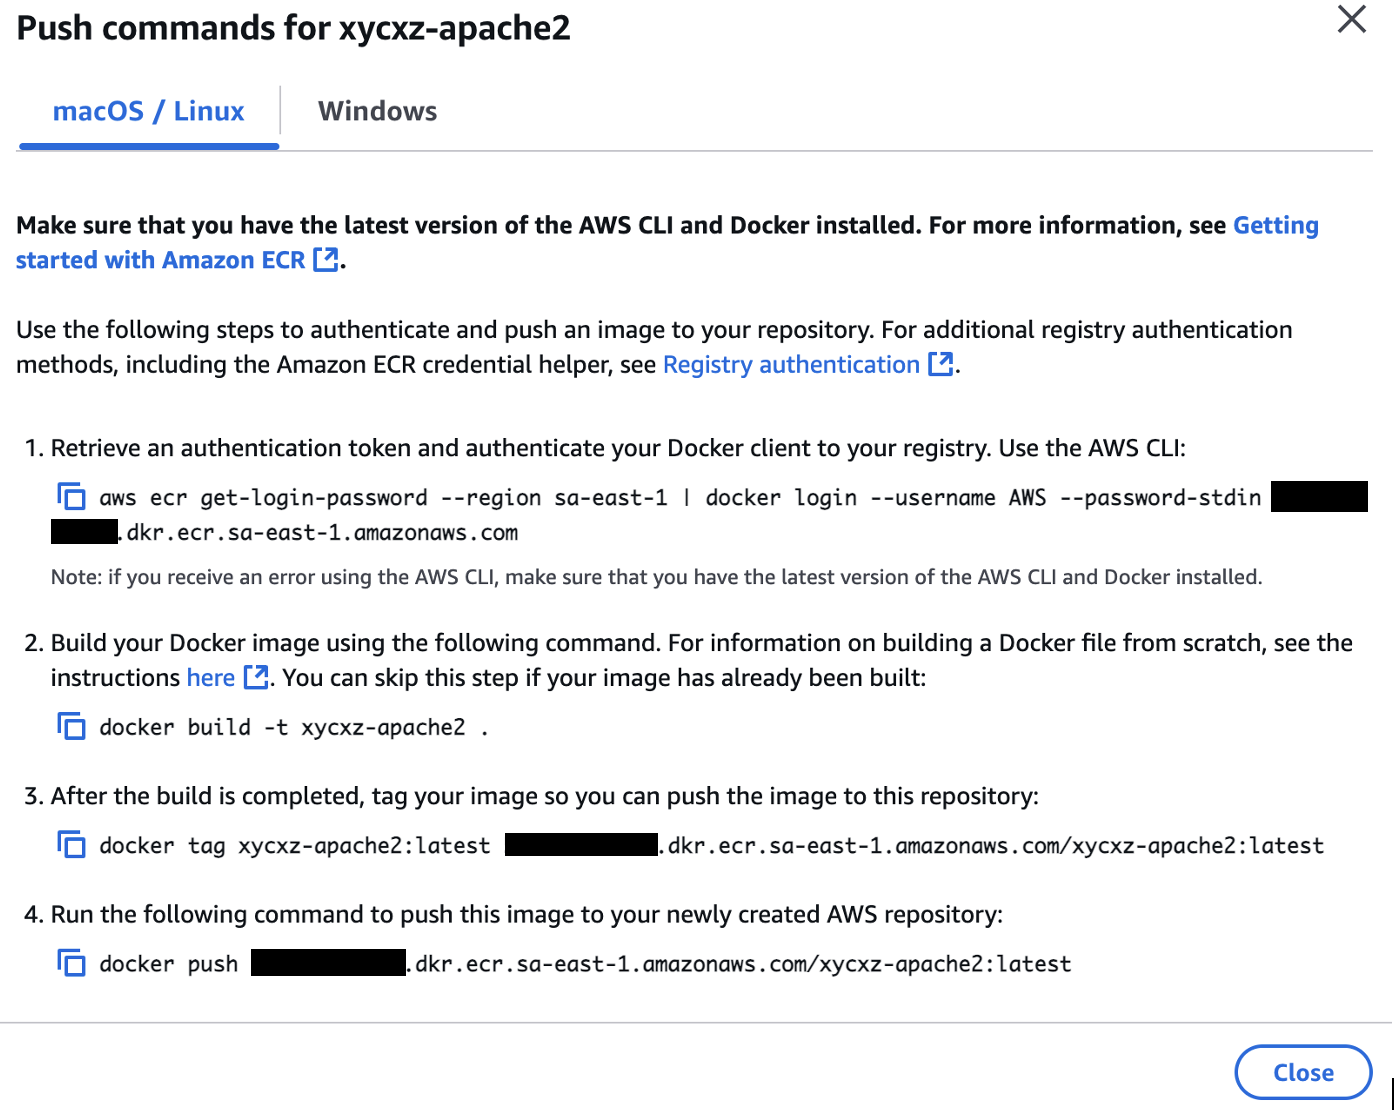
This gives us the commands we need to run to make everything work properly. Just follow the steps and you should be good to go!
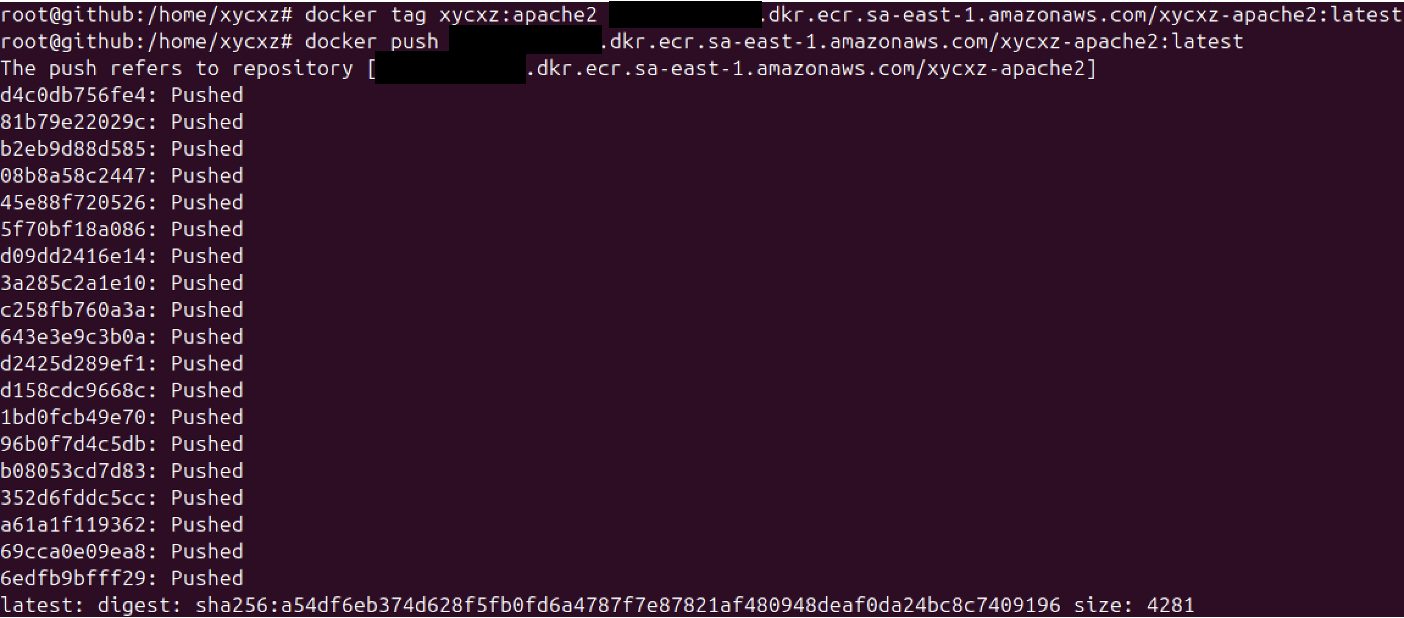
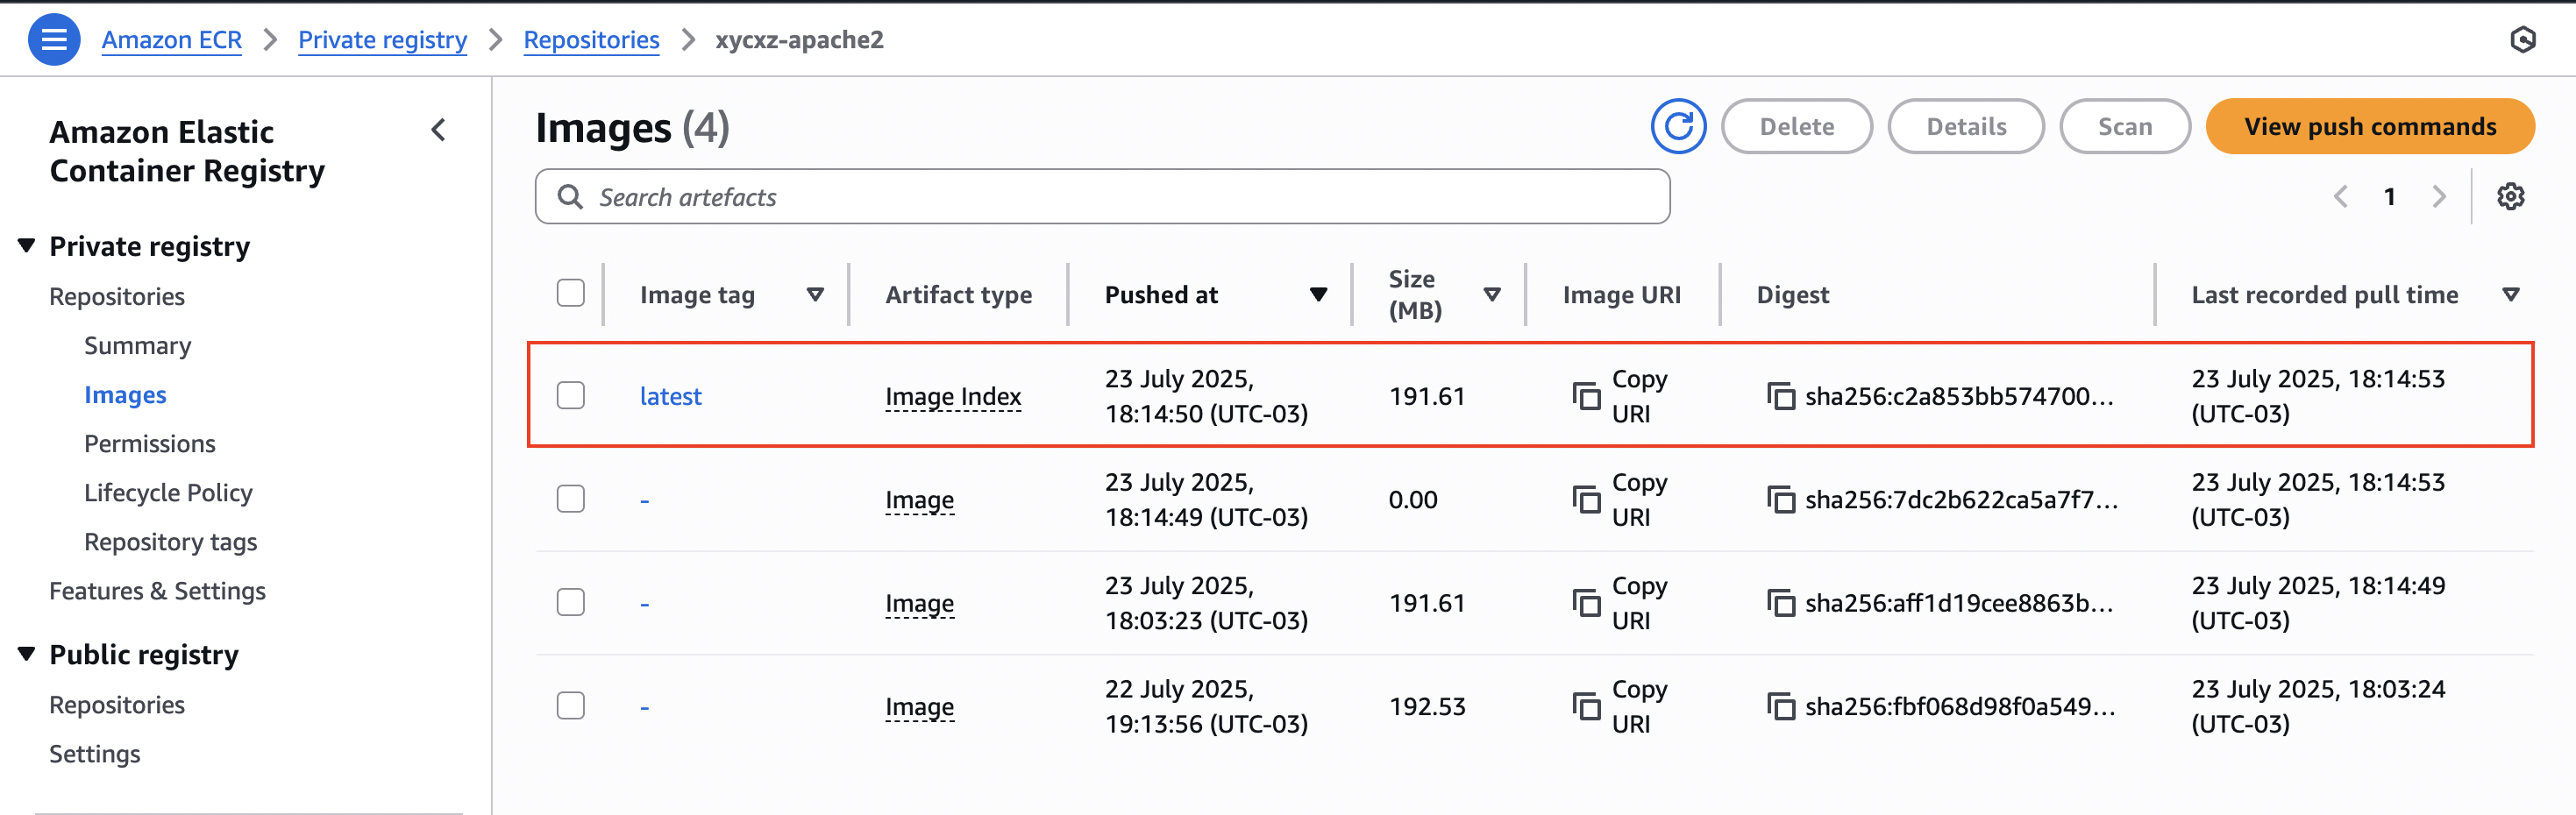
Let’s see if our image got uploaded to the repository:
Deploying to AppRunner
Now that we’ve already pushed our image on our own repository using ECR, we will be exploring how to deploy it using AppRunner. For that, let’s navigate to the AWS App Runner service and click on Create an App Runner service. You should see the configuration shown in the image below:
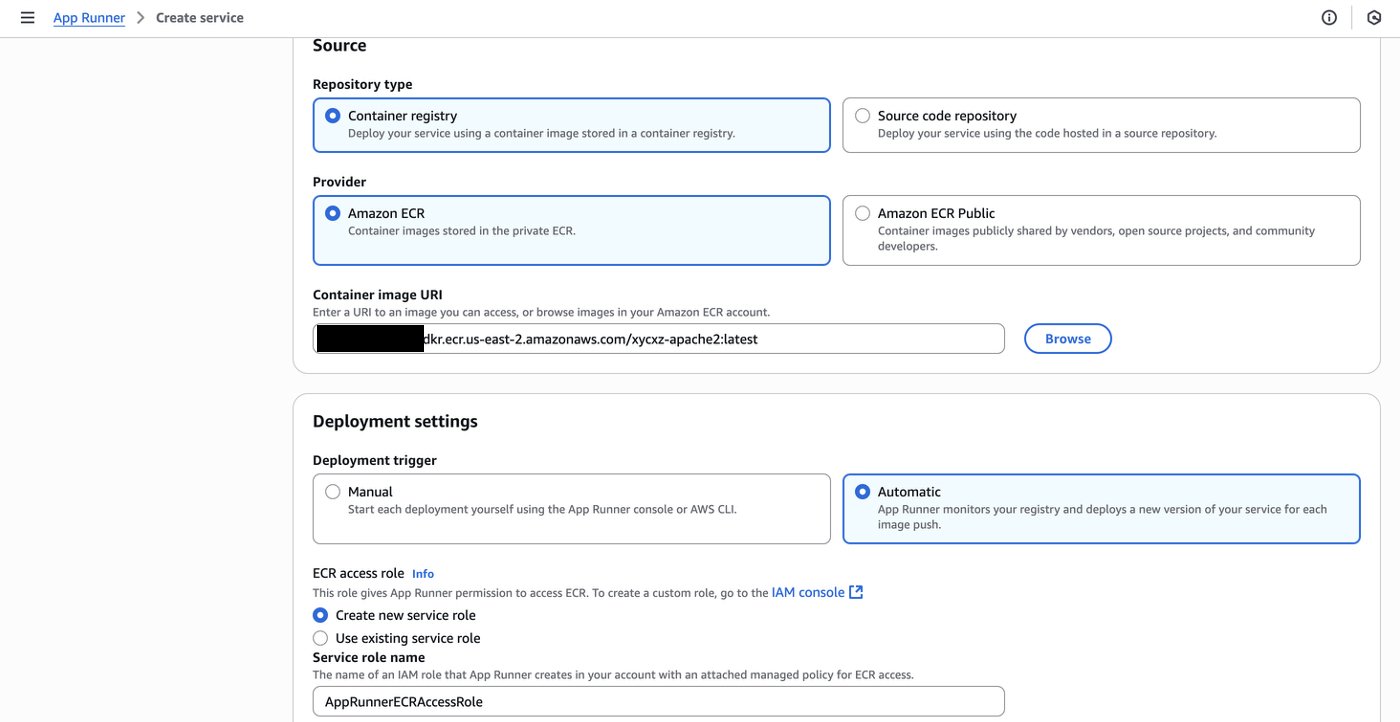
Note: In my case I had to change the region because AppRunner is not supported in South America, but this is not a problem for what I want to show. If that was your problem as well, repeat the steps to create a repository and push the image in one of the available zones.
Set the Deployment settings to Automatic which means that when we push a new image into our repository it will then automatically deploy the new version. The idea of the ECR access role is that we have an AppRunner service that can only access specific repositories and not all of them, which enhances security, enforcing the principle of least privilege.
We can click on Next to configure the service:
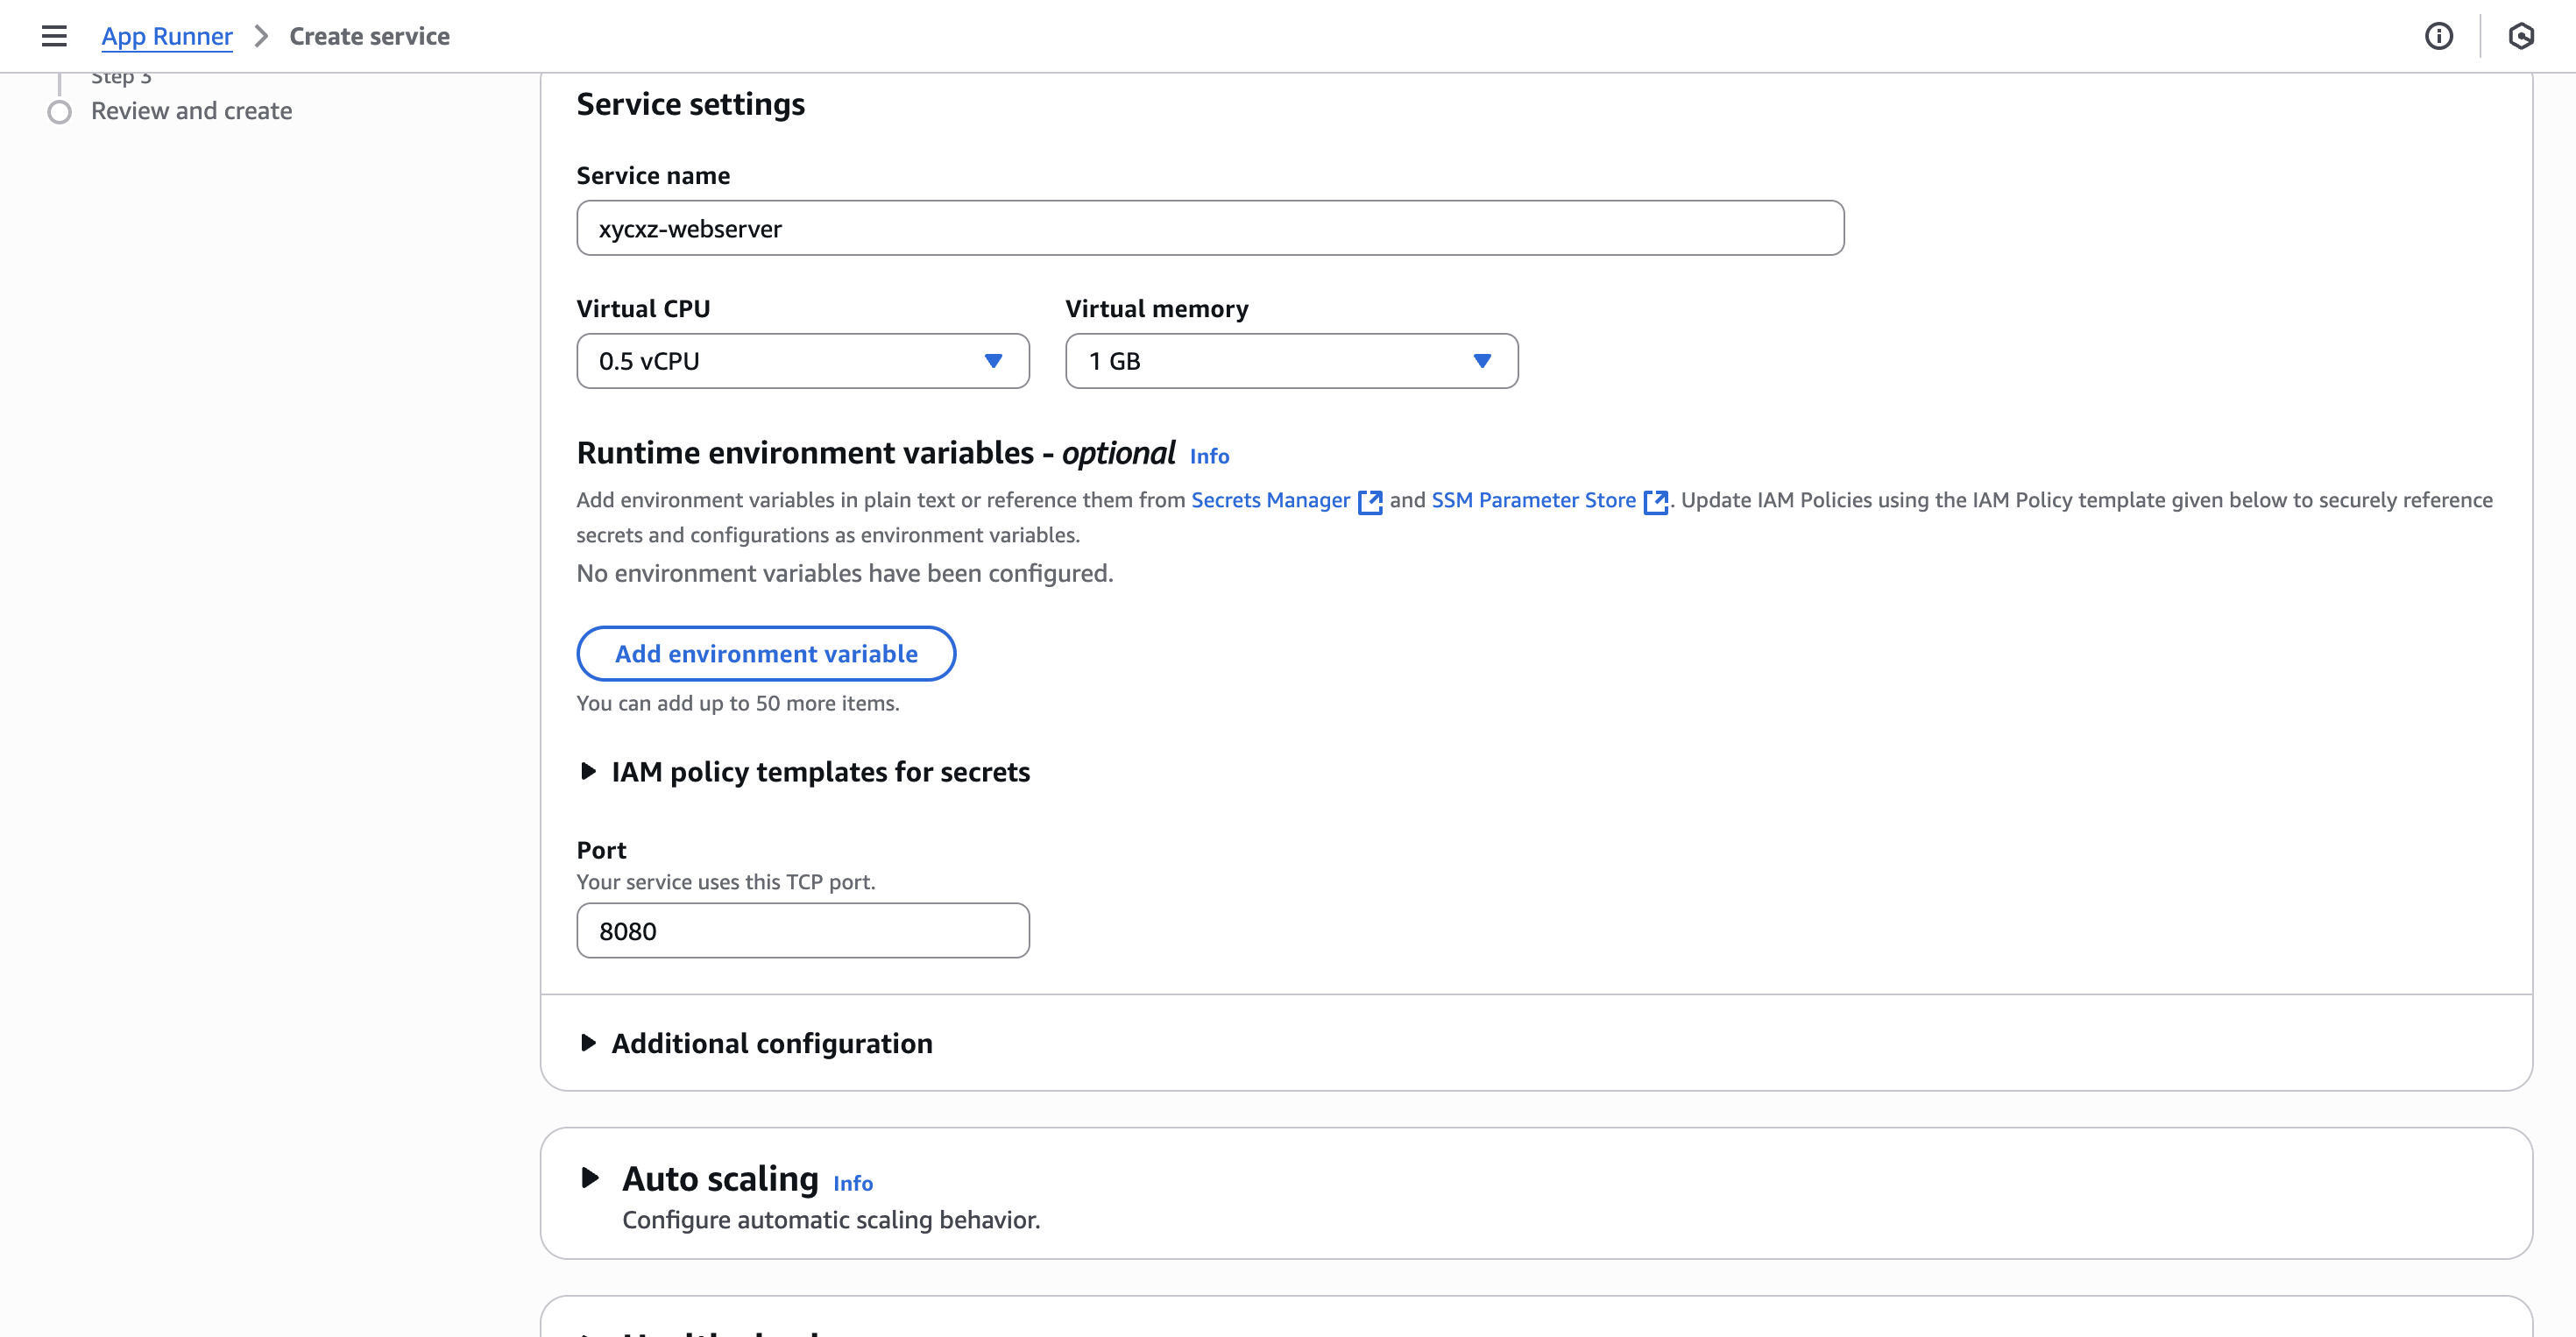
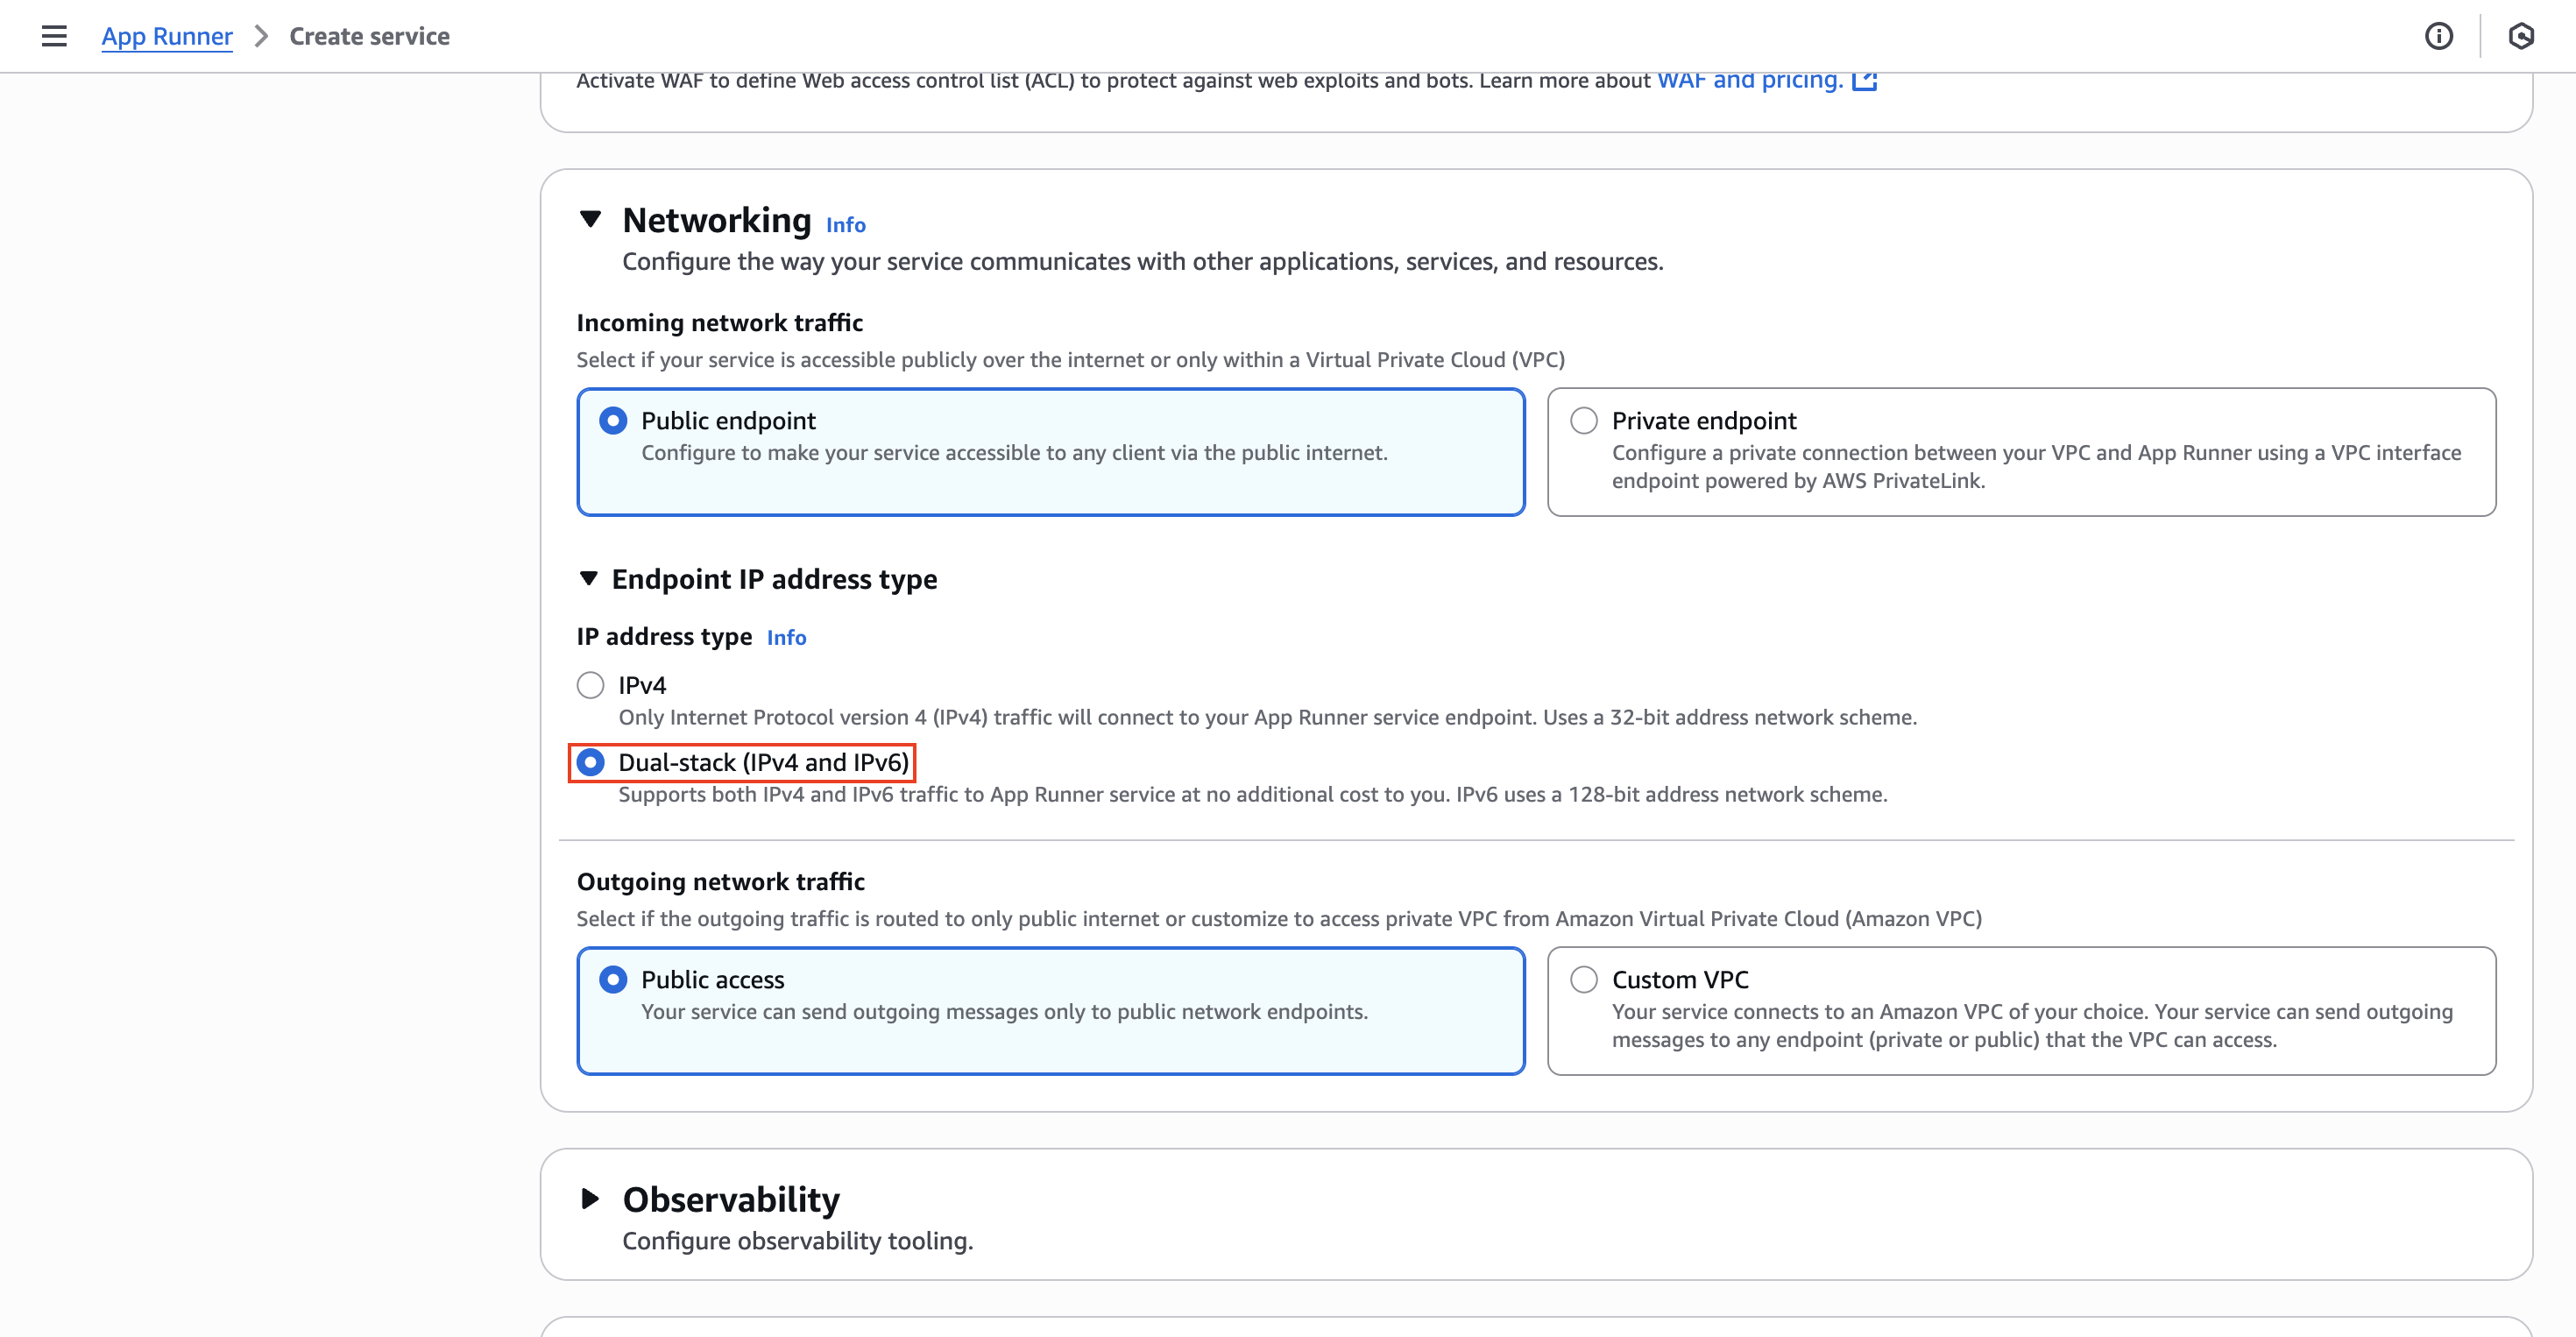
We need to make sure our listening port is the port we initially configured in our web server container (8080), so AppRunner can configure the entire load balancer setup, for example. Additionally, we have to configure our networking settings to accept IPv6 since this is going to be the modern way in the future:
Finally, we can click on Next and then Create & deploy. We will have to wait a bit until the service has been deployed, which can take some time. However, we will see that we get the following error:
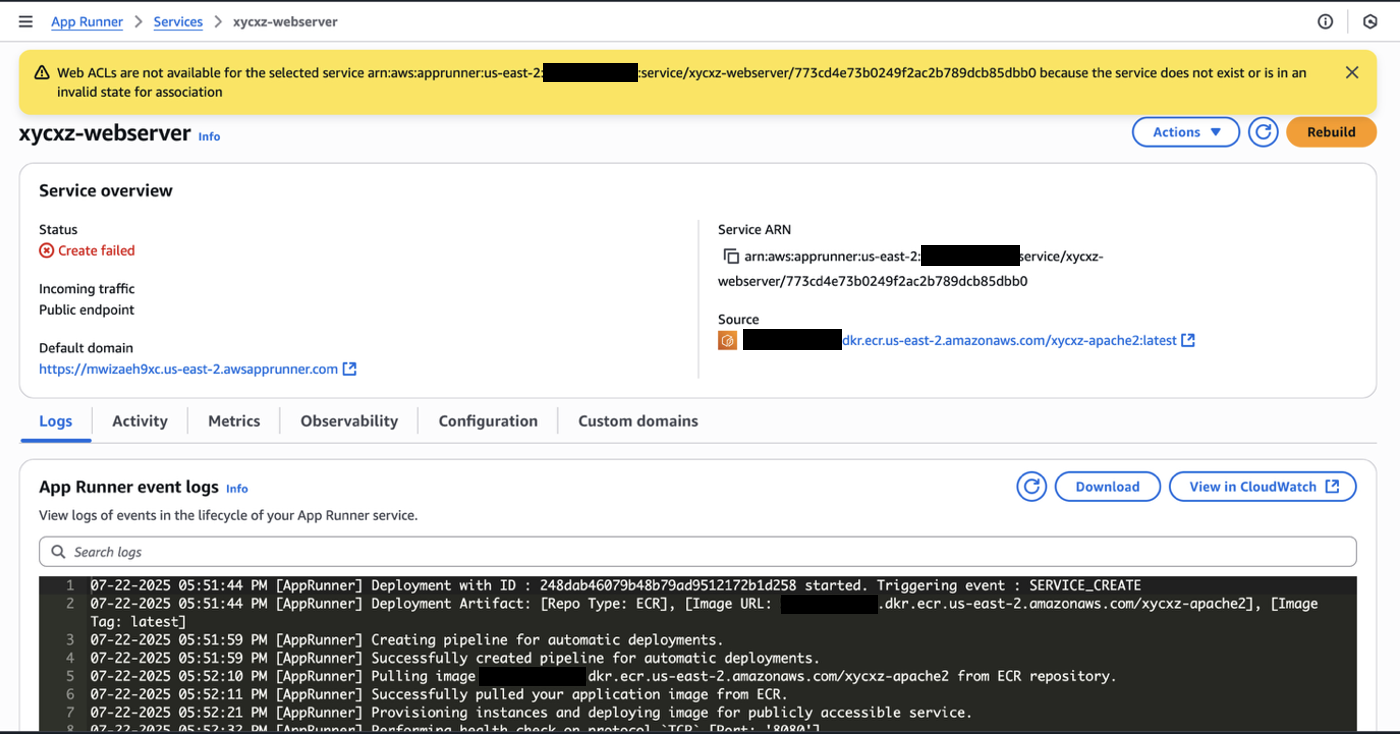
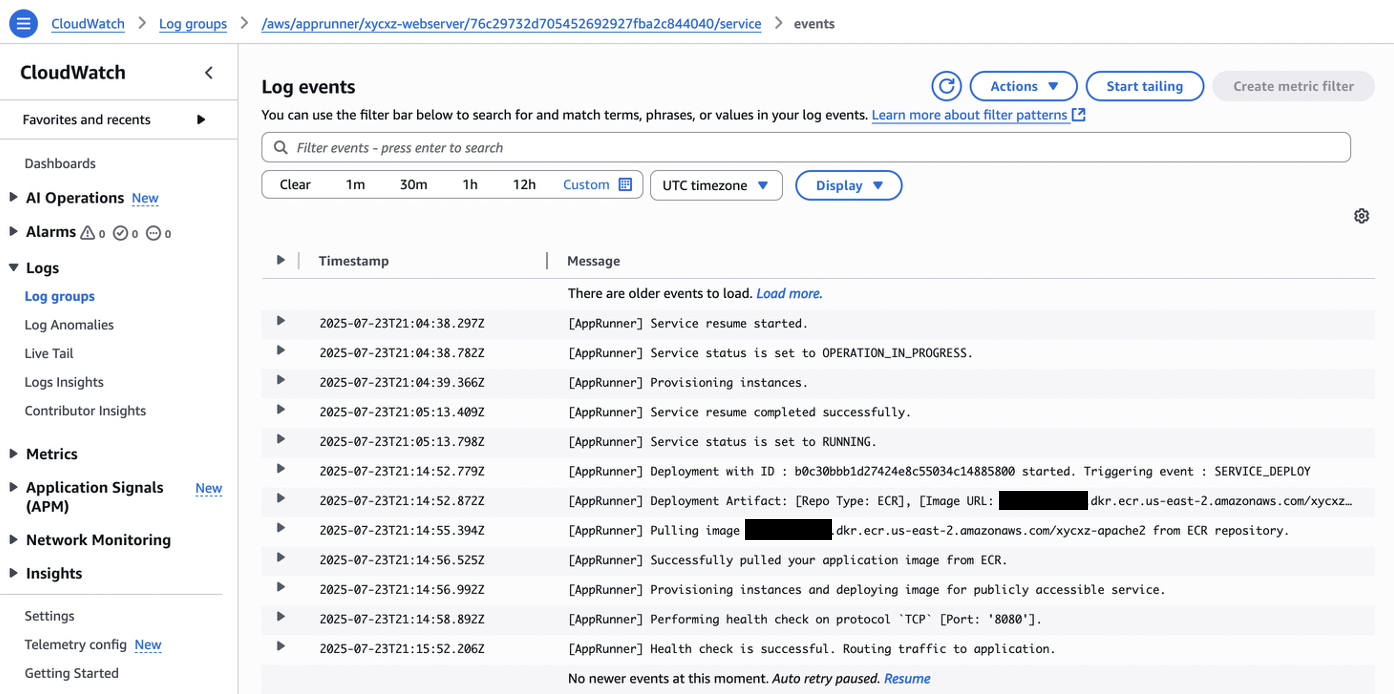
Let’s troubleshoot this together, shall we? The best way is by inspecting the logs by scrolling down and clicking on View in CloudWatch and then Search log group. This will show us the exact place of the issue:
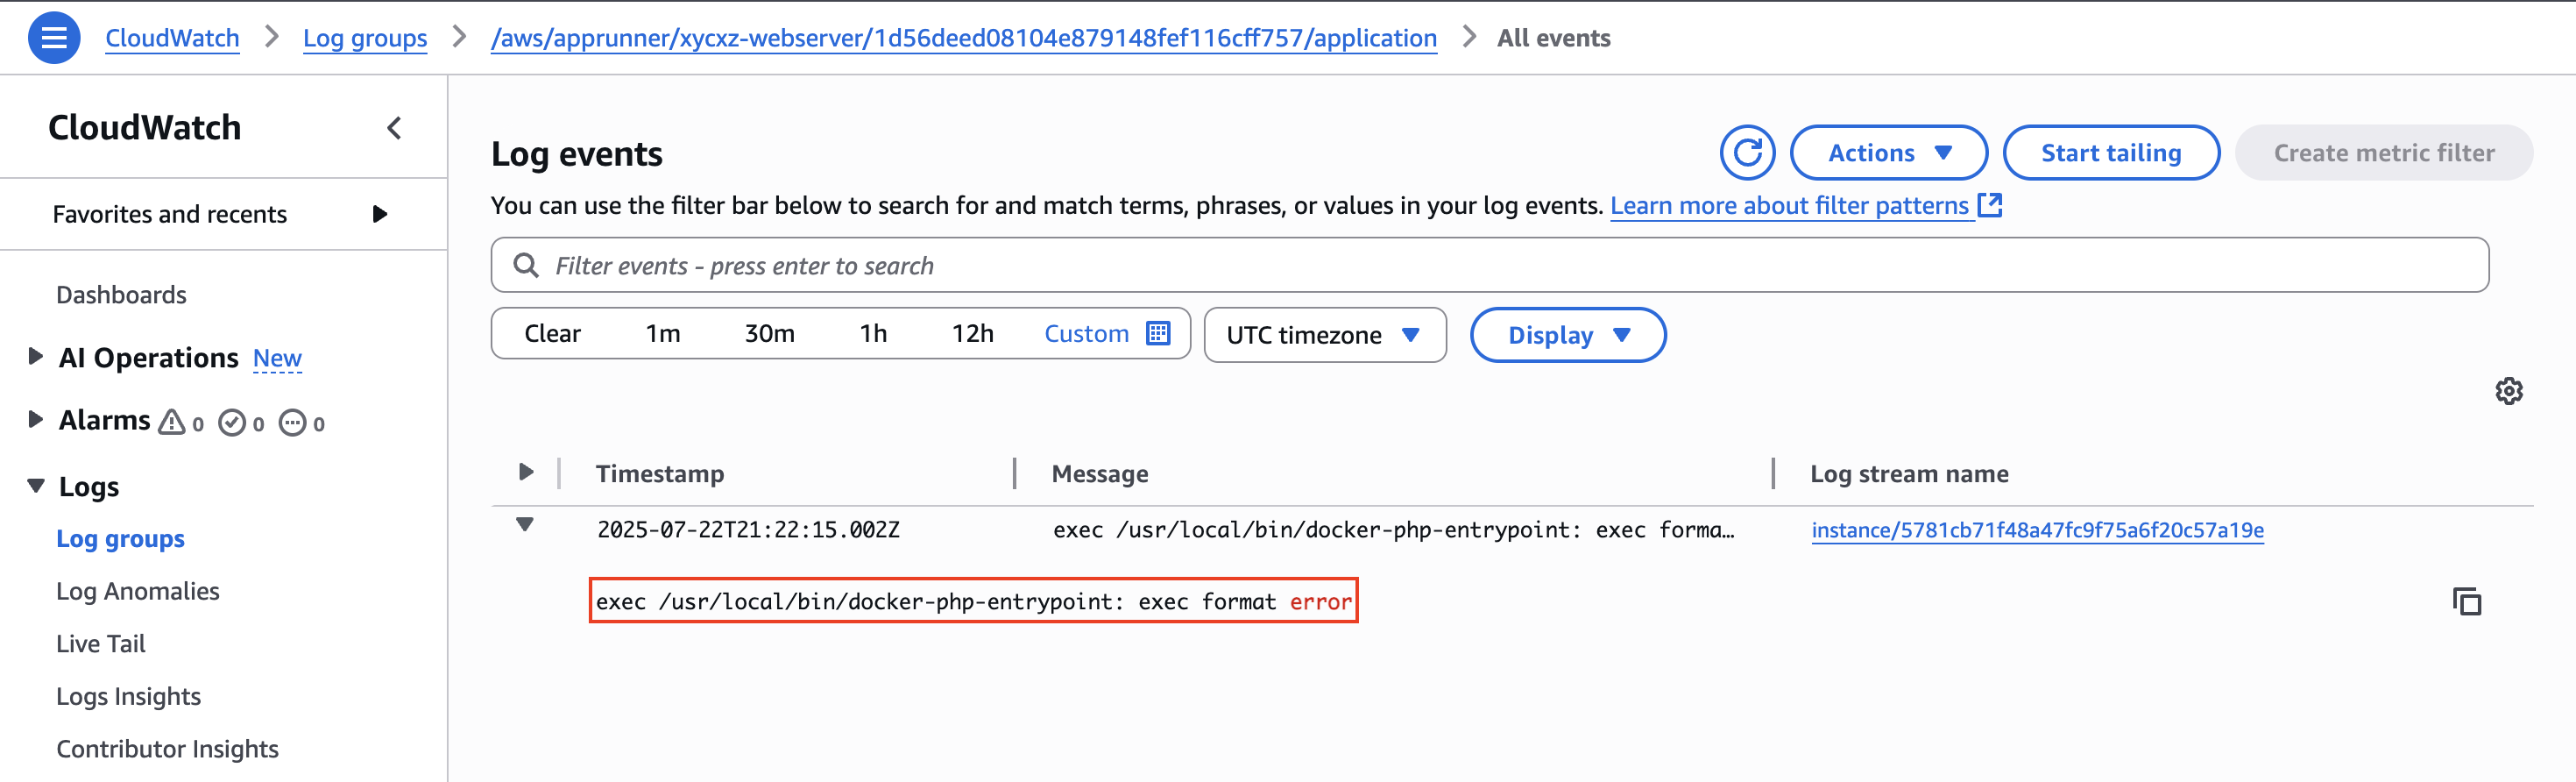
We get a format error, which points to probably issues with the architecture of our container. This makes sense, as my custom image uses the arm64 architecture, while AppRunner supports only amd64 at the time of writing this post.
Let’s delete our image (from the repository) and build it once again with the amd64 architecture. After that, we can push it to the repository and repeat the steps. If you’re a Mac user, you might have to run the following commands:
1
2
3
4
5
6
# Install emulators for other CPU architectures
docker run --privileged --rm tonistiigi/binfmt --install all
# Create a new builder instance that can use these emulators
docker buildx create --name mybuilder --use
# Build the image for the specified platform (amd64)
docker buildx build --platform linux/amd64 -t xycxz-apache2-amd <REPOSITORY_LOCATION>
Now repeat the steps above and deploy the application once again:
Connecting our Domain to AppRunner
When deploying our container using AppRunner, we saw that the default domain in which is served is kind of a mess. Fortunately, because everything is integrated, we can simply look for our registered domain and link it to the application we just created.
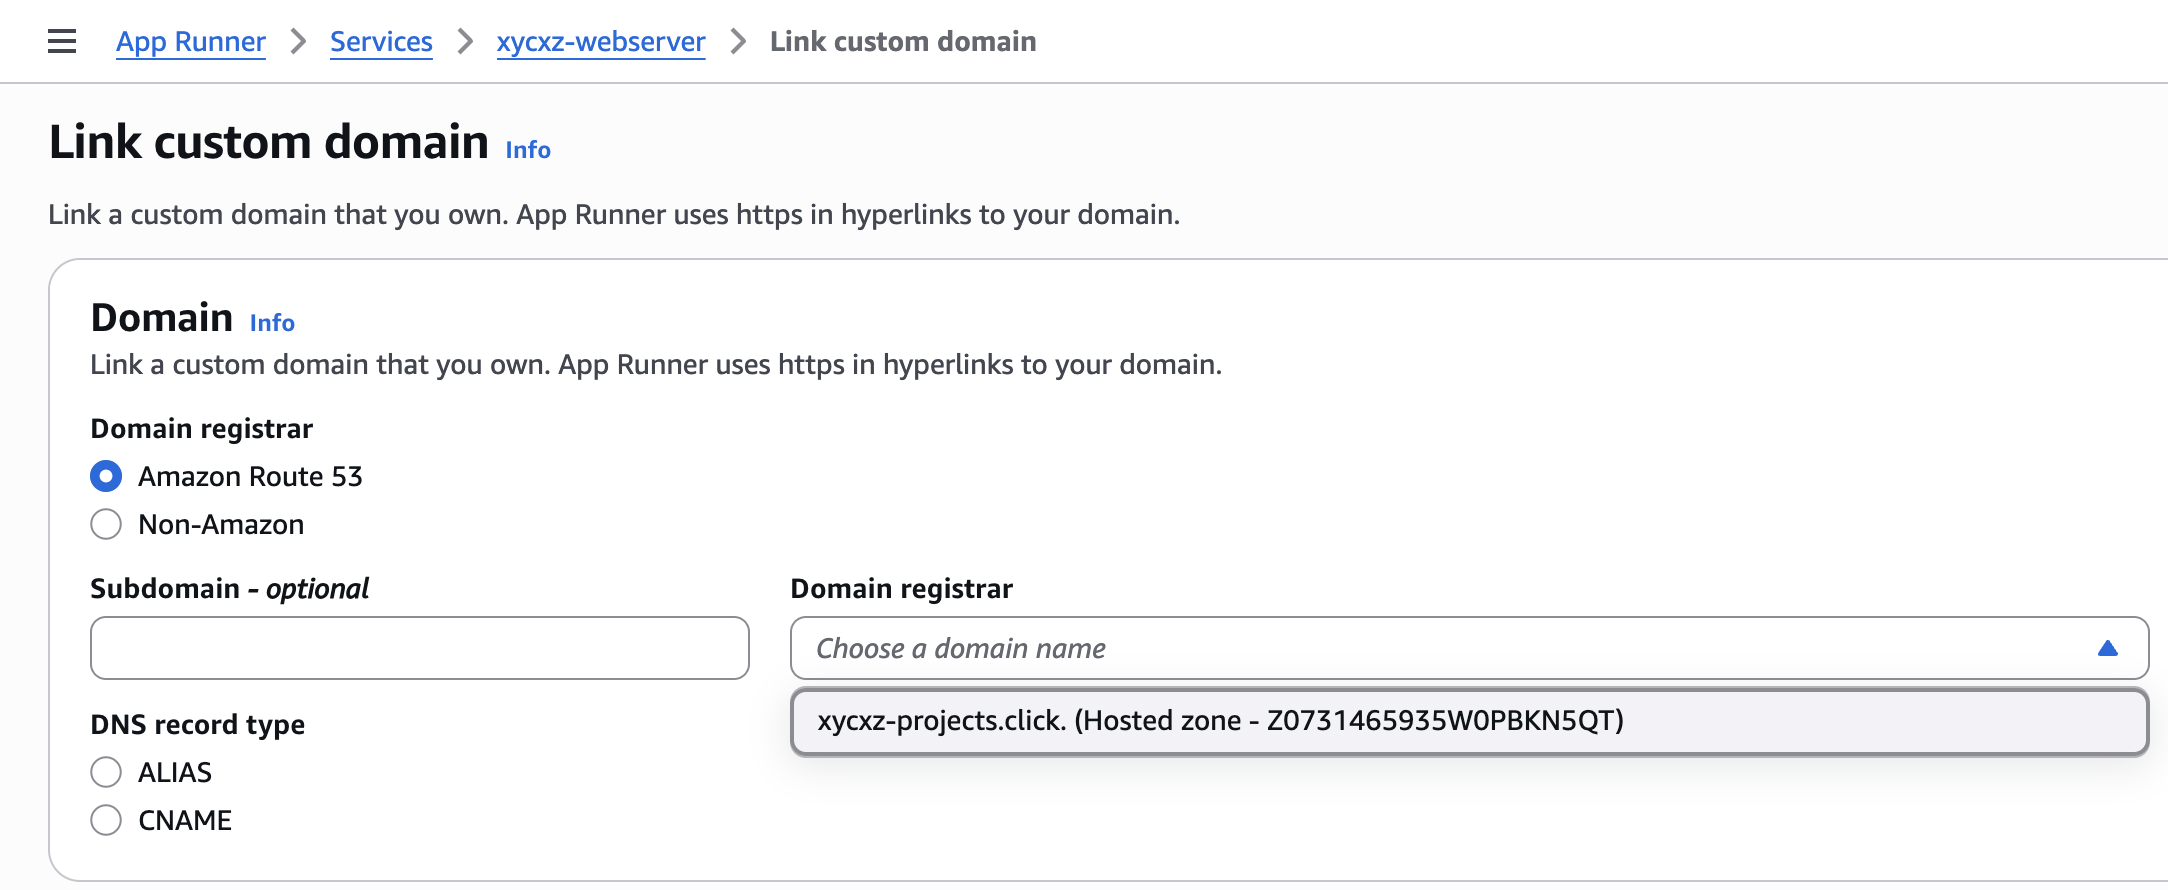
For that we have to navigate to our created service and then click on Custom domains -> Link domain:
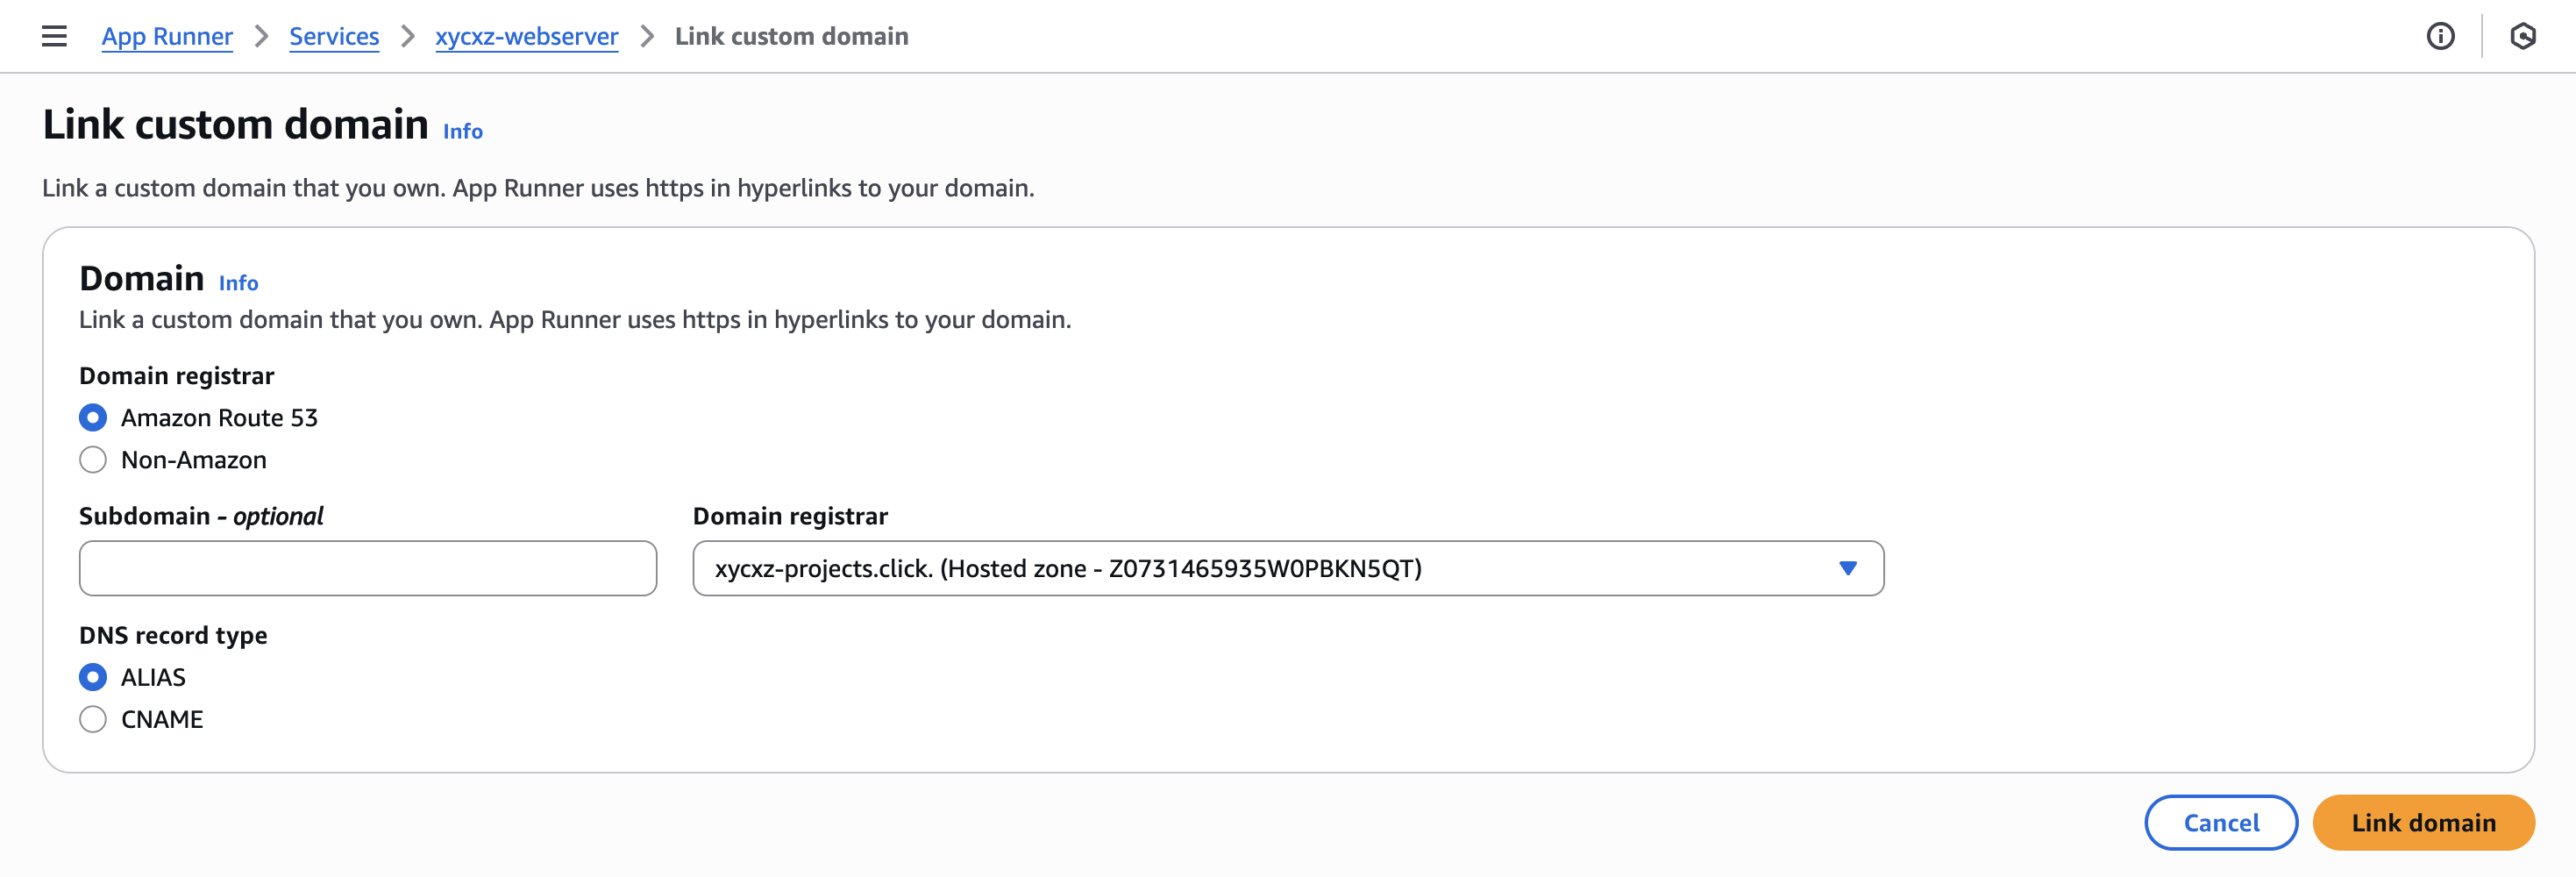
We choose the DNS record type to be ALIAS because this will directly point to the correct IP address and it is the most straightforward approach. Note that ALIAS is an internal AWS record type so for all other domains only CNAME would be supported:

Here we get this error because our domain is already linked with our EC2 instance. We will have to remove the A records that points to it in the Route 53 dashboard so we can link our AppRunner without any issues:
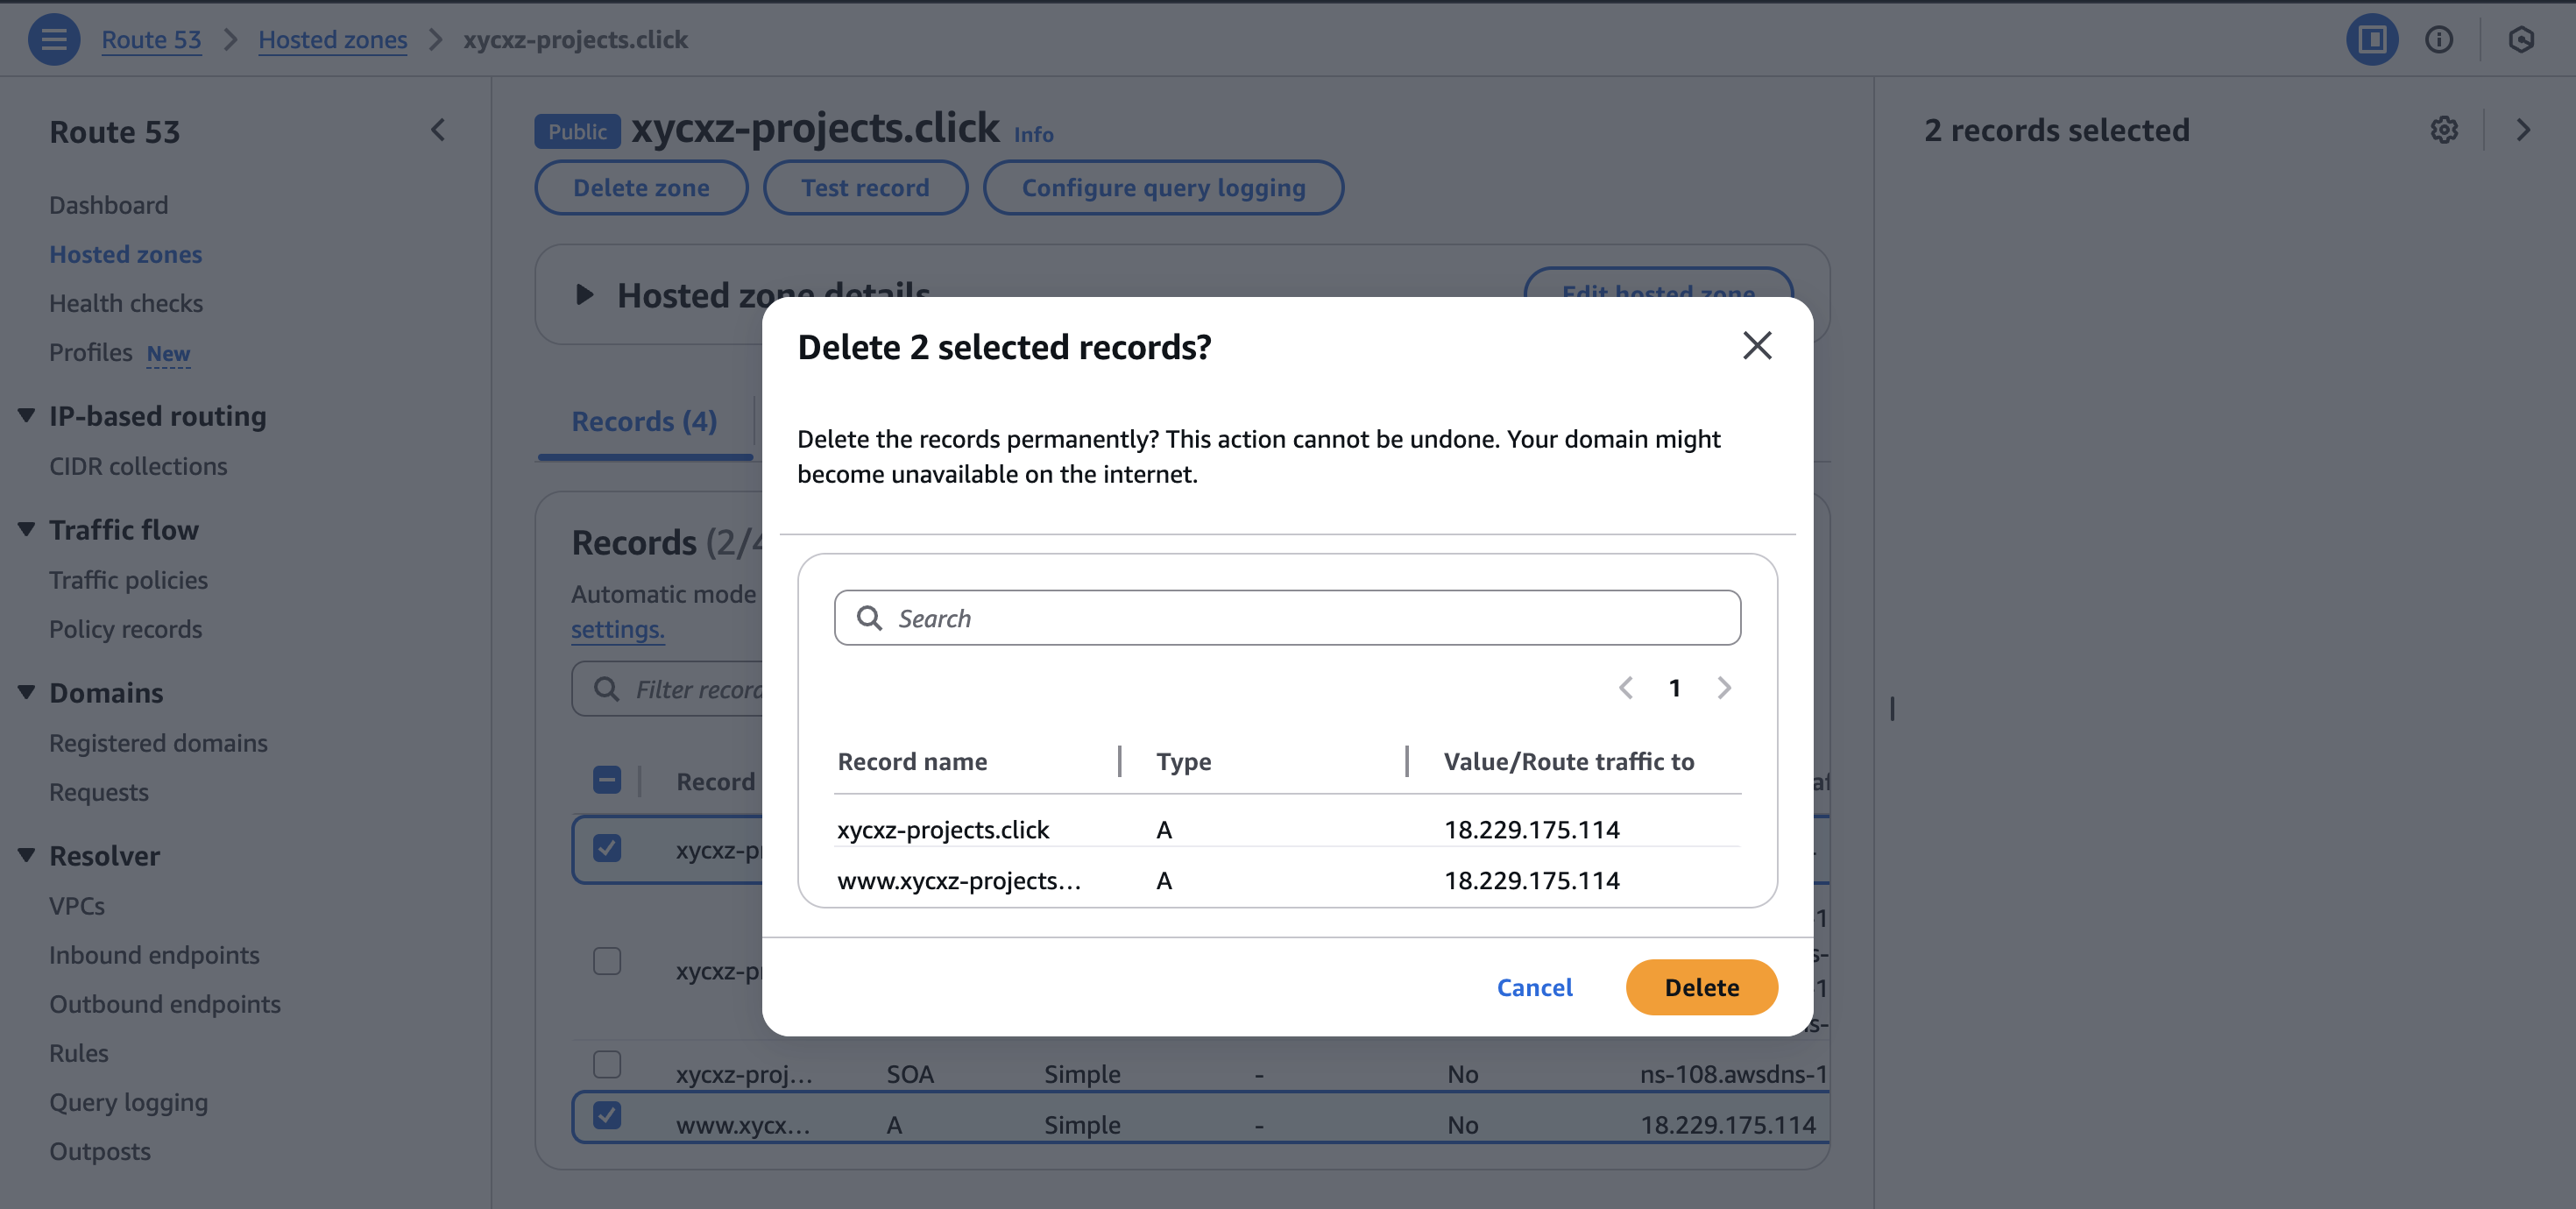
Note: If we try linking the AppRunner before deleting the A records, we will have to unlink the domain (it will be shown a checkbox when going back to Custom domains). Also, make sure that no DNS records were generated and if they did, delete the A and CNAME ones.
Now we can start linking our application to our domain:
Note: Bear in mind that for it to get activated, it can take a while.
Connecting the Domain with our ‘www’ Subdomain
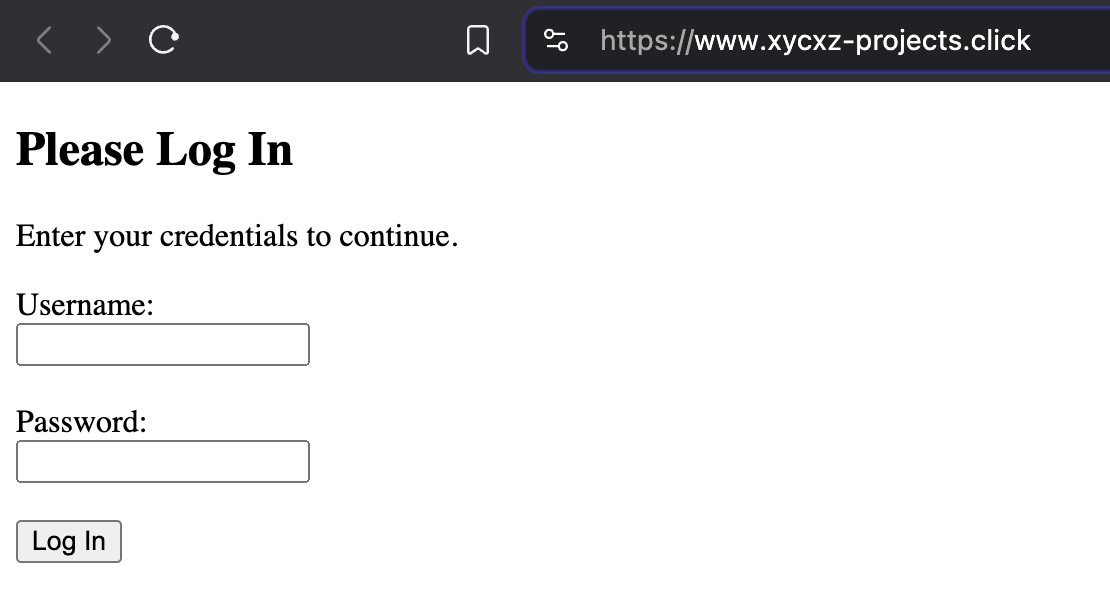
So far, we were able to link our domain with the application. However, when we try navigating to the www subdomain we will see that it gives us an error. This is because the application is currently configured to work with the main domain only, and we already know that subdomains work entirely independently from it. In here we will explore how to also link the application to our subdomain.
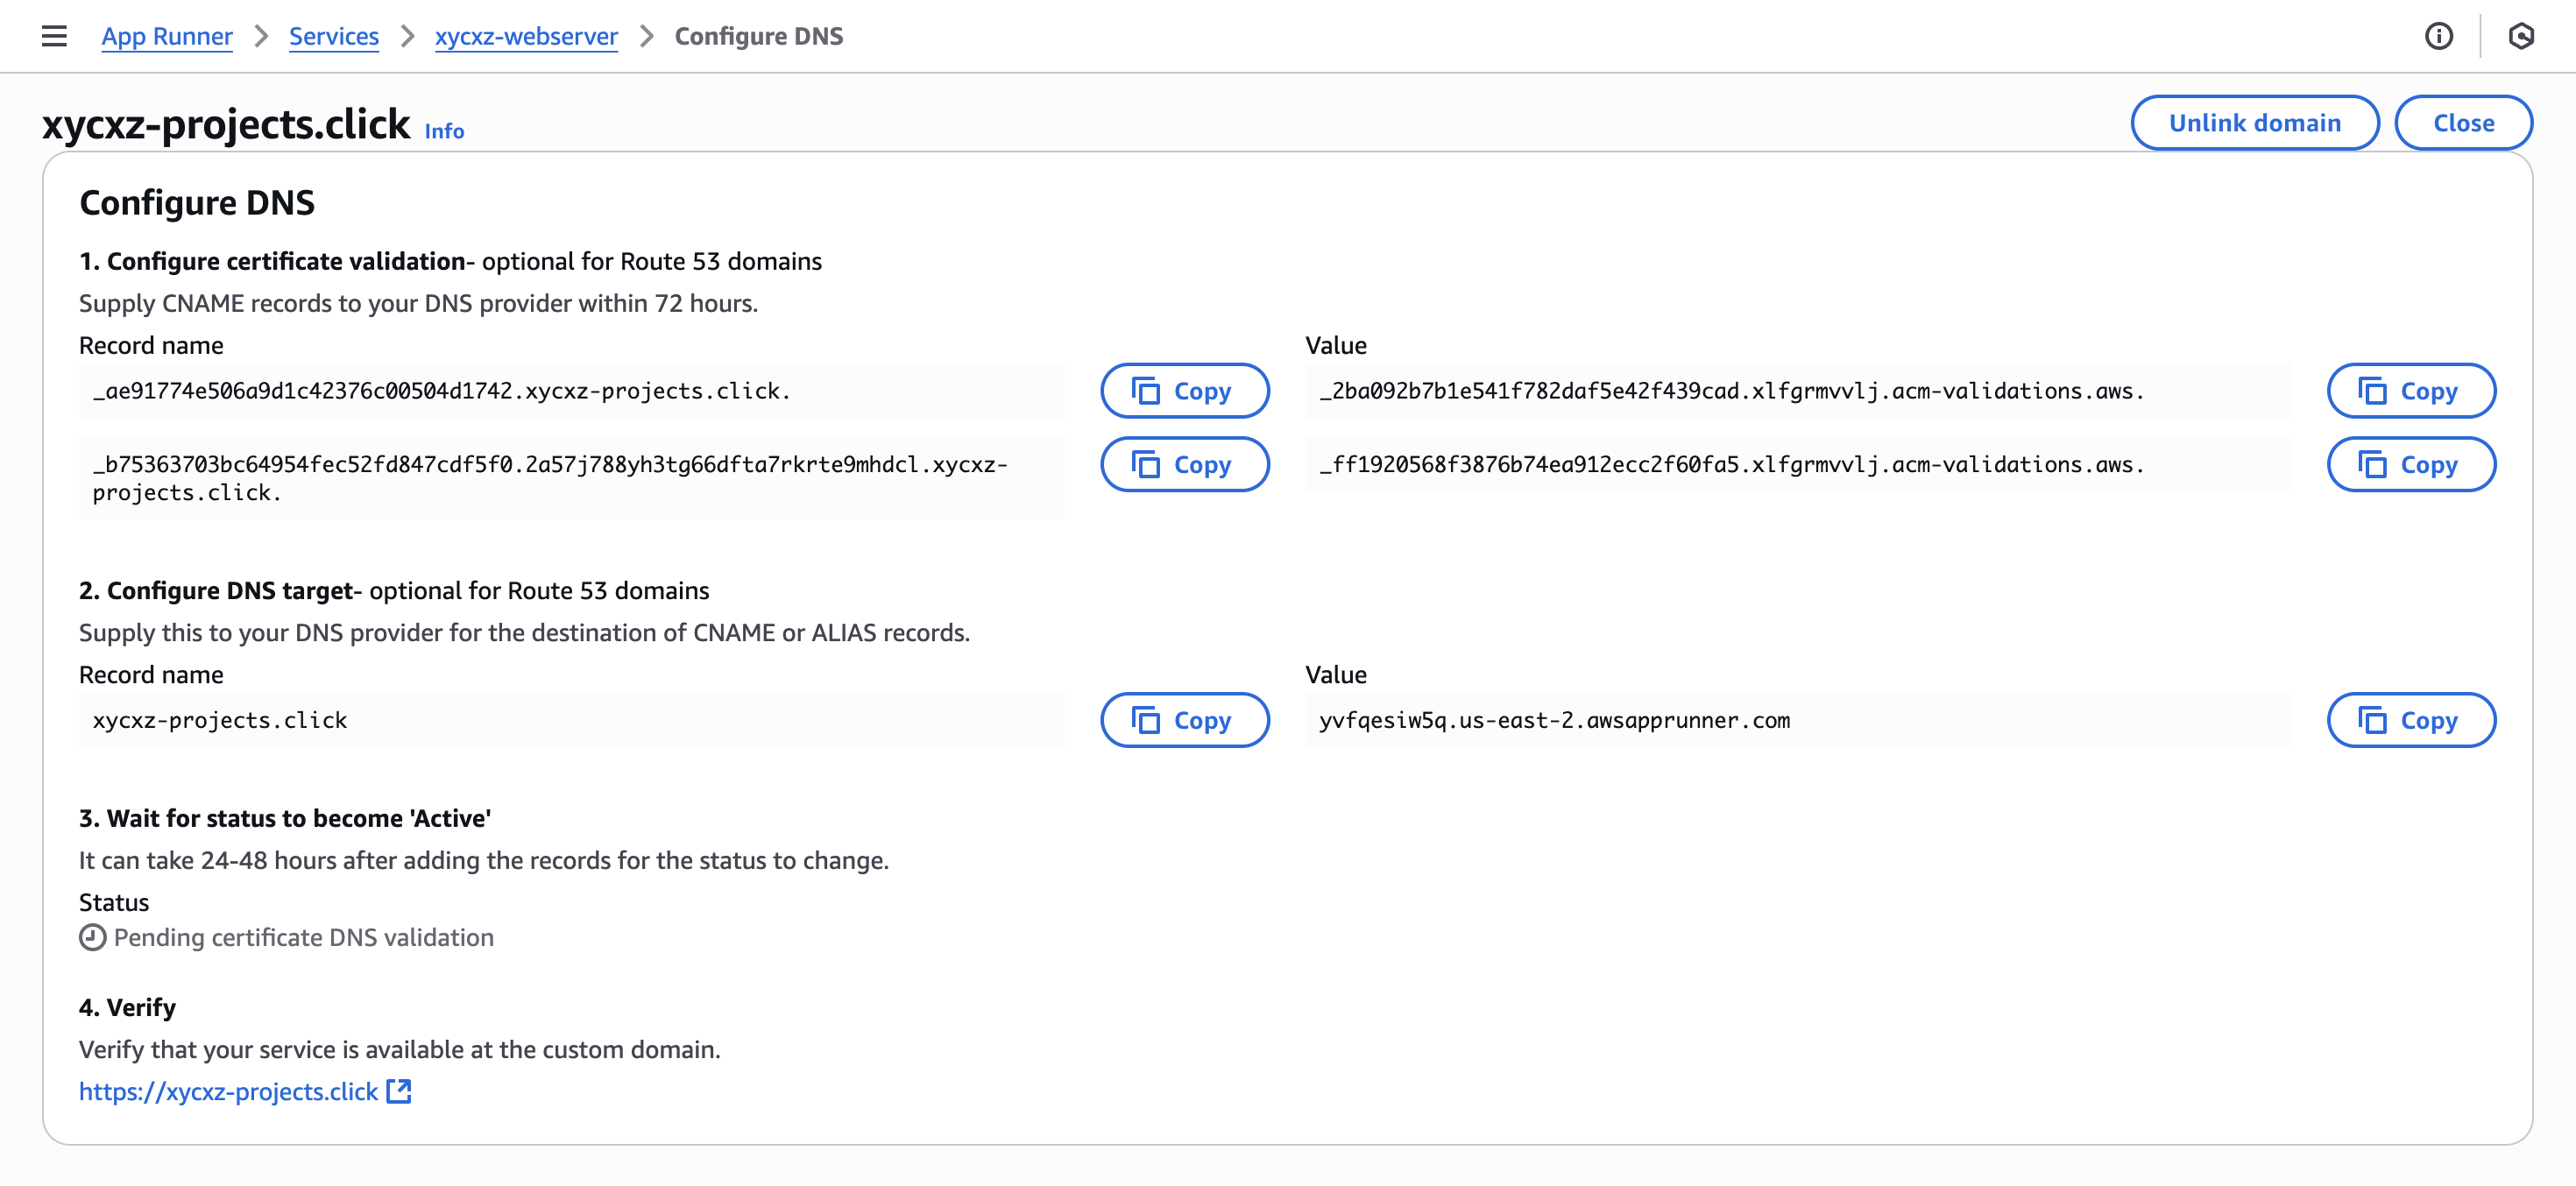
We would have to add the subdomain using the Custom domains option we’ve seen before as a separate entry so that everything works properly with the HTTPS certificate managed by AppRunner. However, when we try linking our subdomain we will see that we don’t have the option available:
Nevertheless, we can see that the dropdown is providing us with something called Hosted zone. This means that we will have to add our subdomain here to make sure it will appear in this menu. For that, let’s go back to the Route 53 dashboard to do this.
We have to click on Hosted zones -> Create hosted zone and introduce the name of our subdomain:

Now we will be able to see our subdomain in the hosted zones. Nevertheless, the setup does not finish here. We have to inspect our new subdomain’s NS records and copy them, because it isn’t yet connected to our main domain:
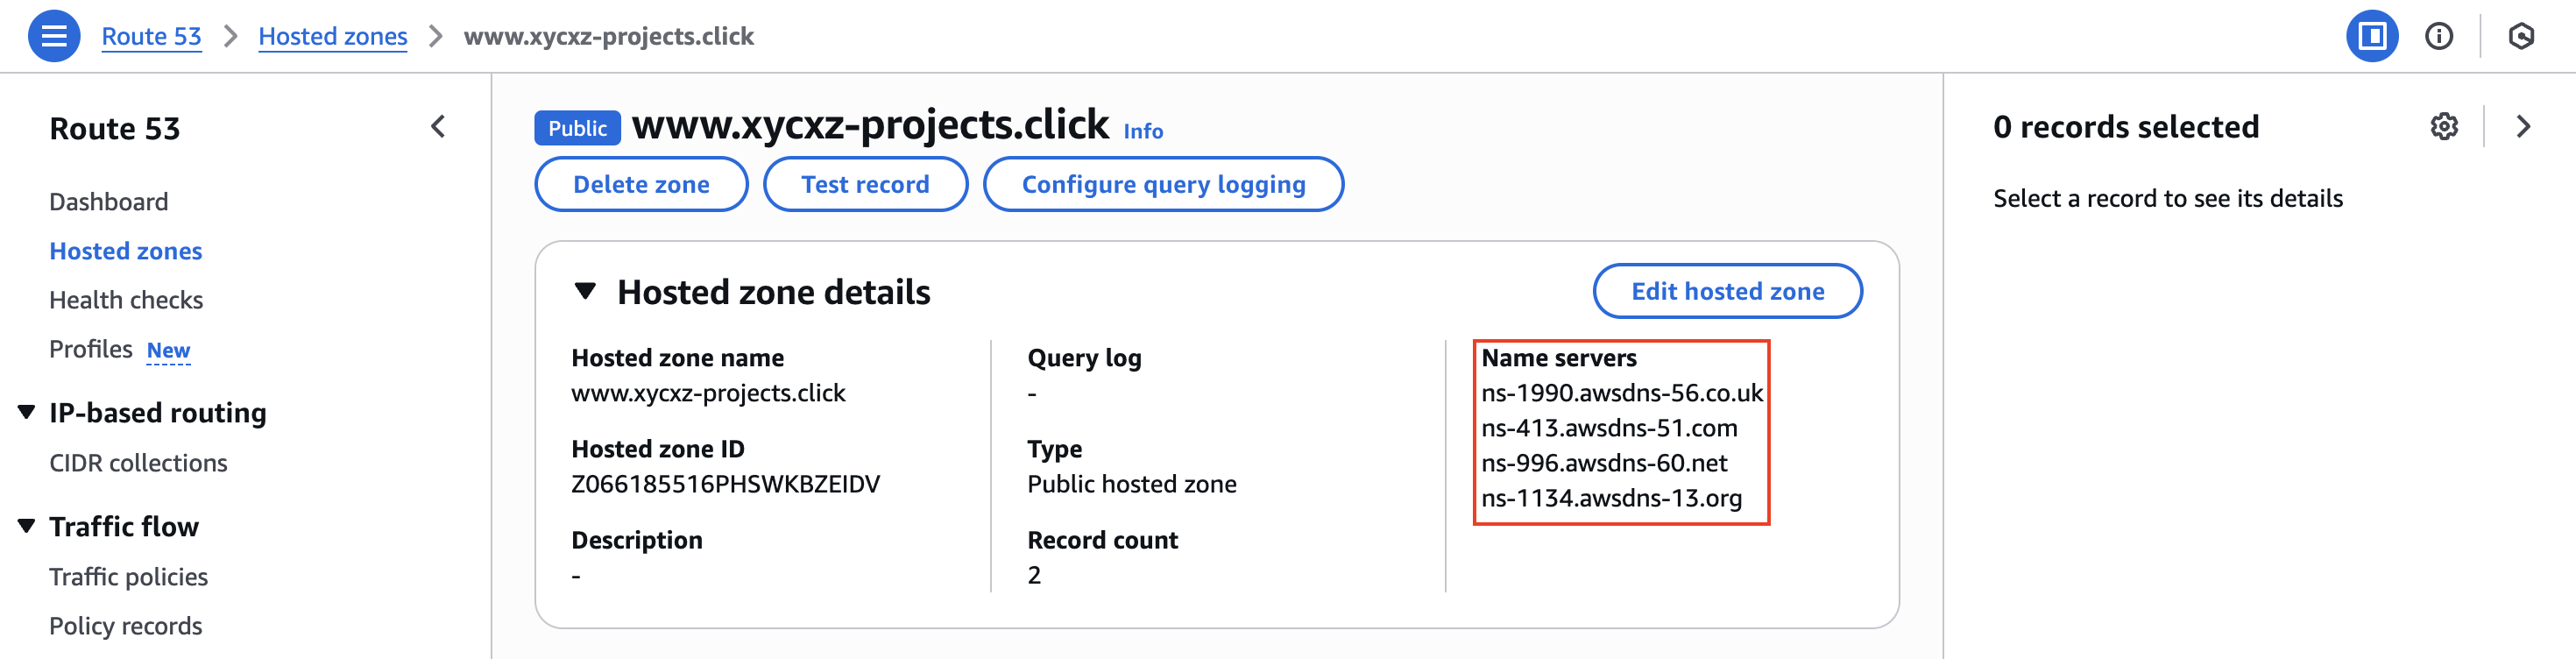
To connect the subdomain with our domain, we have to navigate to our main domain and then click on Create record -> Quick create:
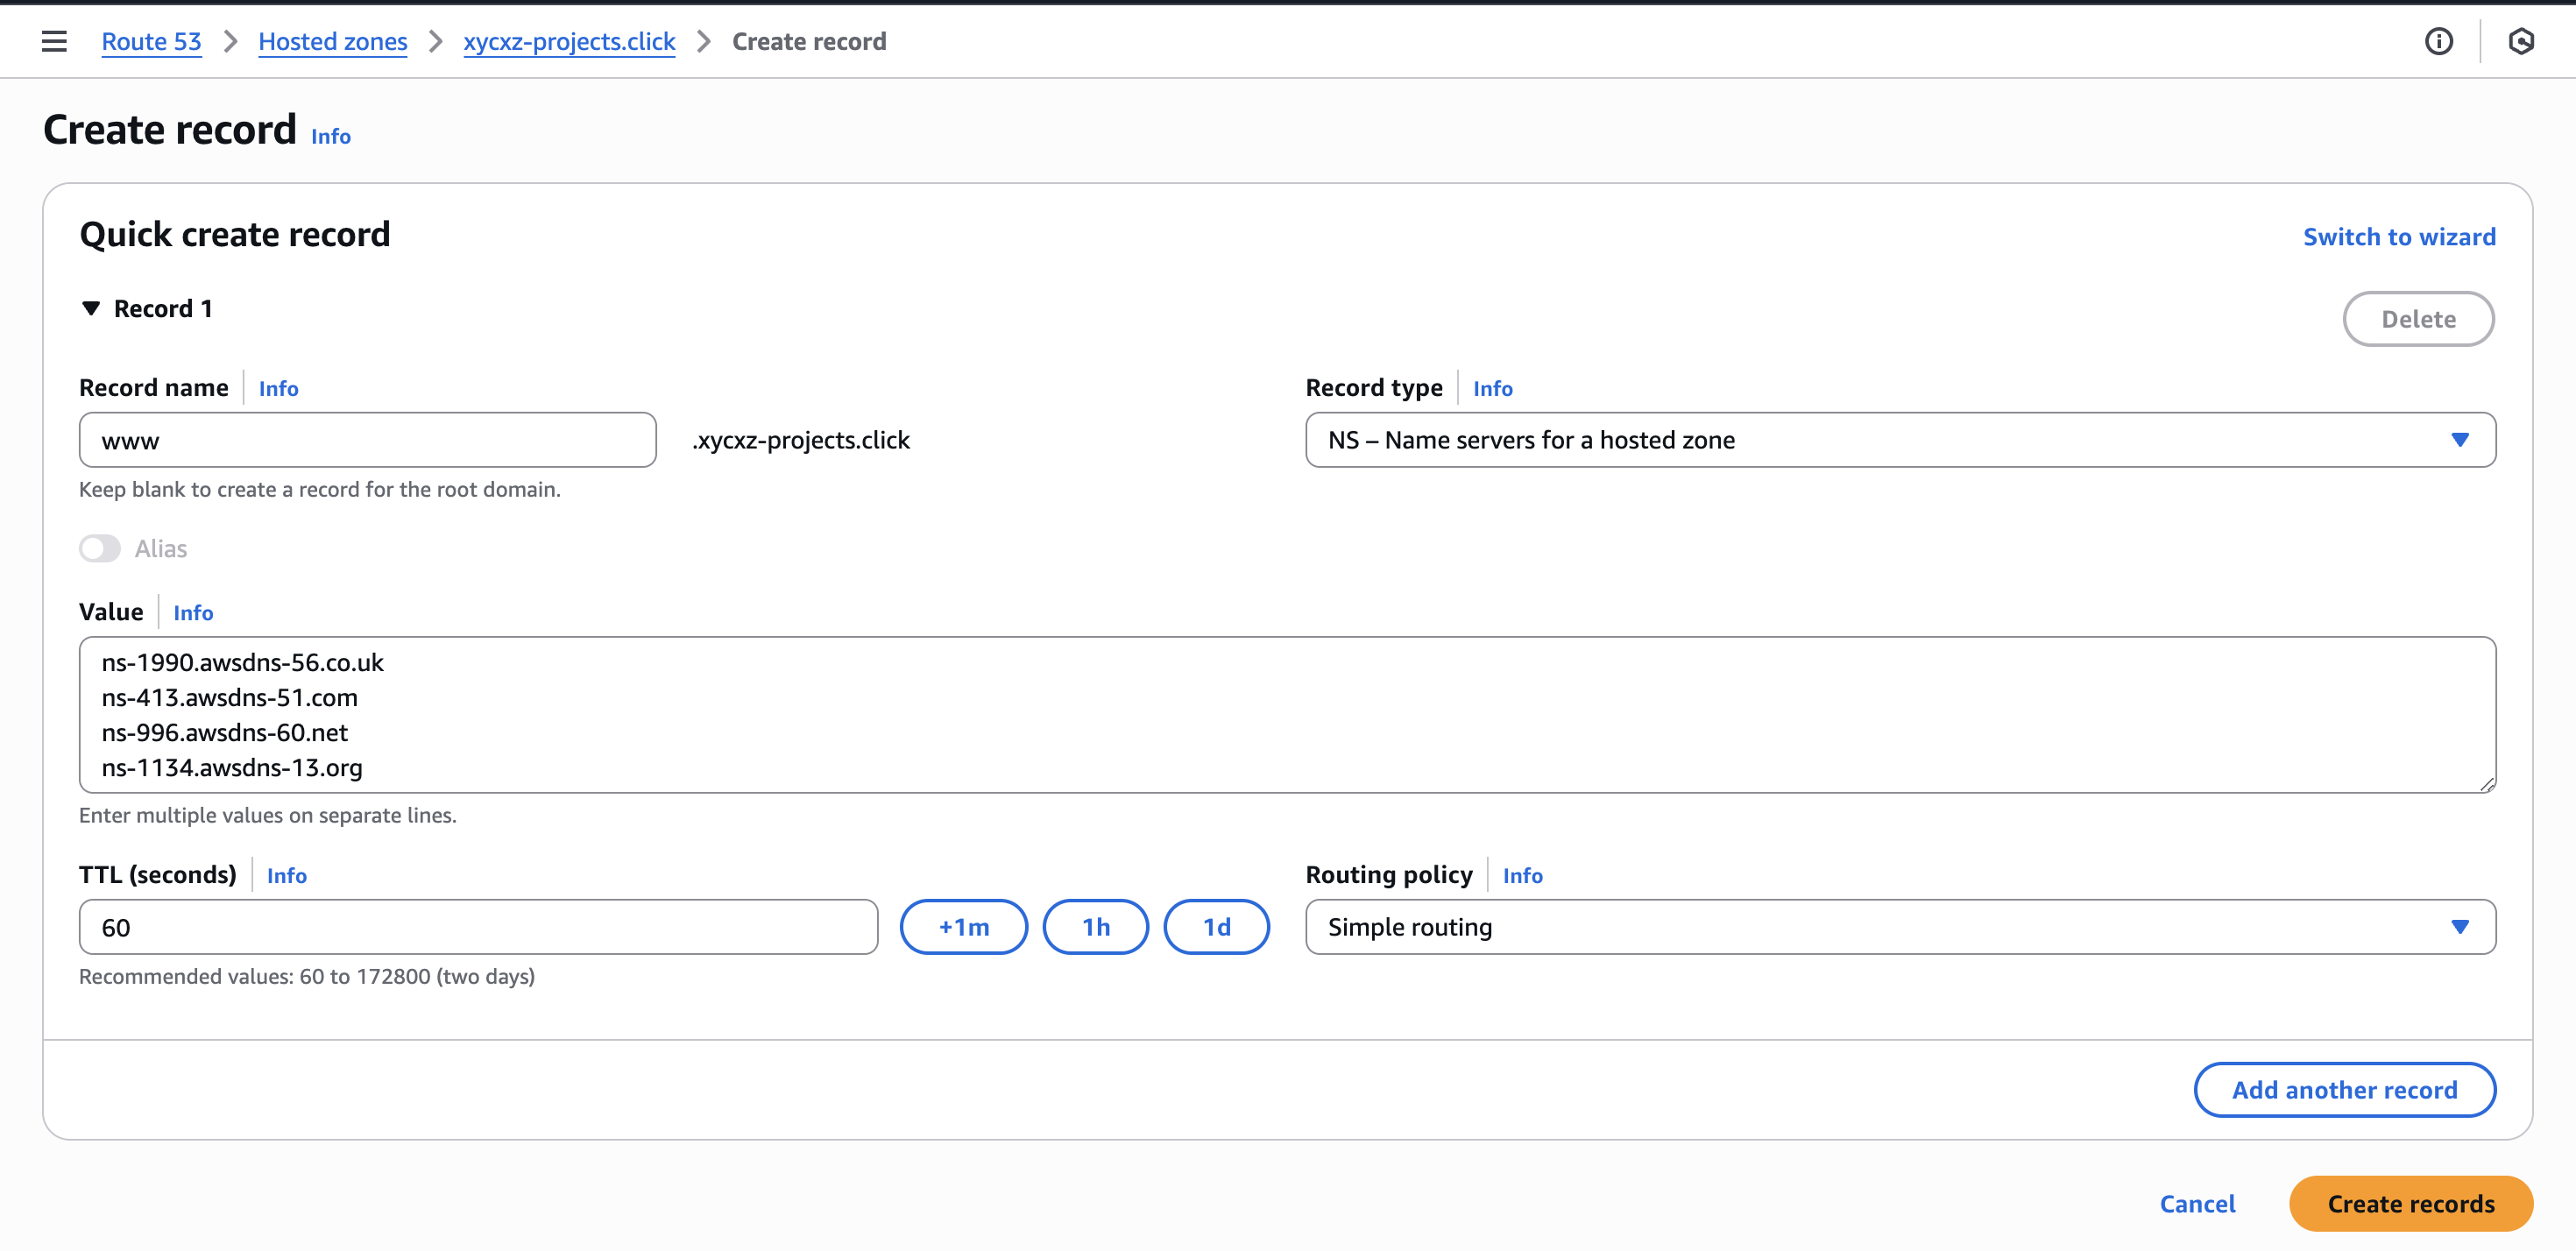
Here, we’re configuring the xycxz-projects.click domain to delegate all www subdomain traffic to the name servers provided by Route 53, which are the ones responsible to host the subdomain.
When a request is made to the subdomain created, the process will look something like this:
A user’s browser asks a DNS Resolver (like our ISP’s DNS or
8.8.8.8), “What is the IP address forwww.xycxz-projects.click?The DNS Resolver finds the authoritative name servers for the main domain,
xycxz-projects.click. It asks them, “Do you have the IP forwww?”The main domain’s
name serversreply, “No, but I have an NS record forwww. To find the answer, you need to go ask theseother name serversinstead (this would be the ones we pasted)The DNS Resolver then sends a
new queryto one of those delegated name servers and asks, “What is the IP address forwww.xycxz-projects.click?”This new name server, which hosts the records for the subdomain, replies with the final IP address
The DNS Resolver gives this final IP address to our browser.
Finally, our browser makes a
separateHTTP request directly to that IP address to fetch the website’s content.
Once we are finished and clicked on Create records, we’re ready to link the subdomain to our application!
Automating the Deployment
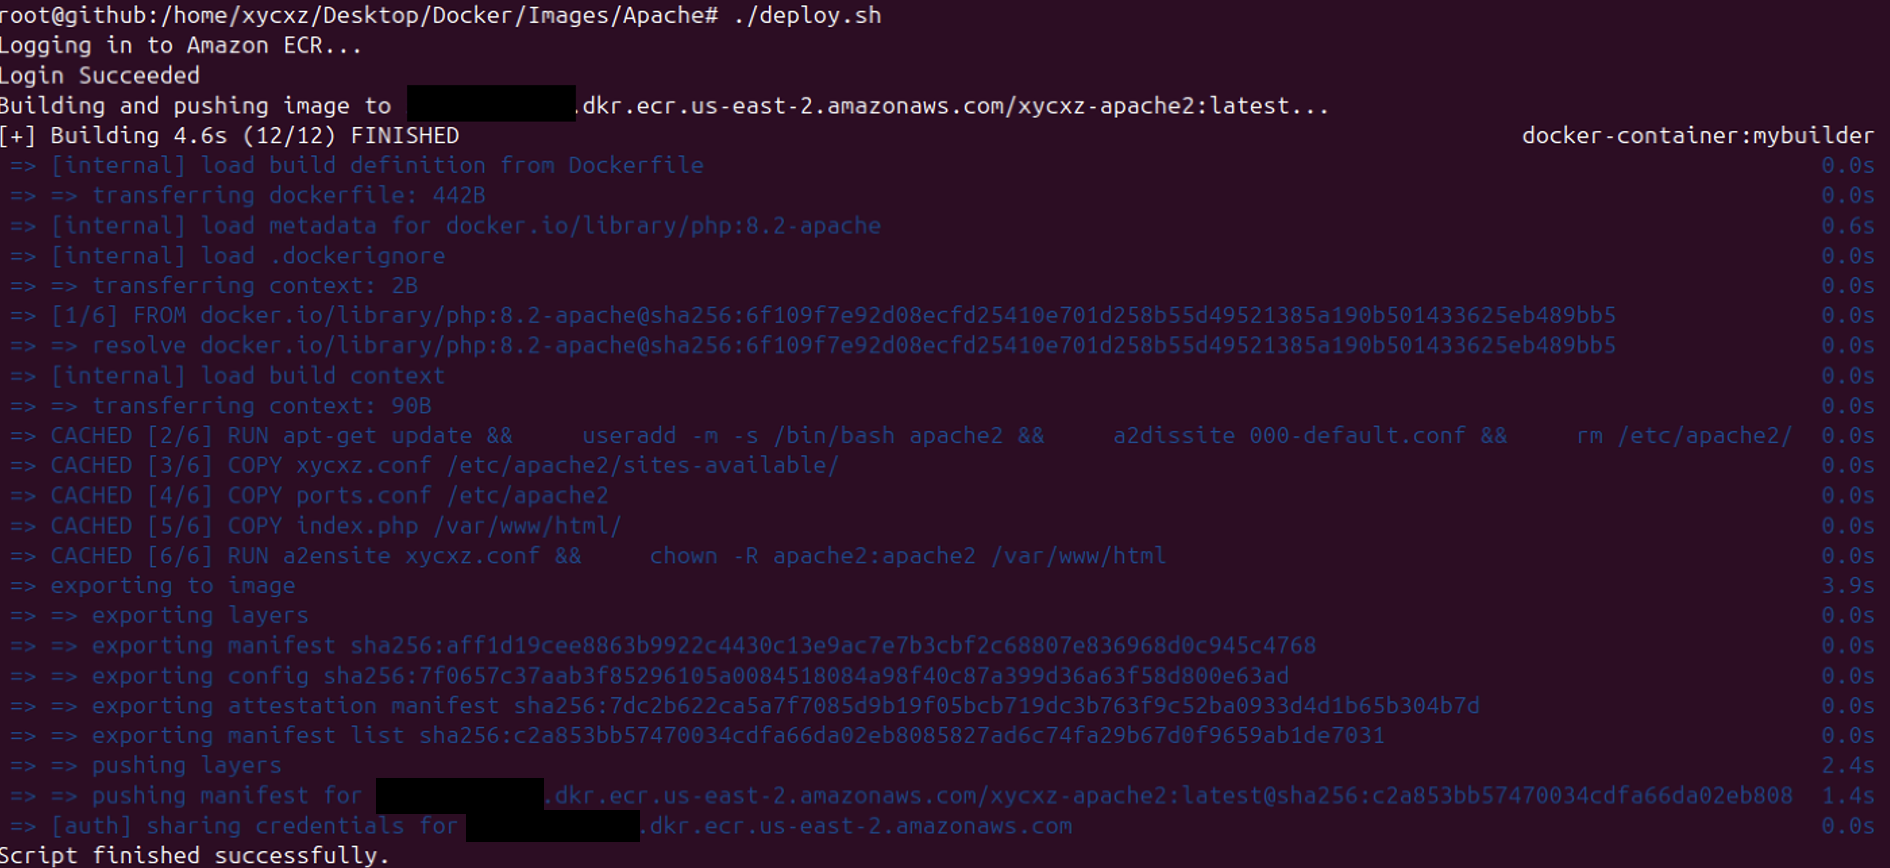
What we need to improve the deployment of our application is a mechanism that would automatically upload our updated image into the ECR so then AppRunner can take it and update it as well (remember we set AppRunner deployment to Automatic). So, what we want to do is create a script that would do this for us.
First, we will go to our VM and locate the directory where we have our image. In there we will create a script that contains the following commands:
1
2
3
4
5
6
7
8
9
10
11
12
13
14
15
16
17
18
19
20
21
#!/bin/bash

# Enable BuildKit so Buildx can work properly
export DOCKER_BUILDKIT=1

# Variables
AWS_ACCOUNT_ID="COMPLETE"
AWS_REGION="COMPLETE"
IMAGE_NAME="COMPLETE"
IMAGE_TAG="COMPLETE"
ECR_REPO_URI="${AWS_ACCOUNT_ID}.dkr.ecr.${AWS_REGION}.amazonaws.com/${IMAGE_NAME}:${IMAGE_TAG}"

# Log in to AWS ECR
echo "Logging in to Amazon ECR..."
aws ecr get-login-password --region ${AWS_REGION} | docker login --username AWS --password-stdin ${AWS_ACCOUNT_ID}.dkr.ecr.${AWS_REGION}.amazonaws.com

# Build AND Push the image in a single command
echo "Building and pushing image to ${ECR_REPO_URI}..."
docker buildx build --platform linux/amd64 -t ${ECR_REPO_URI} --push .

echo "Script finished successfully."
Note: Specifying the platform and exporting DOCKER_BUILDKIT won’t be necessary if you are using amd64 architecture (although it is becoming the default, and is generally recommended regardless of arch). Be sure to adjust the script if you’re not using arm64 or BuildKit!
We should see the updated version of our image in our ECR:
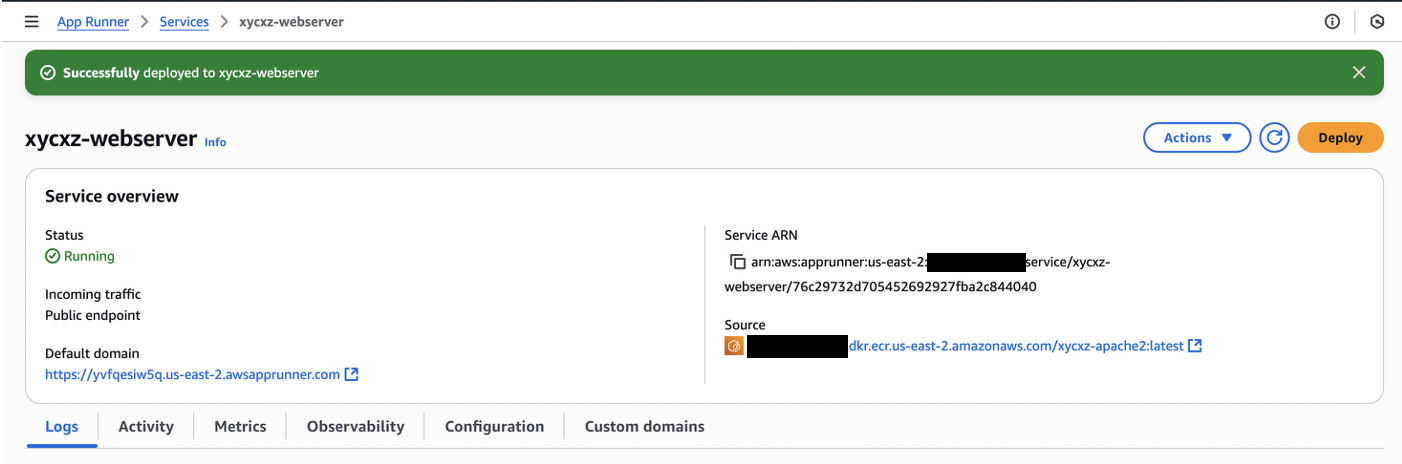
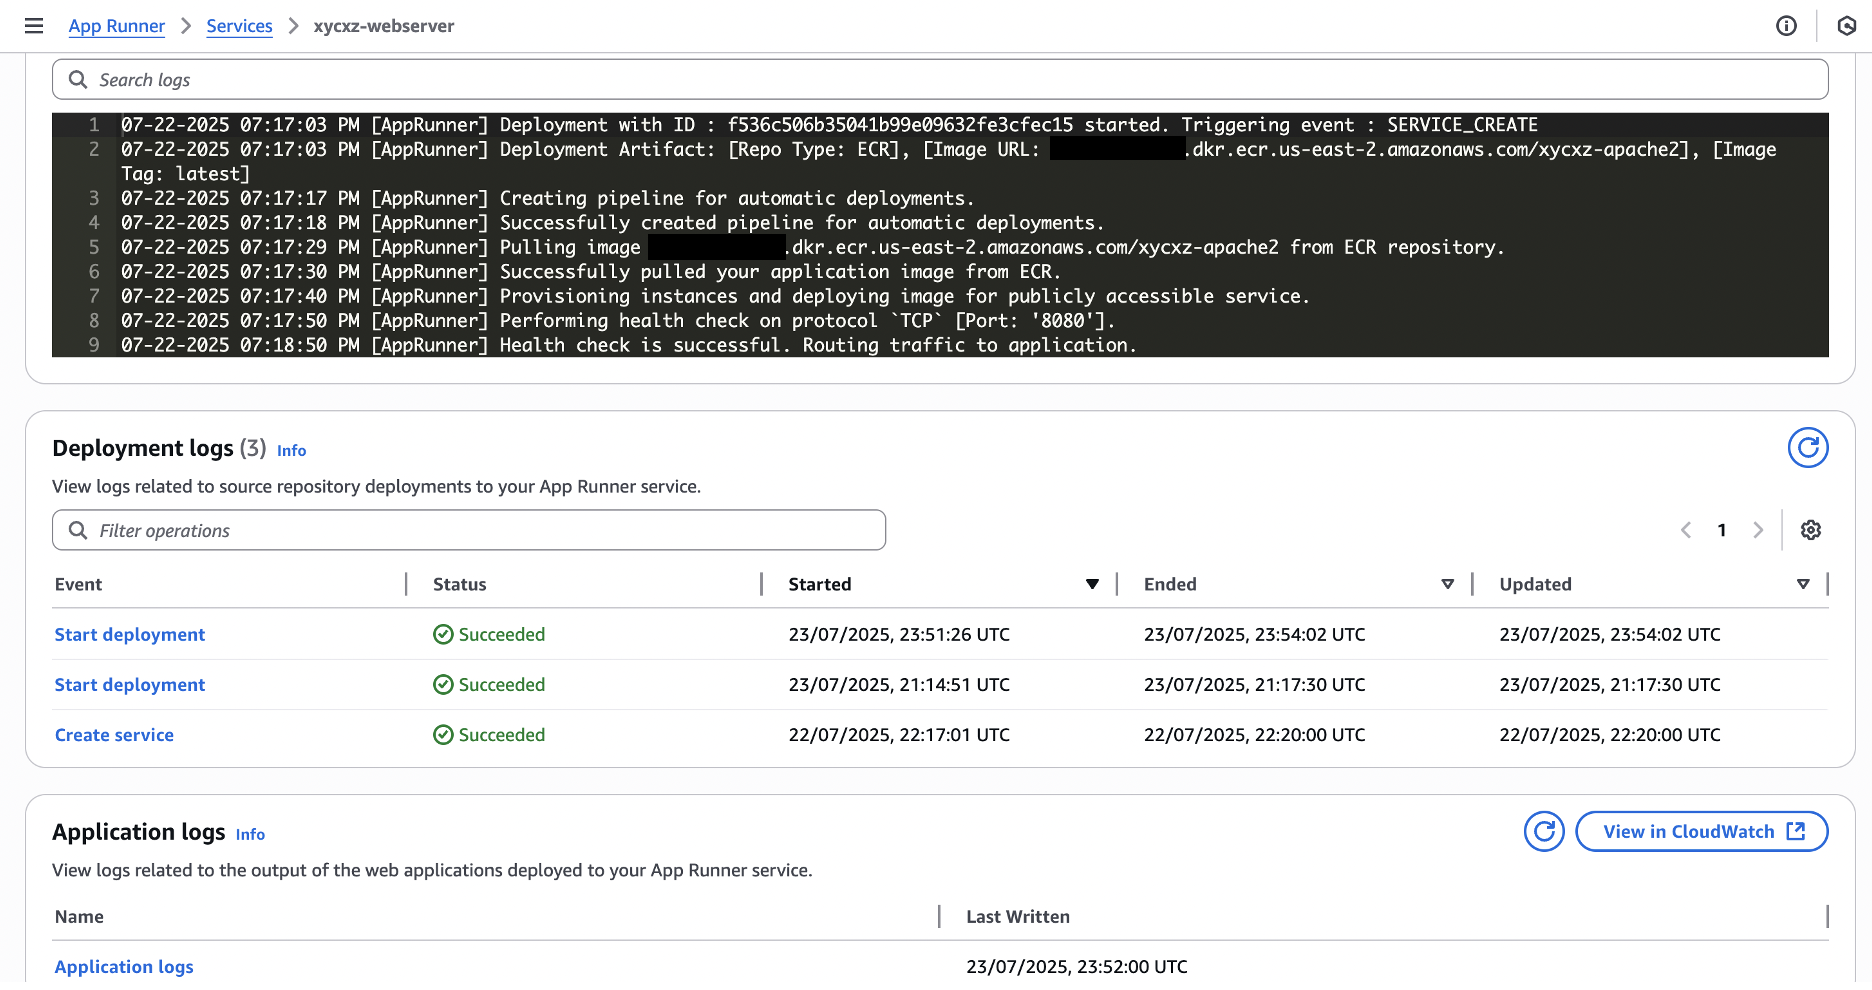
We should also see AppRunner taking care of the deployment of this new version of the image:
This process is now automated! However, using a script could be somewhat time-consuming because we would have to run it manually (in this case). Luckily, I have a better proposal to make this even better.
Let’s say we had a GitHub repository holding the source code of our application. AWS can automatically create the image for ECR from that! All we would have to do is push our source code into the GitHub repository and the rest would happen automatically.
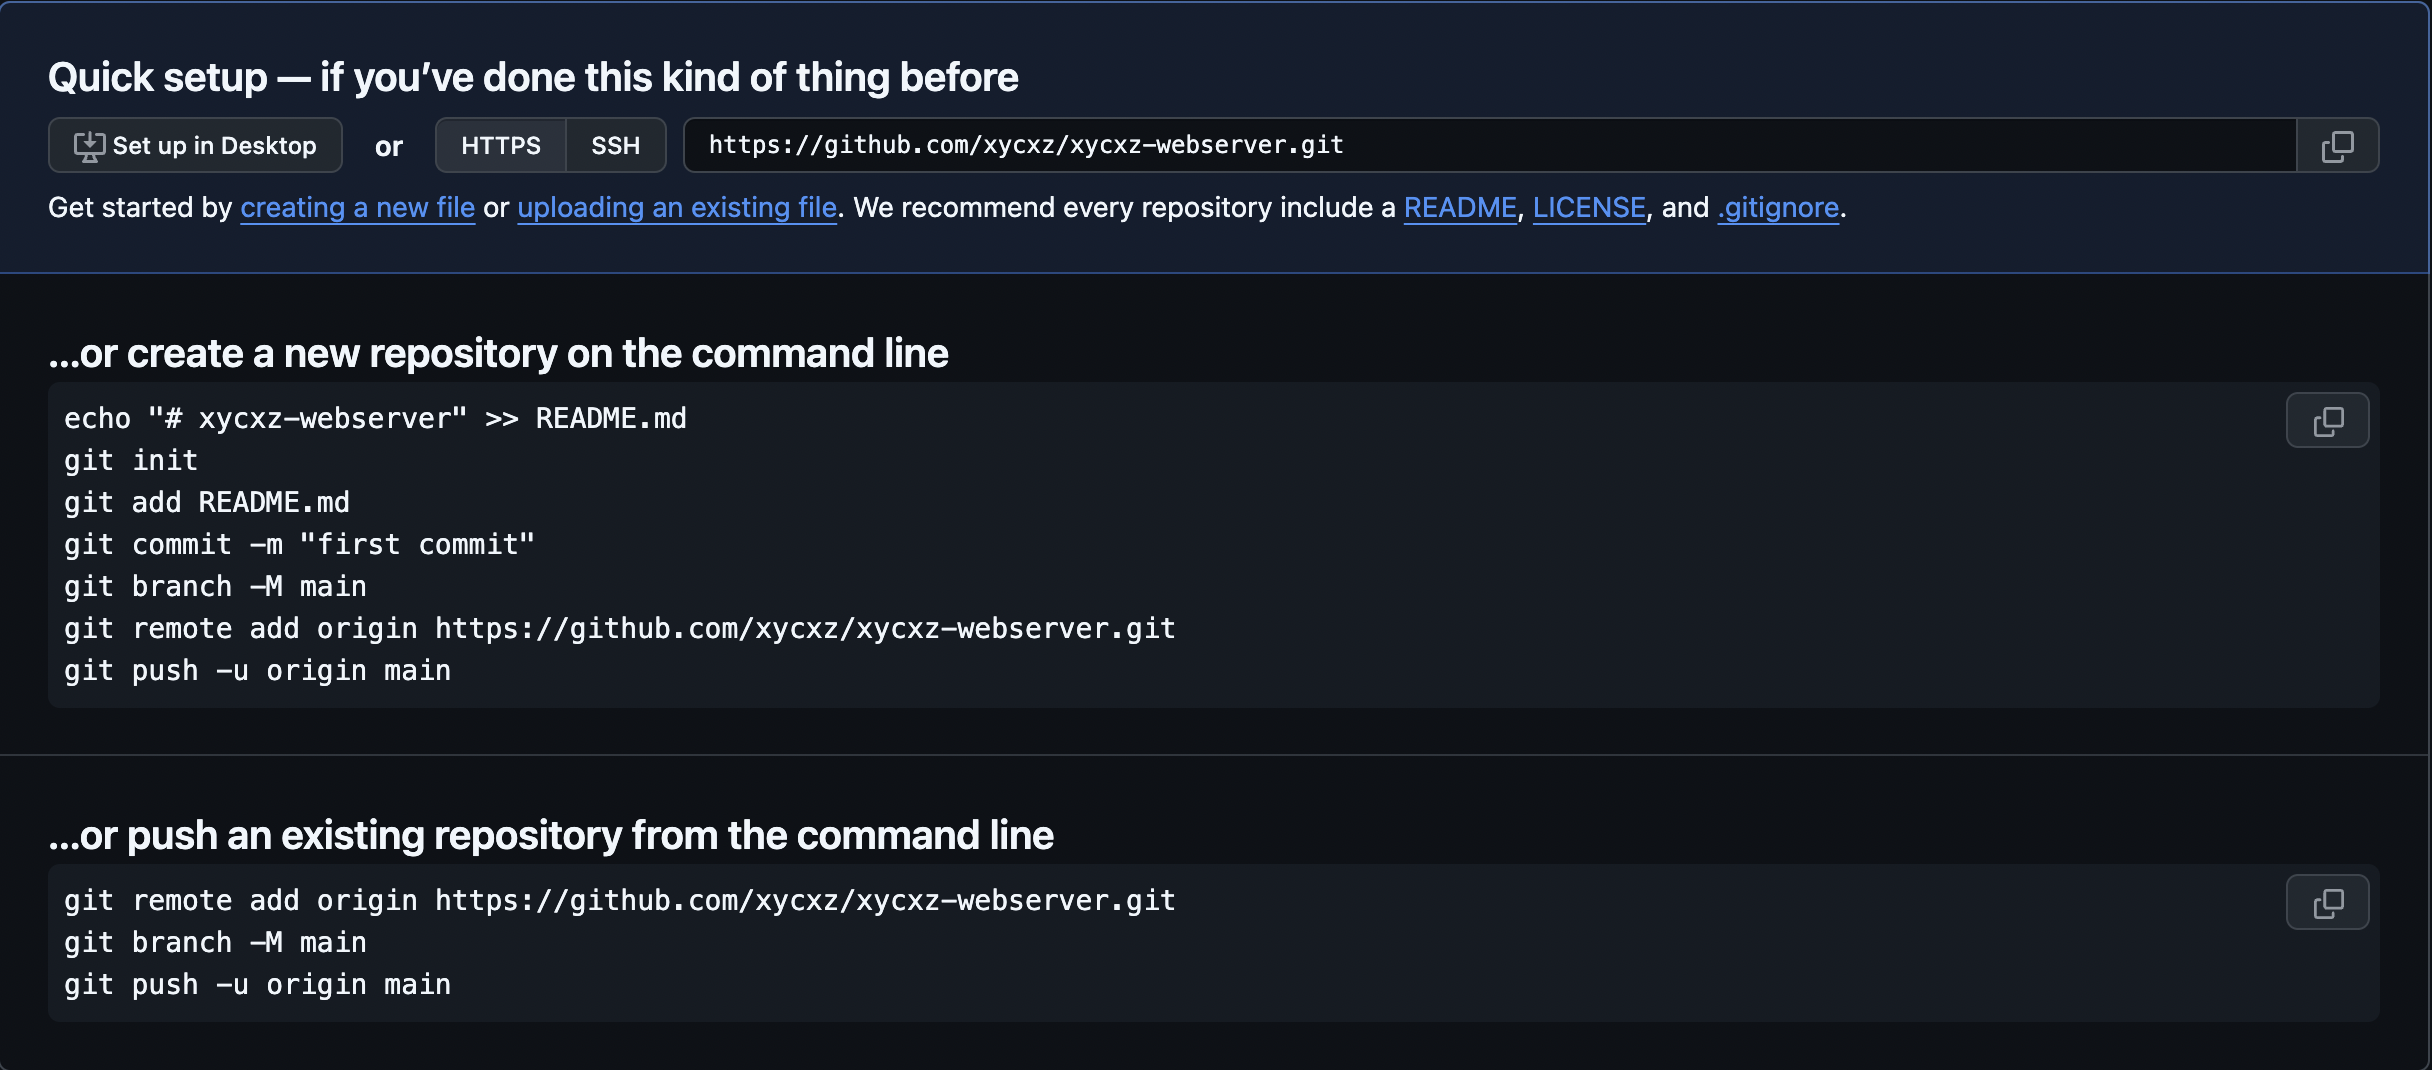
First, we need to push our application into a GitHub repository. Let’s go to GitHub and create the repository (you will need to create an account and link a SSH key if you don’t have one). Once we create it, we will have the instructions needed to push our source code:
In my case, I will configure this repository to use the SSH protocol. For that, I will use the following command to check my current remote URL:
1
git remote -v
If we see https:// this means we have to change it. For that, we can use the following command:
1
git remote set-url origin git@github.com:<username>/<repository>.git
Note: This extra step is not needed if you choose SSH on the GitHub guide.
Now we can follow the steps provided by GitHub to push the source code of our application.
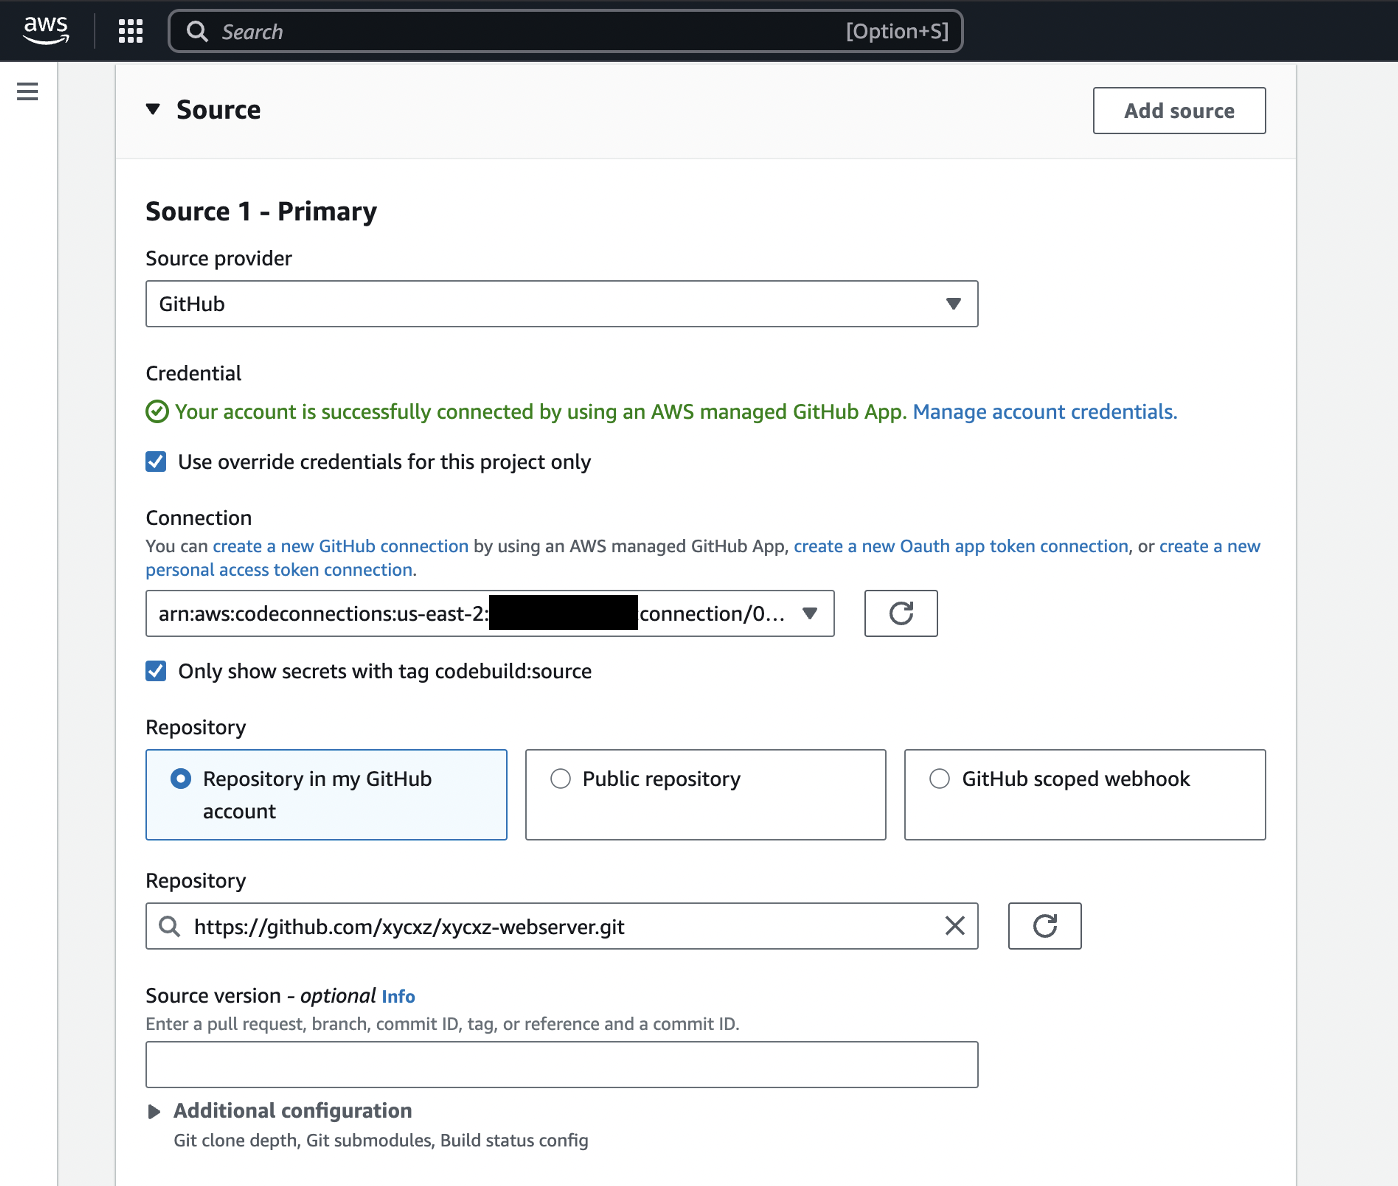
Connecting our GitHub Repository to AWS
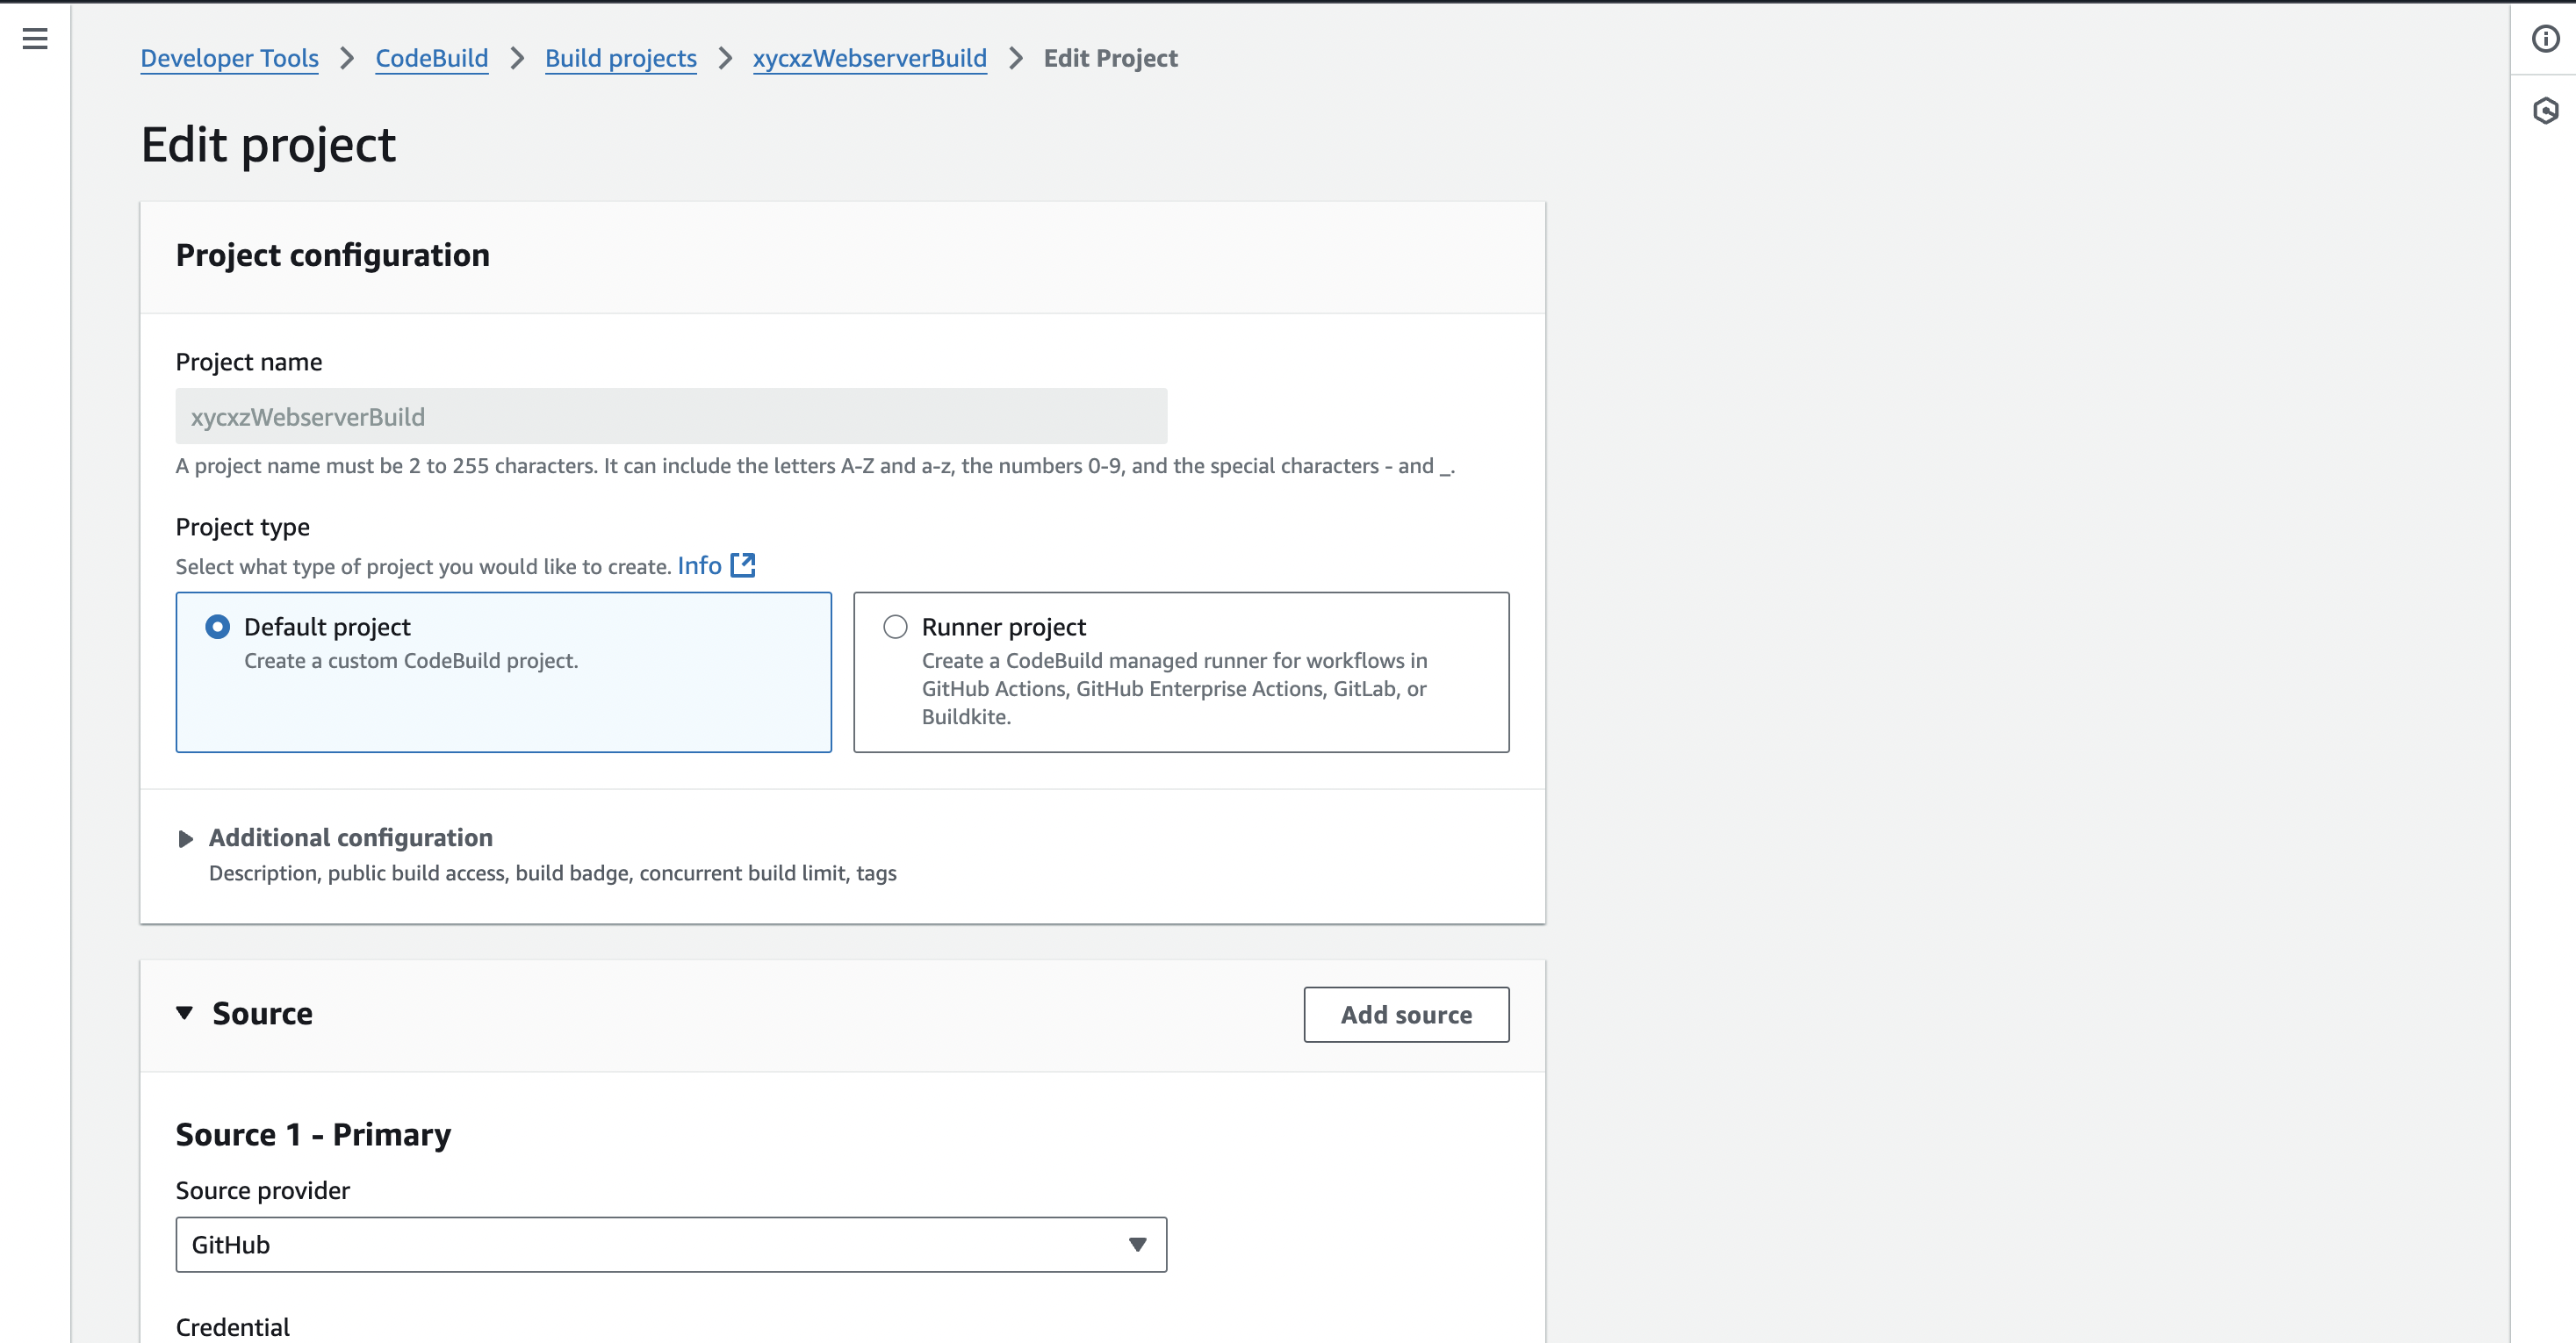
CodeBuild will allow us to automatically turn our GitHub code into an image that we host in ECR. For that we have to navigate to its dashboard and click on Create project to start the configuration:
Note: Follow the link provided by AWS in case of not having your GitHub account already linked!
A webhook is a feature that GitHub provides which allows GitHub to tell AWS that a change to the source code has occurred. We have to enable that to make this work. We also have to indicate what should happen when this gets rebuild by providing a filter (PUSH):
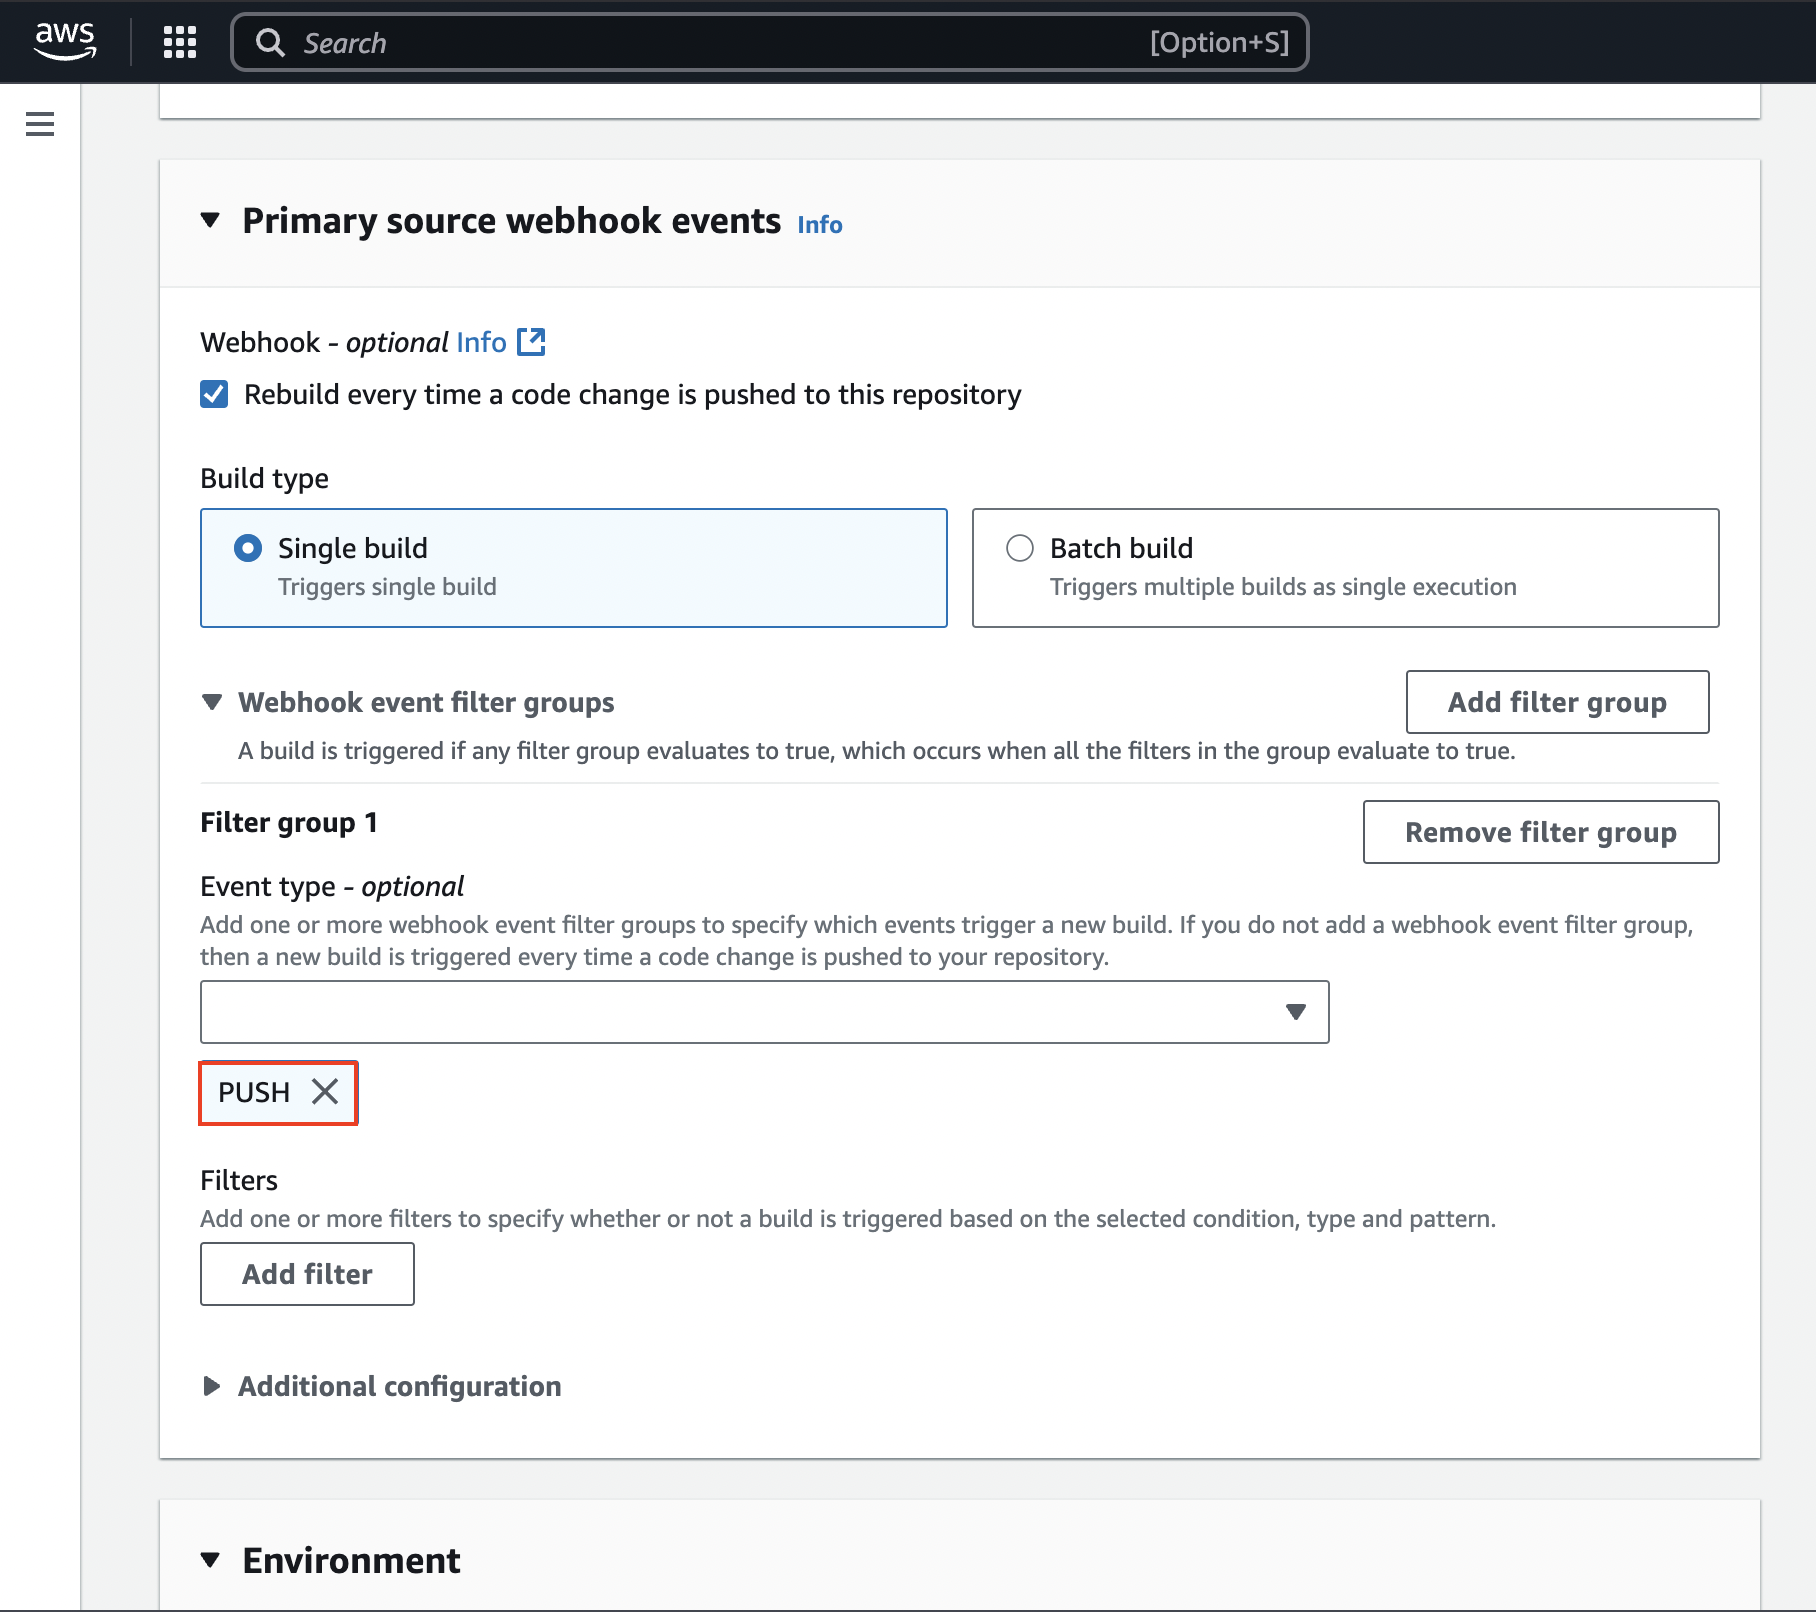
If we now push something new to our GitHub repository the webhook will trigger and then rebuild the image causing AppRunner to re-deploy the application.
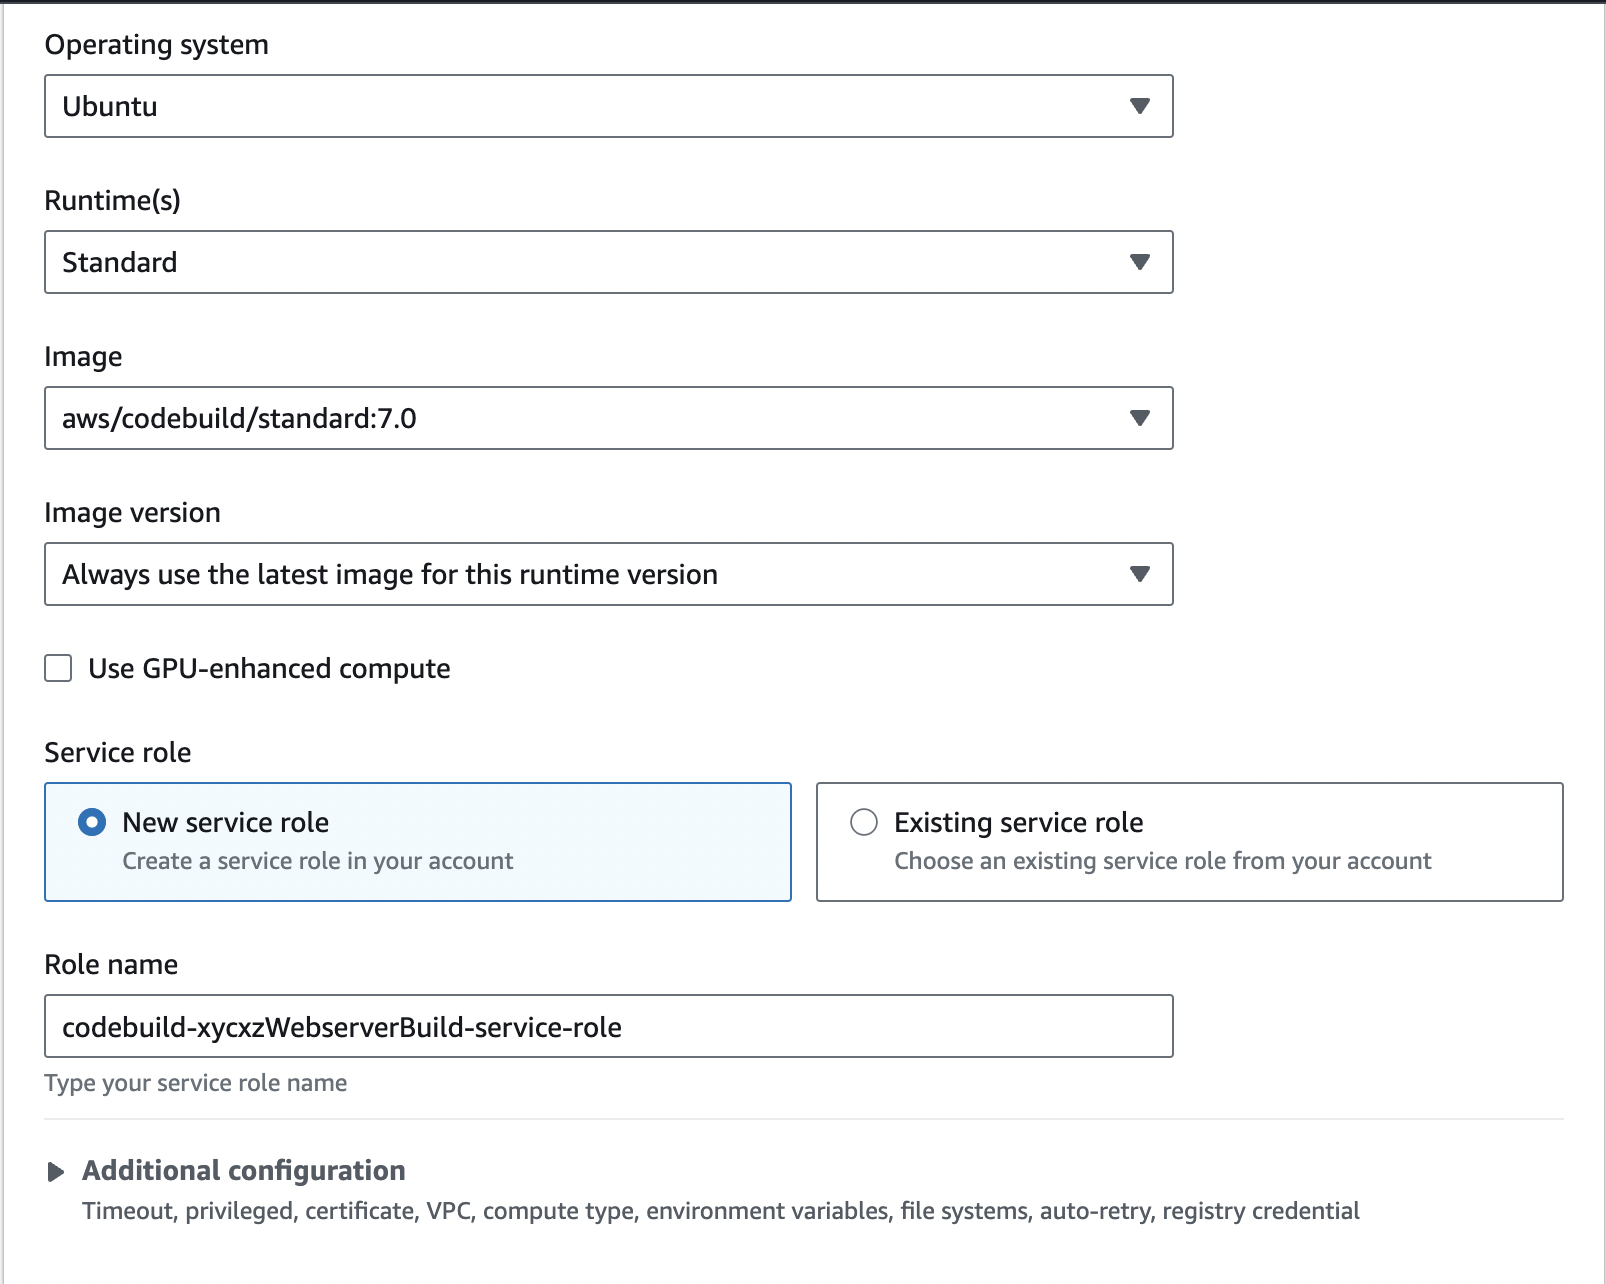
Inside the Environment configuration we will select Ubuntu as our OS because it is what I am using everywhere else:
We will also configure Buildspec to pass in the commands from our script:
1
2
3
4
5
6
7
8
9
10
11
12
version: 0.2

phases:
  pre_build:
    commands:
      - export DOCKER_BUILDKIT=1
      - echo "Logging in to Amazon ECR..."
      - aws ecr get-login-password --region us-east-2 | docker login --username AWS --password-stdin <REDACTED>.dkr.ecr.us-east-2.amazonaws.com
  build:
    commands:
      - echo "Building and pushing image..."
      - docker buildx build --platform linux/amd64 -t <REDACTED>.dkr.ecr.us-east-2.amazonaws.com/xycxz-apache2:latest --push .
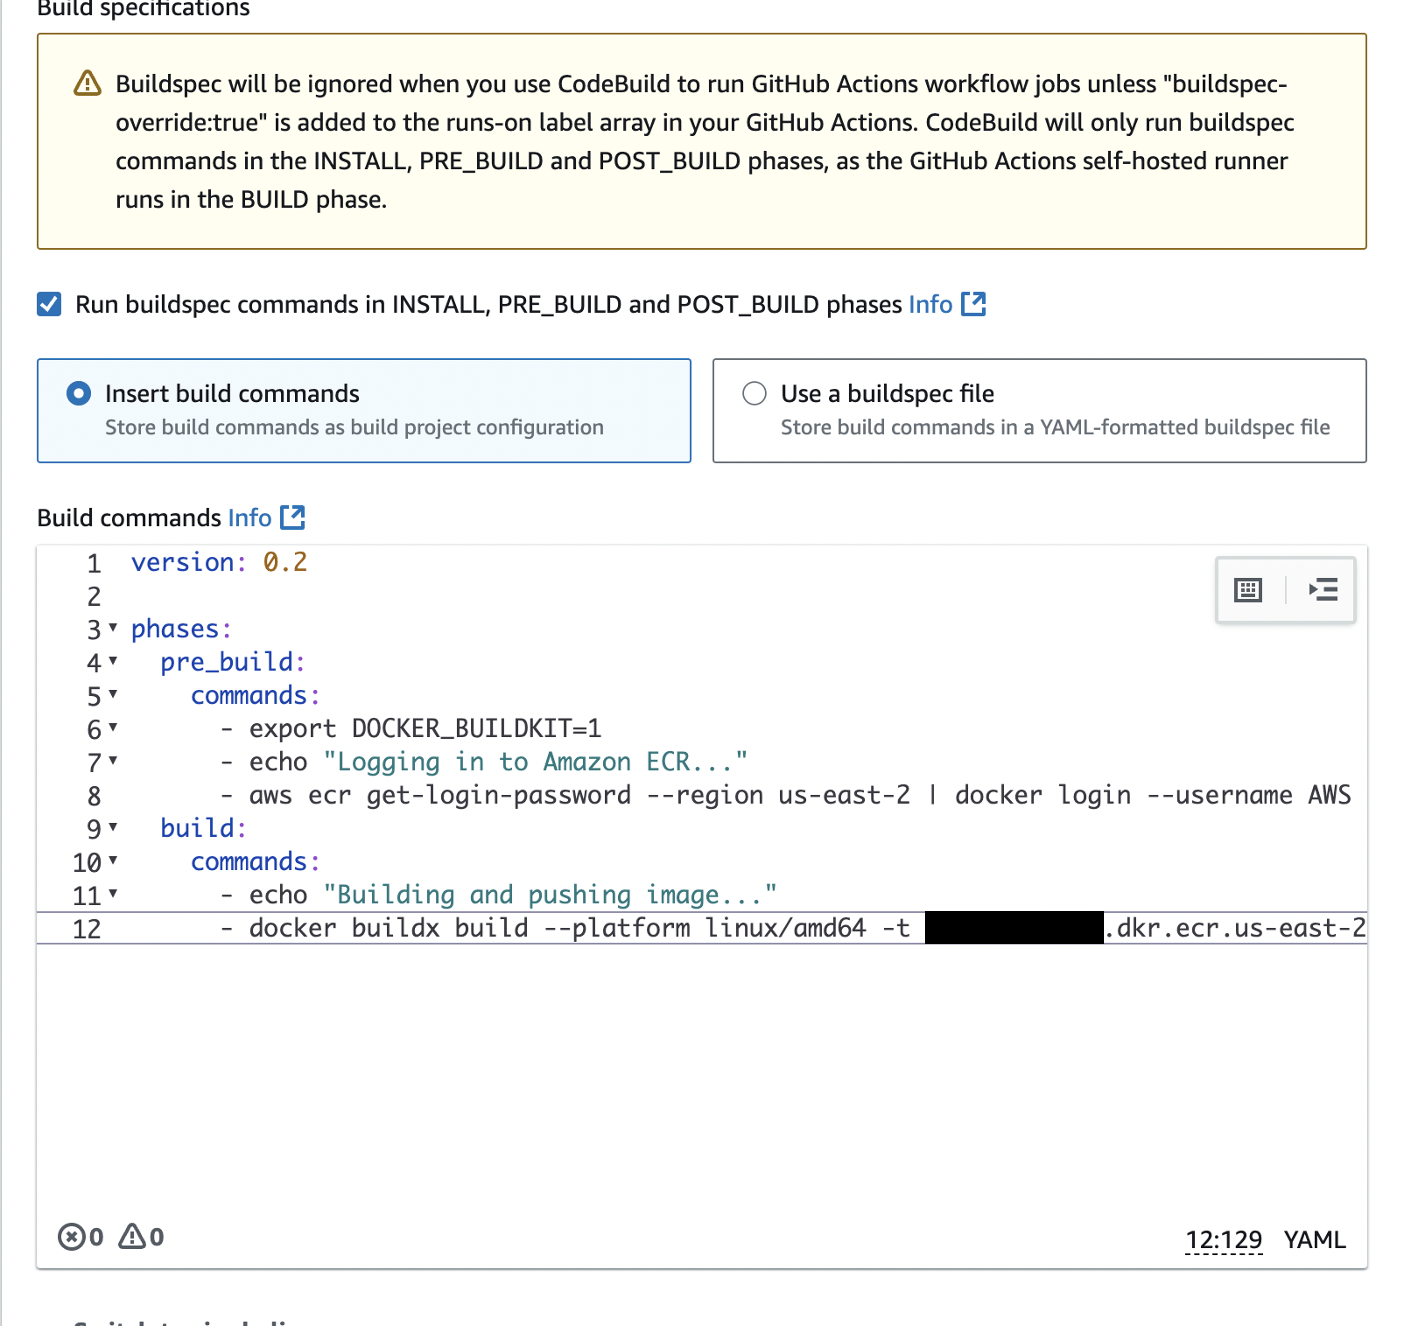
Note: You can also use custom or built-in environmental variables if the information inside the yaml file is too sensitive. You can find a list of built-in environmental variables here and an important security practice for your custom variables here.
Once that’s ready, go ahead and create the project. We will see that the building process will fail:
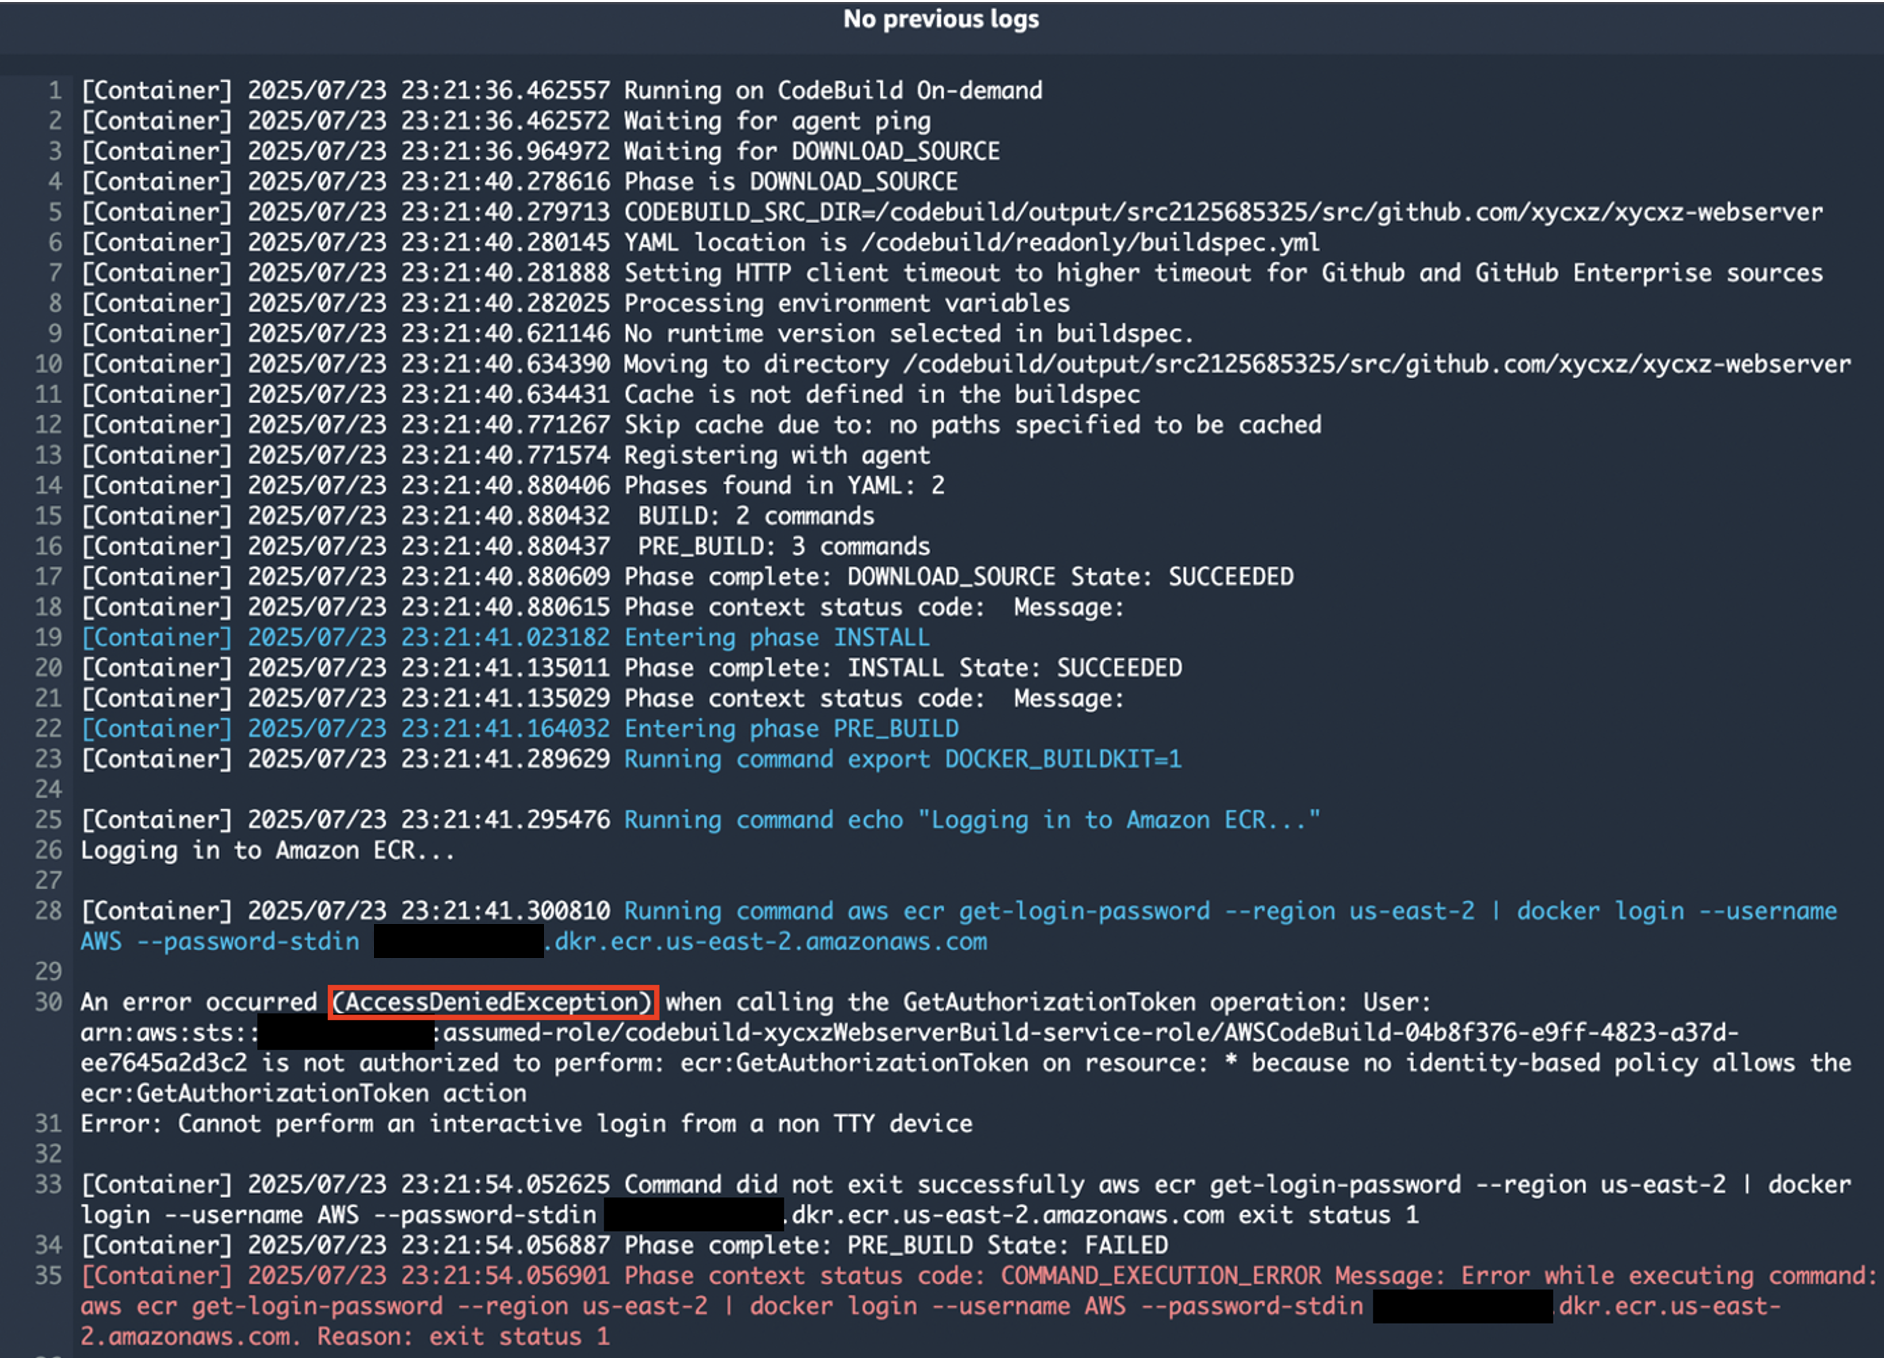
Checking the logs, we will see that there is an AccesDenied error due to that the role assigned did not have sufficient permissions to access ECR. The reason is that when we try to run this command we need to login through the AWS CLI and only if we had logged in there earlier, the commands would work. However, I am running this from a computer that is not connected to it.
Within the AWS cloud, each machine has a service role and is the one responsible for allowing or not the execution of commands (in this case) to access another service. This means that now we have to set the correct permissions to the service role we are using here. For that, let’s go to the IAM dashboard and look for the role we choose during the configuration process and attach the correct policy to it:
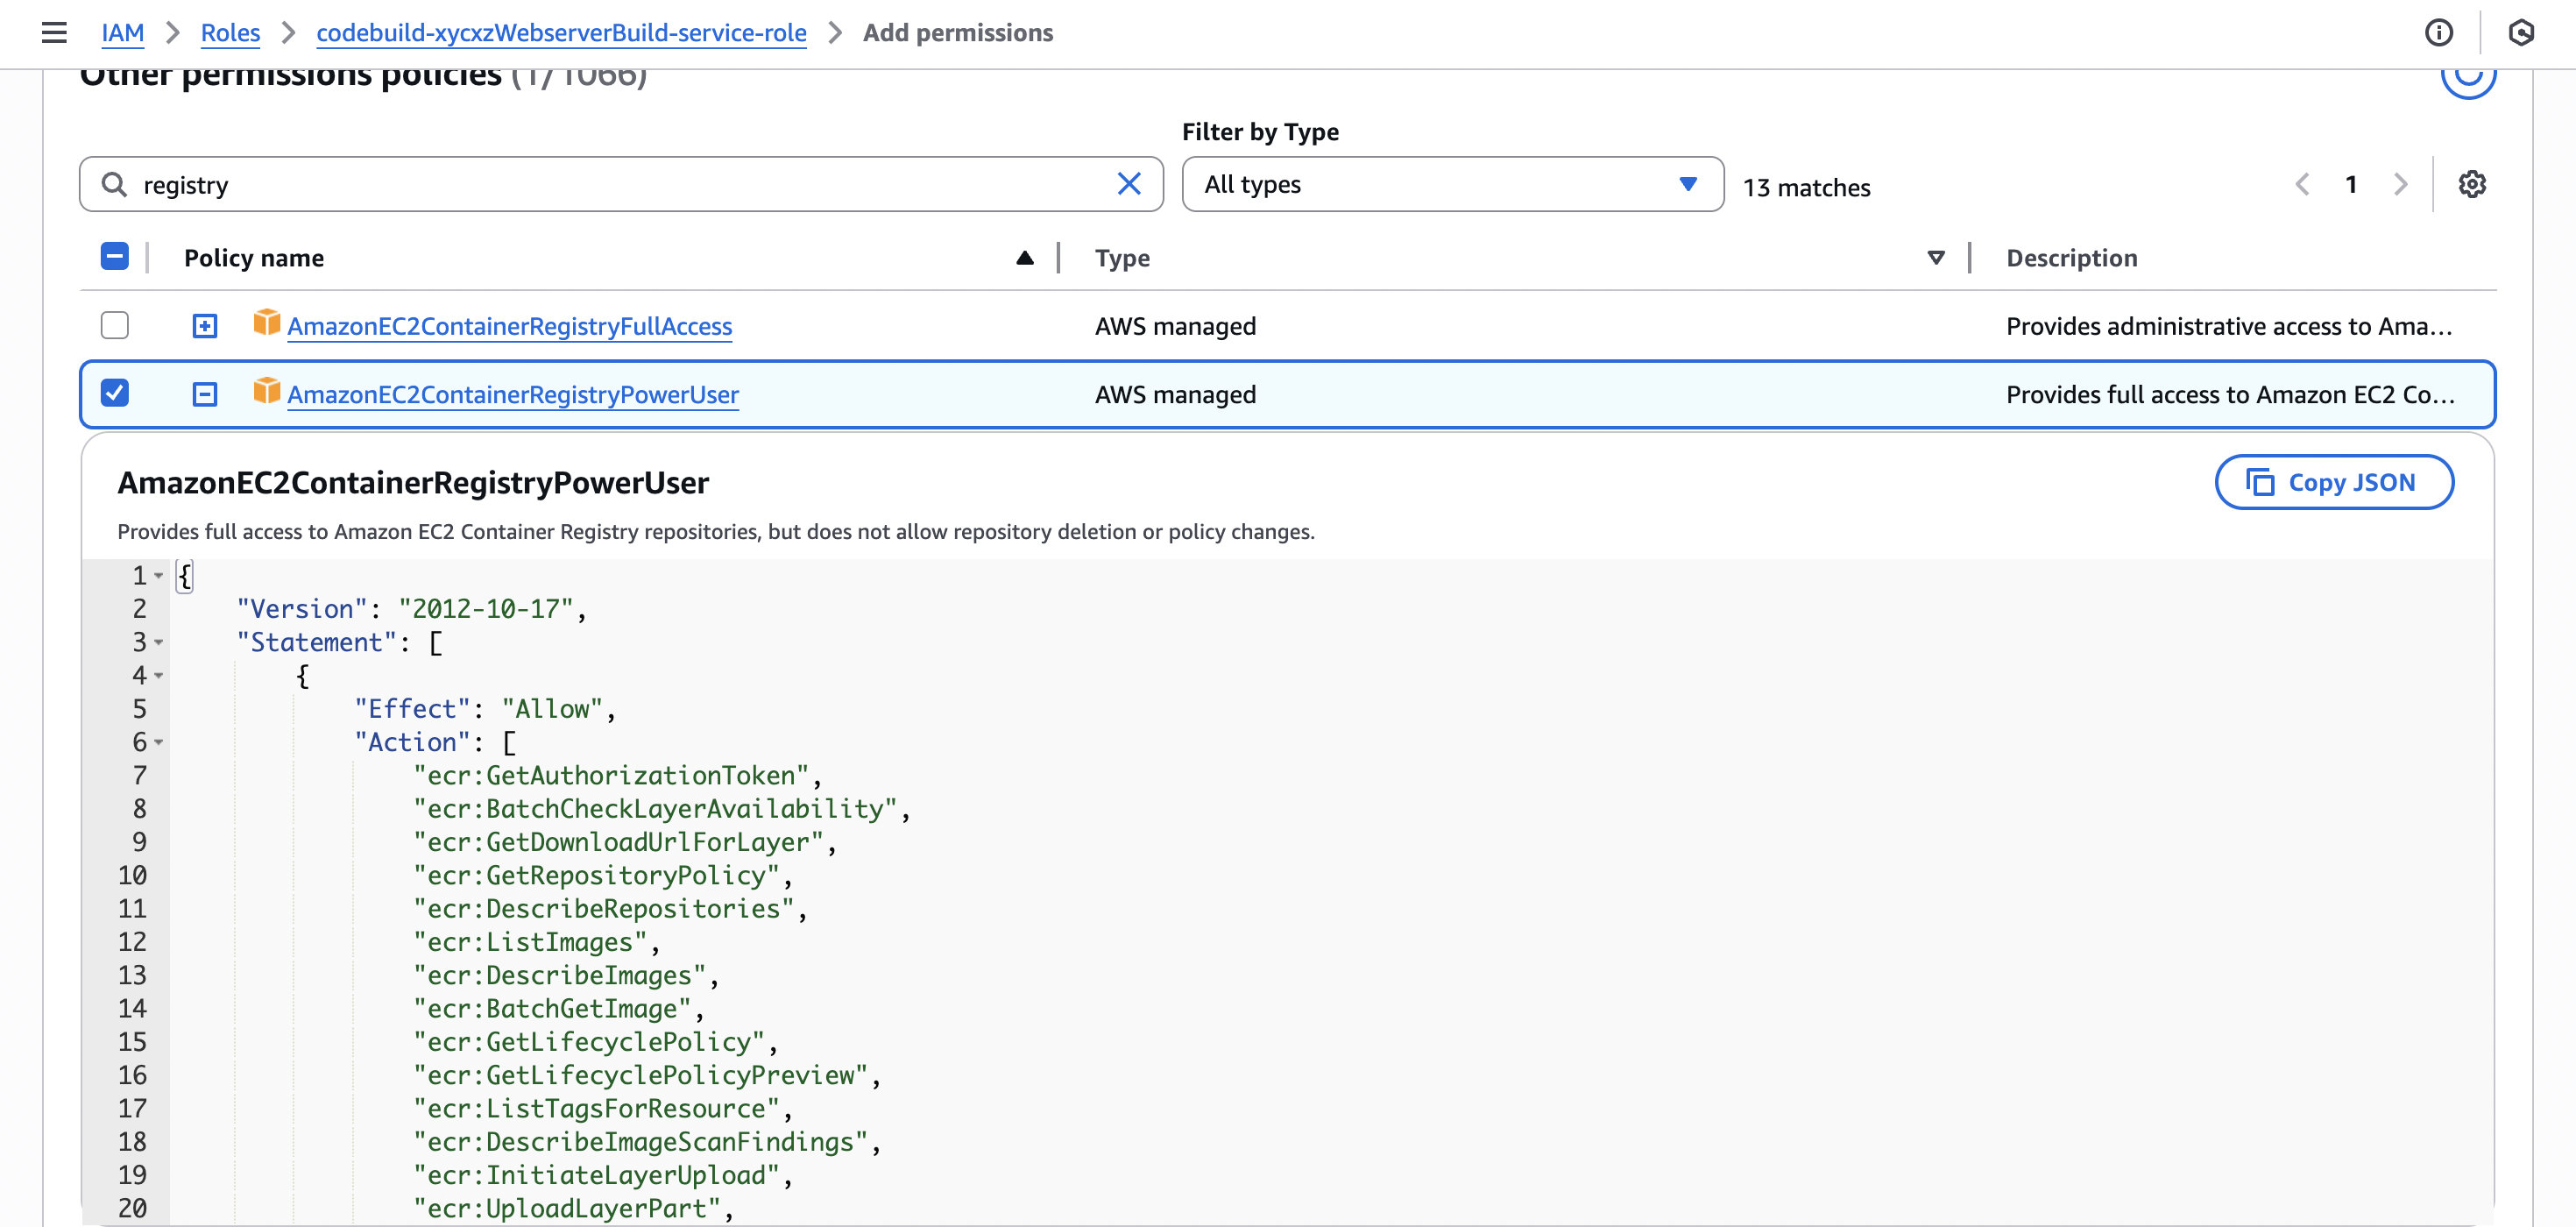
Note: In a production environment, we should always limit permissions! That’s why I strongly recommend creating custom policies depending on the environment we are working on.
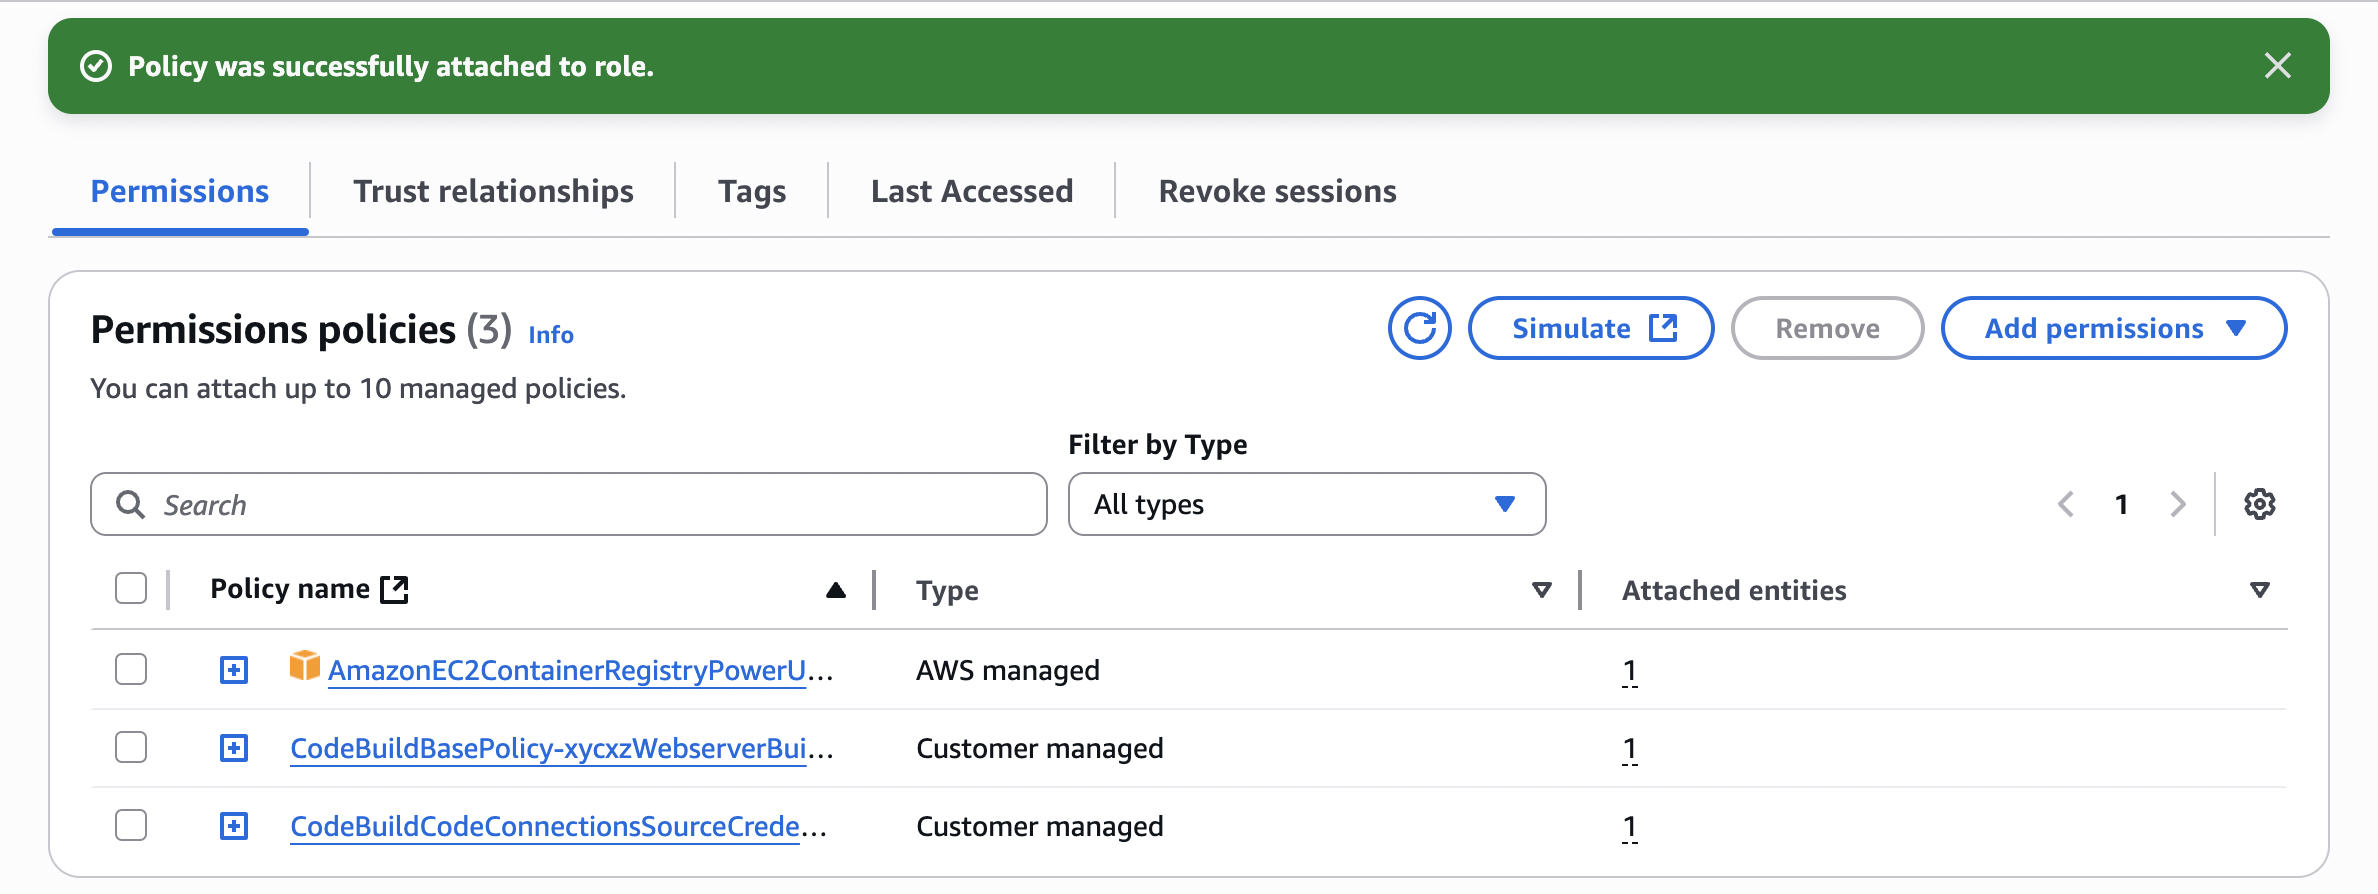
With this ready, now we can retry our build once again:
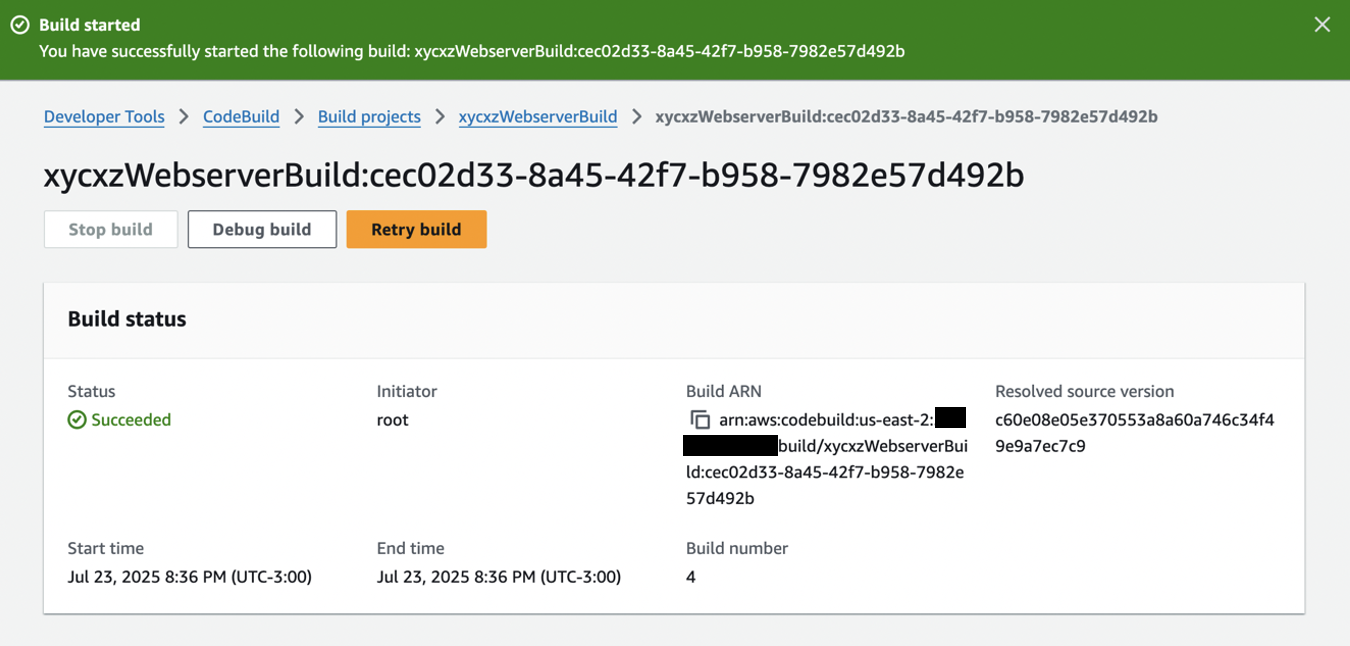
Success! Next, check whether the new image appears in your ECR repository:

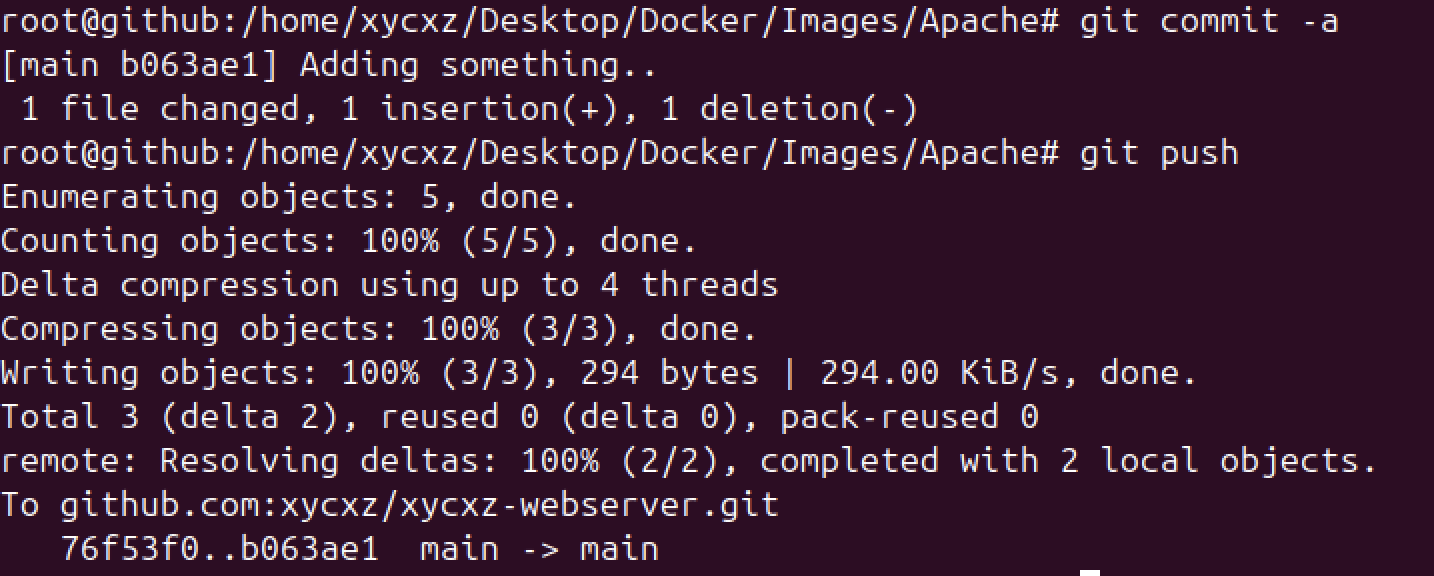
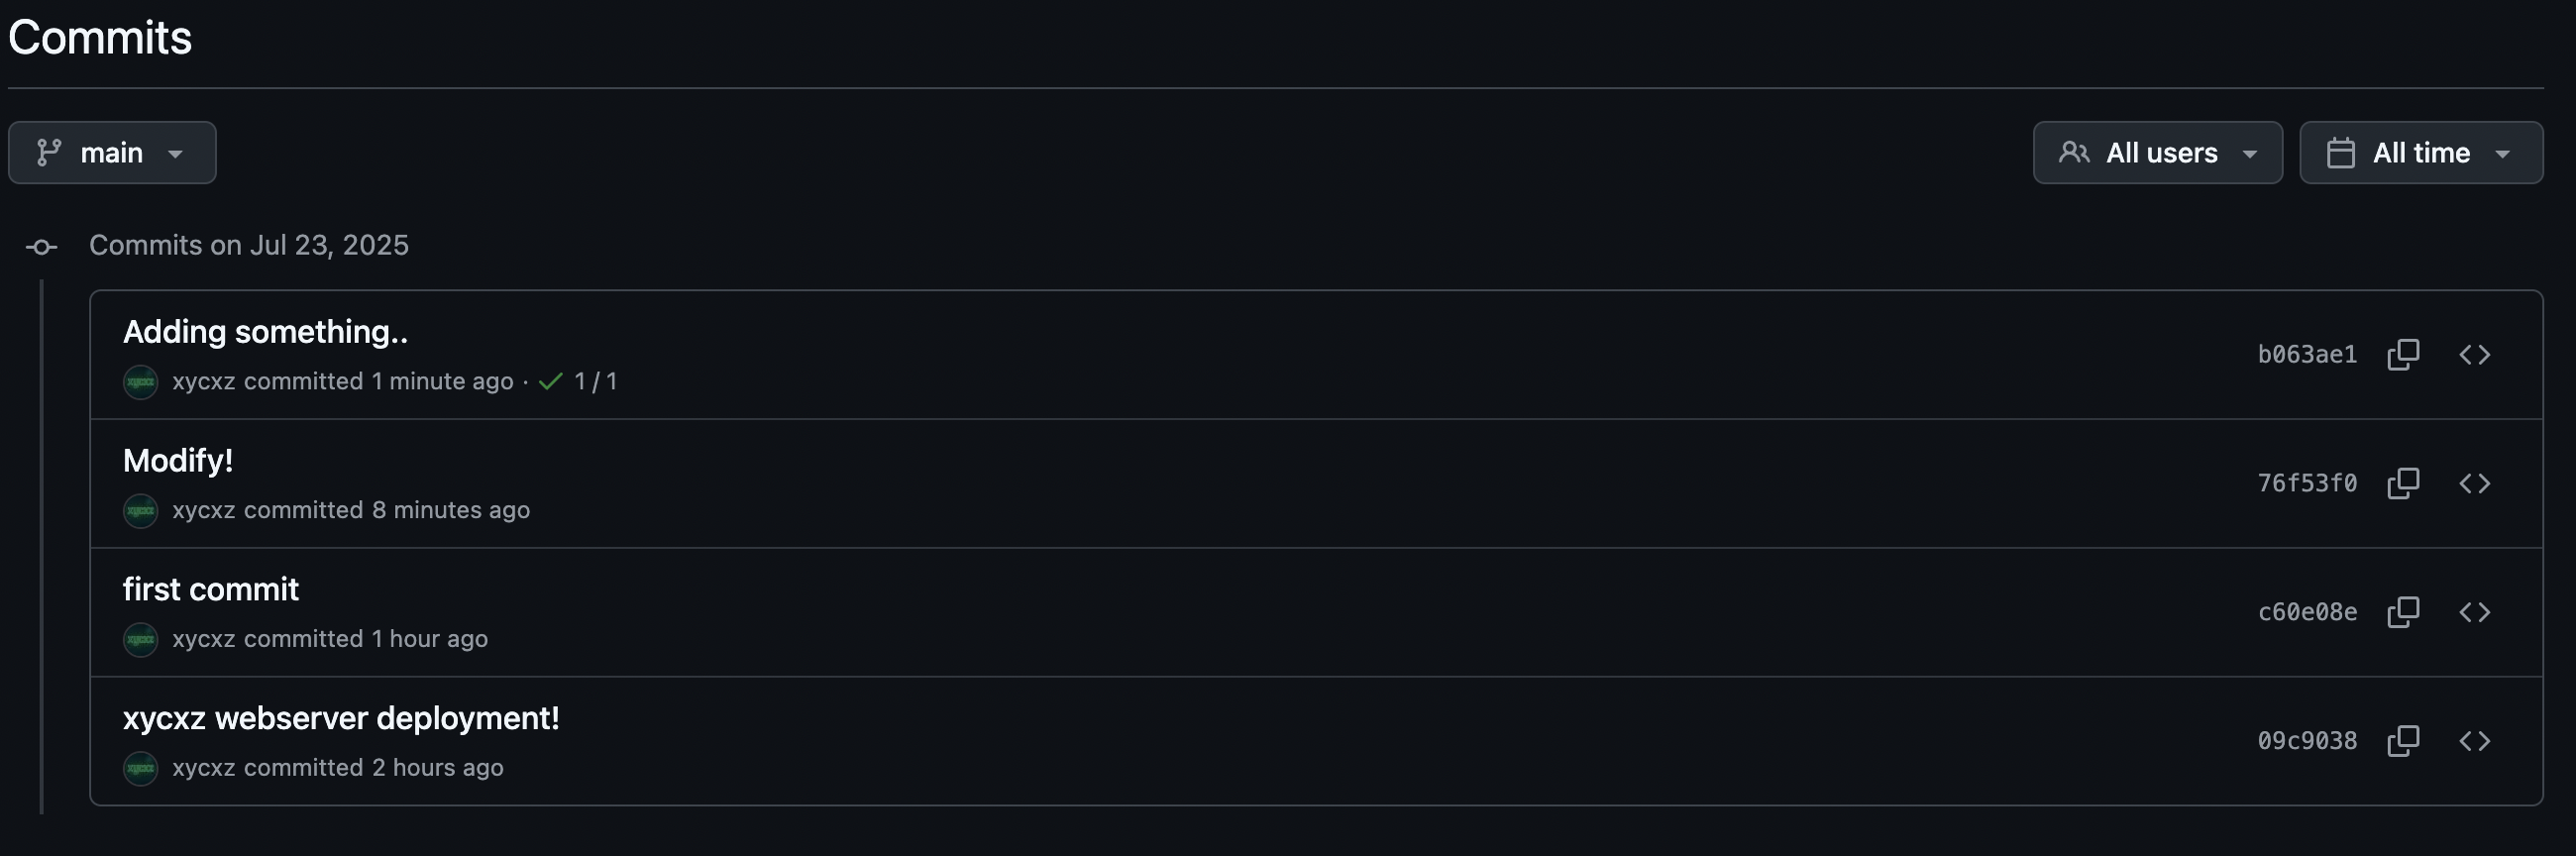
Now I will do a small modification to my index.php and see if it gets reflected and the automation actually works. I will show the commit first on my Github:
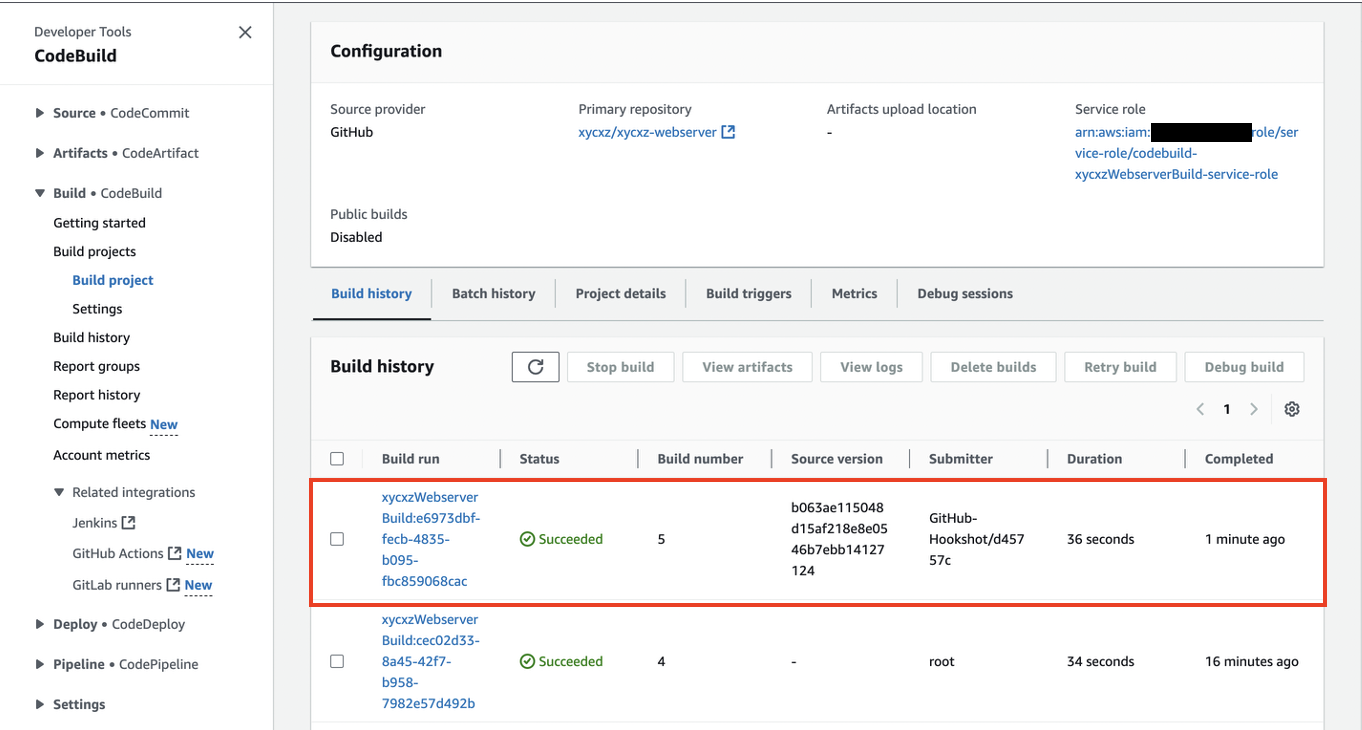
Let’s go back to the CodeBuild dashboard now. We will see that it is working perfectly without pressing any button or running any script:
Let’s check our AppRunner now:
As we can see, we were able to fully automate our container deployment using GitHub and AppRunner.
Next Steps
This project keeps getting more interesting with every blog post. We will continue working on it! Next time I will talk about AWS core networking concepts.