Docker Compose - Docker
Objective
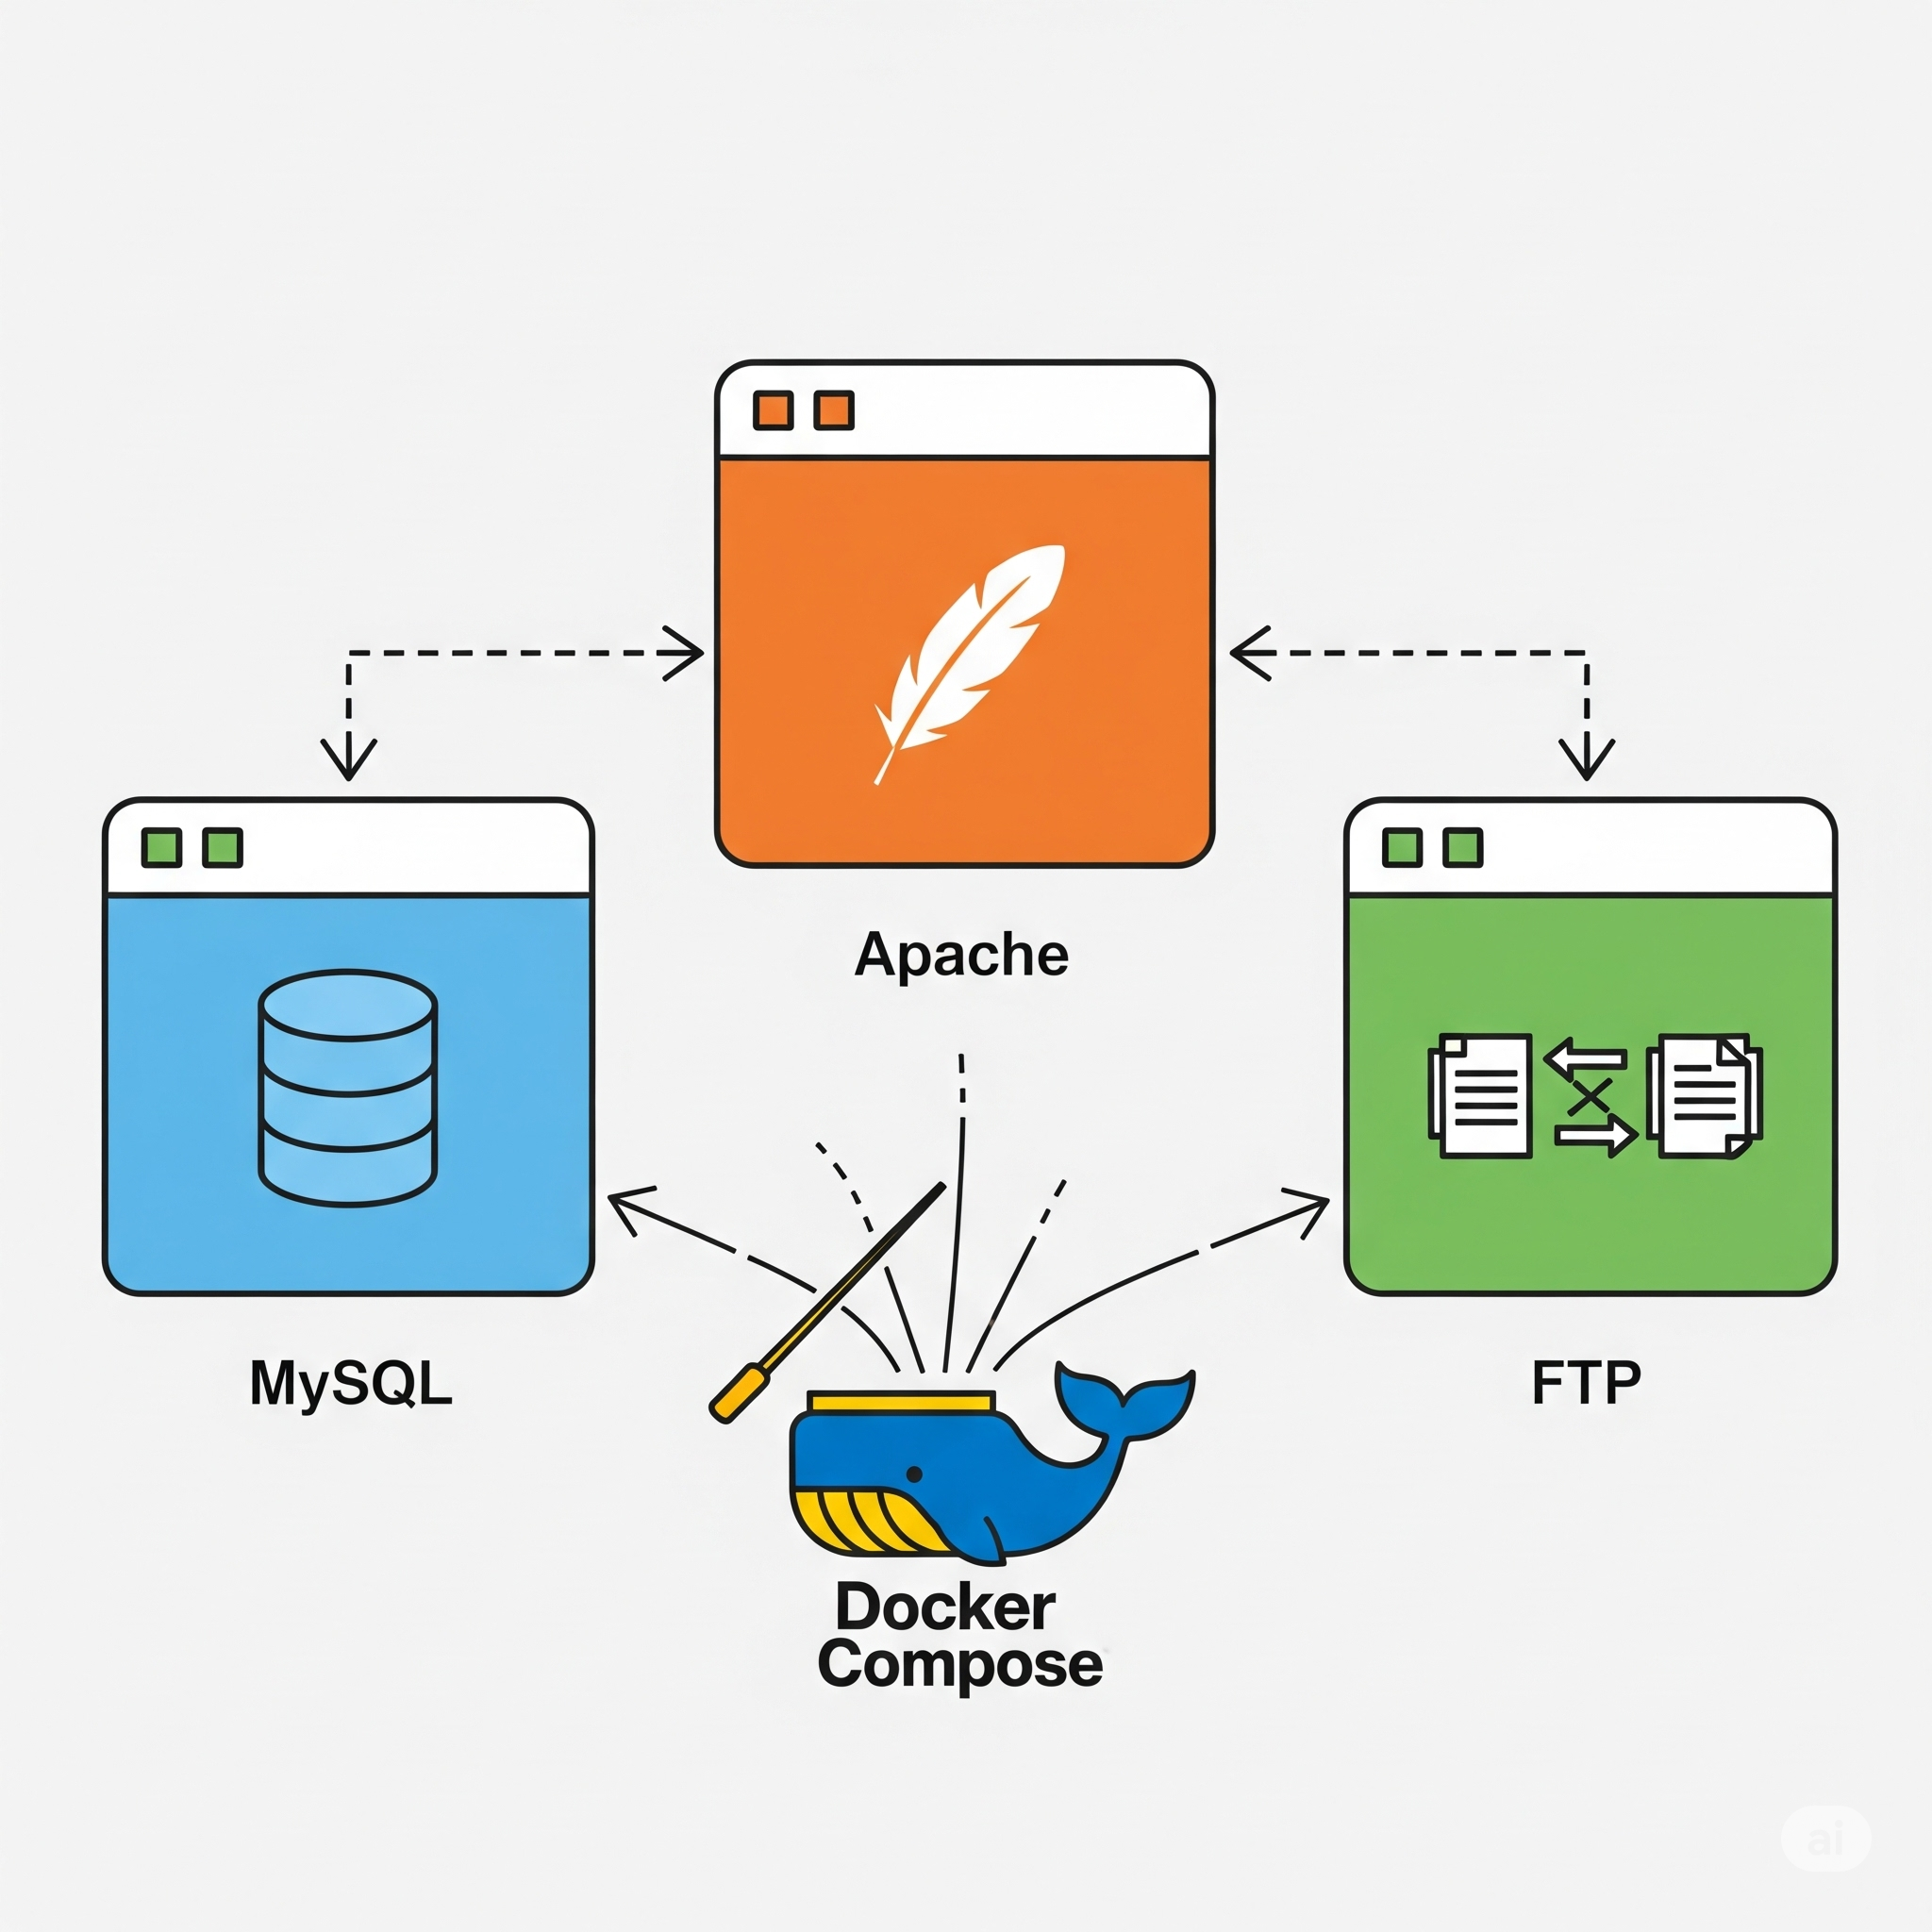
It is time to integrate all the containers we’ve configured so far. Today, I will be explaining what Docker Compose is and show you the advantages it has when it comes to creating and managing containers.
I’ll also add some new features that I haven’t talked about in previous posts, so I hope you are ready to learn something new!
What is Docker Compose?
So far, deploying applications that require multiple containers is a complex and tedious process. Imagine you have thousands of containers to launch; running them one by one would be an endless process.
Fortunately, this is the reason why Docker Compose was developed, to help us with handling multi-container setups. It works by creating a .yaml file (usually called compose.yaml) in which we can define multiple services using Docker images (like our custom ones). Additionally, we can also specify the application’s networks and volumes.
Note: By default, Docker Compose creates a private network for the specified services, so configuring a custom network isn’t strictly necessary. Nevertheless, it might be a good idea to do it just to have more control over the containers.
In essence, what Docker Compose does is transform multiple docker run commands into a single .yaml file. Let’s take a look at the final .yaml file I created to connect all the containers:
1
2
3
4
5
6
7
8
9
10
11
12
13
14
15
16
17
18
19
20
21
22
23
24
25
26
27
28
29
30
31
32
33
34
35
36
37
38
39
40
41
42
43
44
45
46
47
48
49
50
51
52
53
54
55
56
57
58
59
60
61
62
63
64
65
66
67
68
69
70
71
72
73
74
75
76
77
78
79
80
81
82
83
84
services:
  xycxz-ftp:
    build:
      context: ../Images/FTP
      secrets:
        - source: ftp-user-pass
          target: xycxz_pwd # This is the secret "id" in the FTP Dockerfile
    labels:
      - xyczx-projects.click=true # The value of the label does not matter as long as the container has the label attached to it (so the autohealing container can find it). However, we set it to "true" because is a best practice.
    ports:
      - 20:20
      - 21:21
      - 21100-21110:21100-21110
    environment:
      PASV_ADDRESS: ${HOST_IP}
      PASV_MIN_PORT: 21100
      PASV_MAX_PORT: 21110
    restart: always
    volumes:
      - /home/xycxz/app/helpdesk:/home/xycxz # I would consider this in its developement stage recently added by the fictional company.
    healthcheck:
      test: ["CMD", "pidof", "vsftpd"]
      interval: 30s
      timeout: 10s
      retries: 3

  xycxz-webapp:
    build: ../Images/Apache
    deploy:
      replicas: 3
    labels:
      - xyczx-projects.click=true
    restart: always
    depends_on:
      xycxz-db:
        condition: service_healthy
    healthcheck:
      test: curl -f http://localhost:8080/ || exit 1 # This command runs INSIDE the container. That's why I used port 8080
      interval: 30s
      timeout: 10s
      retries: 3
      start_period: 1m

  xycxz-db:
    build: ../Images/MySQL
    labels:
      - xyczx-projects.click=true
    environment:
      MYSQL_ROOT_PASSWORD: ${DB_ROOT_PASSWORD}
    restart: always
    healthcheck:
      test: ["CMD", "mysql", "-u", "root", "-p${DB_ROOT_PASSWORD}", "-e", "SHOW DATABASES;"]
      start_period: 1m
      start_interval: 10s
      interval: 1m
      timeout: 5s
      retries: 3
    volumes:
      - xycxzdb-vol:/var/lib/mysql # We need to list this volume as a separate top-level property to keep data safe and share it easily across other services. We can manage its properties in a centralized way as well.

  lb:
    image: caddy
    restart: always
    depends_on:
      - xycxz-webapp
    ports:
      - 8000:80
    volumes:
      - ./lb/Caddyfile:/etc/caddy/Caddyfile:ro

  autoheal:
    image: willfarrell/autoheal
    restart: always
    environment:
      - AUTOHEAL_CONTAINER_LABEL=xyczx-projects.click # Set so only SPECIFIC container will be autohealed (the ones with the corresponding label)
    volumes:
      - /var/run/docker.sock:/var/run/docker.sock:ro # This volume allows the image to access our Docker (of our machine). This is crucial to check if the containers are healthy or not (the communication works through a socket).

volumes:
  xycxzdb-vol: {} # This is like a toolbox that can be used by multiple services. We're telling Docker to create it!

secrets:
  ftp-user-pass:
    file: ../Images/FTP/xycxz_pass.txt
Compose Configuration
It looks like it is a lot to digest. The only thing you should know here is that we have top-level properties that can be applied globally. For example, inside services are the containers we are trying to run; volumes (top-level property at the bottom, outside containers configuration) define the named volumes we are going to use. We can define some properties for these volumes as well.
Note: The reason to define a top-level volume is the following: Imagine we only defined a (named) volume inside a service. If we were to remove that service from our compose.yml file, what should happen to the data? The instruction to create the volume would be gone, making its management ambiguous.
Finally, secrets would be something similar to volumes, in the sense that it can be applied to any container (re-used). Of course, it has nothing to do with a volume, because this keyword is used just to store one (or multiple) secret files that contains sensitive information (for example, a password) and does not keep track of data like a volume would do.
Let’s start breaking down the different configuration stages of the file. Because all the services share many properties, I’ll explain them once and then talk about what is particular to each service.
FTP
1
2
3
4
5
6
7
8
9
10
11
12
13
14
15
16
17
18
19
20
21
22
23
24
25
services:
  xycxz-ftp:
    build:
      context: ../Images/FTP
      secrets:
        - source: ftp-user-pass
          target: xycxz_pwd # This is the secret "id" in the FTP Dockerfile
    labels:
      - xyczx-projects.click=true # The value of the label does not matter as long as the container has the label attached to it (so the autohealing container can find it). However, we set it to "true" because is a best practice.
    ports:
      - 20:20
      - 21:21
      - 21100-21110:21100-21110
    environment:
      PASV_ADDRESS: ${HOST_IP}
      PASV_MIN_PORT: 21100
      PASV_MAX_PORT: 21110
    restart: always
    volumes:
      - /home/xycxz/app/helpdesk:/home/xycxz # I would consider this in its developement stage recently added by the fictional company.
    healthcheck:
      test: ["CMD", "pidof", "vsftpd"]
      interval: 30s
      timeout: 10s
      retries: 3
As we can see, we start a service by giving it a name (xycxz-ftp), followed by the image we want to use for it. In this case, because I am using a custom image, I had to use the build keyword (instead of image) with a couple of properties so it can run as we have seen it before here.
The context attribute should indicate the path of where the image we want to (re)build is stored. It is worth mentioning that the path we indicate here (and anywhere) is interpreted as relative to the location of the Compose file.
According to the official Docker documentation, the secrets attribute “grants access to sensitive data defined by the secrets top-level element on a per-service basis”. In essence, it is what let us access the content of the secrets I explained before. I’m using the [long syntax]((https://docs.docker.com/reference/compose-file/services/#long-syntax-5) as well to be more specific with that I need to mount in this container.
What I described here, would be running this command:
1
docker build --secret id=<ID GIVEN (TARGET)>,src=<FILE WITH PASSWORD (SOURCE)> <PATH TO IMAGE>
Note: I’m skipping the labels property now because I’ll make a mini section explaining it later.
Then we have the ports keyword which specifies the port mapping so the container is accessible from the outside, and the environment keyword that specifies the environmental variables used by the container.
The .env file
Notice that when I specified the key PASV_ADDRESS, I passed in the value of ${HOST_IP}. This is the way of making reference to a variable defined in another file, which is the .env file that “typically contains key-value pairs of variables, and it lets you centralize and manage configuration in one place”.
Note: The .env file should be placed at the root of the project directory next to our compose.yaml file. This is a secure way of passing sensitive information without exposing it in the configuration file.
Restart Policy
A restart policy controls whether the Docker daemon restarts a container after exit. In this case, we are using the value always, so it will always restart the container if it stops. This combined with the healthcheck (I will explain what this is later) will help use immensely to keep the production environment working even when we can’t monitor it, providing an automated way of solving potential issues.
I also used the volumes property for a bind mount. Let me stop here and do a small clarification about when should we use volumes. For a development environment, it is much better to mount what we need in the container, because we still have to do modifications to it and will be easier to access the files (or source code). Nevertheless, for a production environment we should always copy the files directly to the container because we want a self-contained, immutable, and reliable artifact.
What I’ve been describing here is basically the docker run command that would look like this:
1
docker run -p 21:21 -p 20:20 -p 21100-21110:21100-21110 -v /home/xycxz/app/helpdesk:/home/xycxz -e PASV_ADDRESS=<HOST_IP> -e PASV_MIN_PORT=21100 -e PASV_MAX_PORT=21110 --restart always <PATH TO IMAGE>
Healthcheck and Autoheal
Sometimes, we want to ensure that our image starts properly or to detect if it freezes or crashes. This is the reason why a healthcheck should be used when running any application.
To add this to a container, we use the healthcheck property and the test attribute to it to pass in the command in charge to check the health of the container. For this, I used the exec form syntax because I don’t need a shell to run it (making this optimal because executes the command directly). The pidof command is designed to find the process ID of a running program. It’s perfect for a healthcheck because it exits with code 0 if the process is found, and 1 if it’s not.
Note: The command we use for our healthcheck will work only if it is available within the container (because we are running this commands in a container context). Otherwise, we would have to modify the image and install the command we want to run.
Explanation of the 3 remaining attributes can be find here. I also found this blog post pretty interesting when it comes to healthchecks. Make sure to check it out!
The labels keyword is used as a label, excuse the redundancy, so the autohealing container can find the container when the healthcheck fails and then restart it automatically. A healthcheck is needed to use this property and also launch the web server container only if the database has started successfully (as we will see later).
1
2
3
4
5
6
7
  autoheal:
    image: willfarrell/autoheal
    restart: always
    environment:
      - AUTOHEAL_CONTAINER_LABEL=xyczx-projects.click # Set so only SPECIFIC container will be autohealed (the ones with the corresponding label)
    volumes:
      - /var/run/docker.sock:/var/run/docker.sock:ro # This volume allows the image to access our Docker (of our machine). This is crucial to check if the containers are healthy or not (the communication works through a socket).
Note: The image used here is not an official Docker image, so we need to be careful when downloading this type of images. However, because this one is pretty popular, I would consider it safe to use, but never forget to really check the sources.
The :ro at the end of the mounted volume, indicates that it is read only. This is because we don’t want anyone to be able to modify this volume because it can destroy the autohealing process.
Web Server
1
2
3
4
5
6
7
8
9
10
11
12
13
14
15
16
  xycxz-webapp:
    build: ../Images/Apache
    deploy:
      replicas: 3
    labels:
      - xyczx-projects.click=true
    restart: always
    depends_on:
      xycxz-db:
        condition: service_healthy
    healthcheck:
      test: curl -f http://localhost:8080/ || exit 1 # This command runs INSIDE the container. That's why I used port 8080
      interval: 30s
      timeout: 10s
      retries: 3
      start_period: 1m
There are two new properties when it comes to our web application: one is the deploy and depends_on. We use the latter one to wait for the database to run in a healthy state before launching the application. This makes perfect sense to use because we would not be able to demonstrate the SQL injection without having a Database running properly (or even have our app working).
The first property I mentioned is used to define the quantity of containers running the same service. This is configured with a load balancer (reverse proxy) and its the reason why I am not mapping any ports here (we will explore the load balancer config later).
The rest of the configuration is pretty much the same to what we’ve seen so far. However, we need to bear in mind that if the containers get rebooted or something similar that happens after initial startup, the restart policy has precedence over the depends_on property. This means that we might get an error on our web application when trying to connect to the database. However, if the database works correctly, it should take a few seconds and we need to refresh the page to have everything working properly back again.
Database
1
2
3
4
5
6
7
8
9
10
11
12
13
14
15
16
  xycxz-db:
    build: ../Images/MySQL
    labels:
      - xyczx-projects.click=true
    environment:
      MYSQL_ROOT_PASSWORD: ${DB_ROOT_PASSWORD}
    restart: always
    healthcheck:
      test: ["CMD", "mysql", "-u", "root", "-p${DB_ROOT_PASSWORD}", "-e", "SHOW DATABASES;"]
      start_period: 1m
      start_interval: 10s
      interval: 1m
      timeout: 5s
      retries: 3
    volumes:
      - xycxzdb-vol:/var/lib/mysql # We need to list this volume as a separate top-level property to keep data safe and share it easily across other services. We can manage its properties in a centralized way as well.
Following this article, I came up with a proper command to check the health status of the database container. Basically, what we’re doing is trying to connect to the database and if it does not respond, it should be tagged as unhealthy.
This is pretty much the most important thing we should know about it, and also that the named volume mounted (managed by Docker), will keep track of database modifications.
Load Balancer
Before explaining the configuration of this, we should ask ourselves: Why would we need a load balancer? What this will do is allow us to easily proxy the traffic to all of our instances. This means that the flow would be something like this:
Accept incoming requests -> Proxy the request querying one of the instances of our service -> Get the answer -> Send the answer back to the browser that requested.
When the reverse proxy acts as a load balancer, it means that traffic will get distributed over all our instances in an evenly manner. This give us a centralized way of manage the routing of web traffic, future scalability, isolation of internal services (enhancing security), etc. Combined with multiple instances of a service, if one of them does not work properly the load balancer will notice that and send the request to a working container, keeping the production environment running healthy.
Now, let’s look at the load balancer configuration. In this case, I used Caddy:
1
2
3
4
5
6
7
8
9
  lb:
    image: caddy
    restart: always
    depends_on:
      - xycxz-webapp
    ports:
      - 8000:80
    volumes:
      - ./lb/Caddyfile:/etc/caddy/Caddyfile:ro
As we would expect it, we need to make sure that our web server is running before the load balancer can start its function. Notice that we just need the port mapping here because the load balancer will be in charge of proxying the traffic to the running instances, which are out of reach of the external network.
Note: Take a look at the official image here.
However, the most interesting this is the mounted file named Caddyfile. Our configuration file will look like this::
1
2
3
4
5
6
7
8
9
10
11
12
13
14
15
16
17
18
19
20
:80

// Define WHERE we want to connect to
reverse_proxy {
	dynamic a {
		name      xycxz-webapp
		port	  8080
		refresh   "1s"
	}

	lb_retries 1
	lb_try_duration "8s"

// WHAT connection parameters we want to set
	transport http {
		response_header_timeout "5s"
		read_timeout "5s"
		write_timeout "5s"
	}
}
Note: The documentation of this set up can be found here.
The first line (:80) indicates the port Caddy should listen on.
The reverse_proxy directive tells Caddy where to send the traffic. In this case, because Docker Compose integrates DNS resolution, we can pass in the name of the service we indicated when configuring our web application above (xycxz-webapp). We need to use a dynamic upstream to load balance properly, because the idea is that every time it gets a request, Caddy will perform a DNS lookup to get all available backend containers (using A DNS records, that why we put an a in the config file) and pick one of those randomly and redirect the traffic to that for every request.
We confirm this DNS resolution as follows:
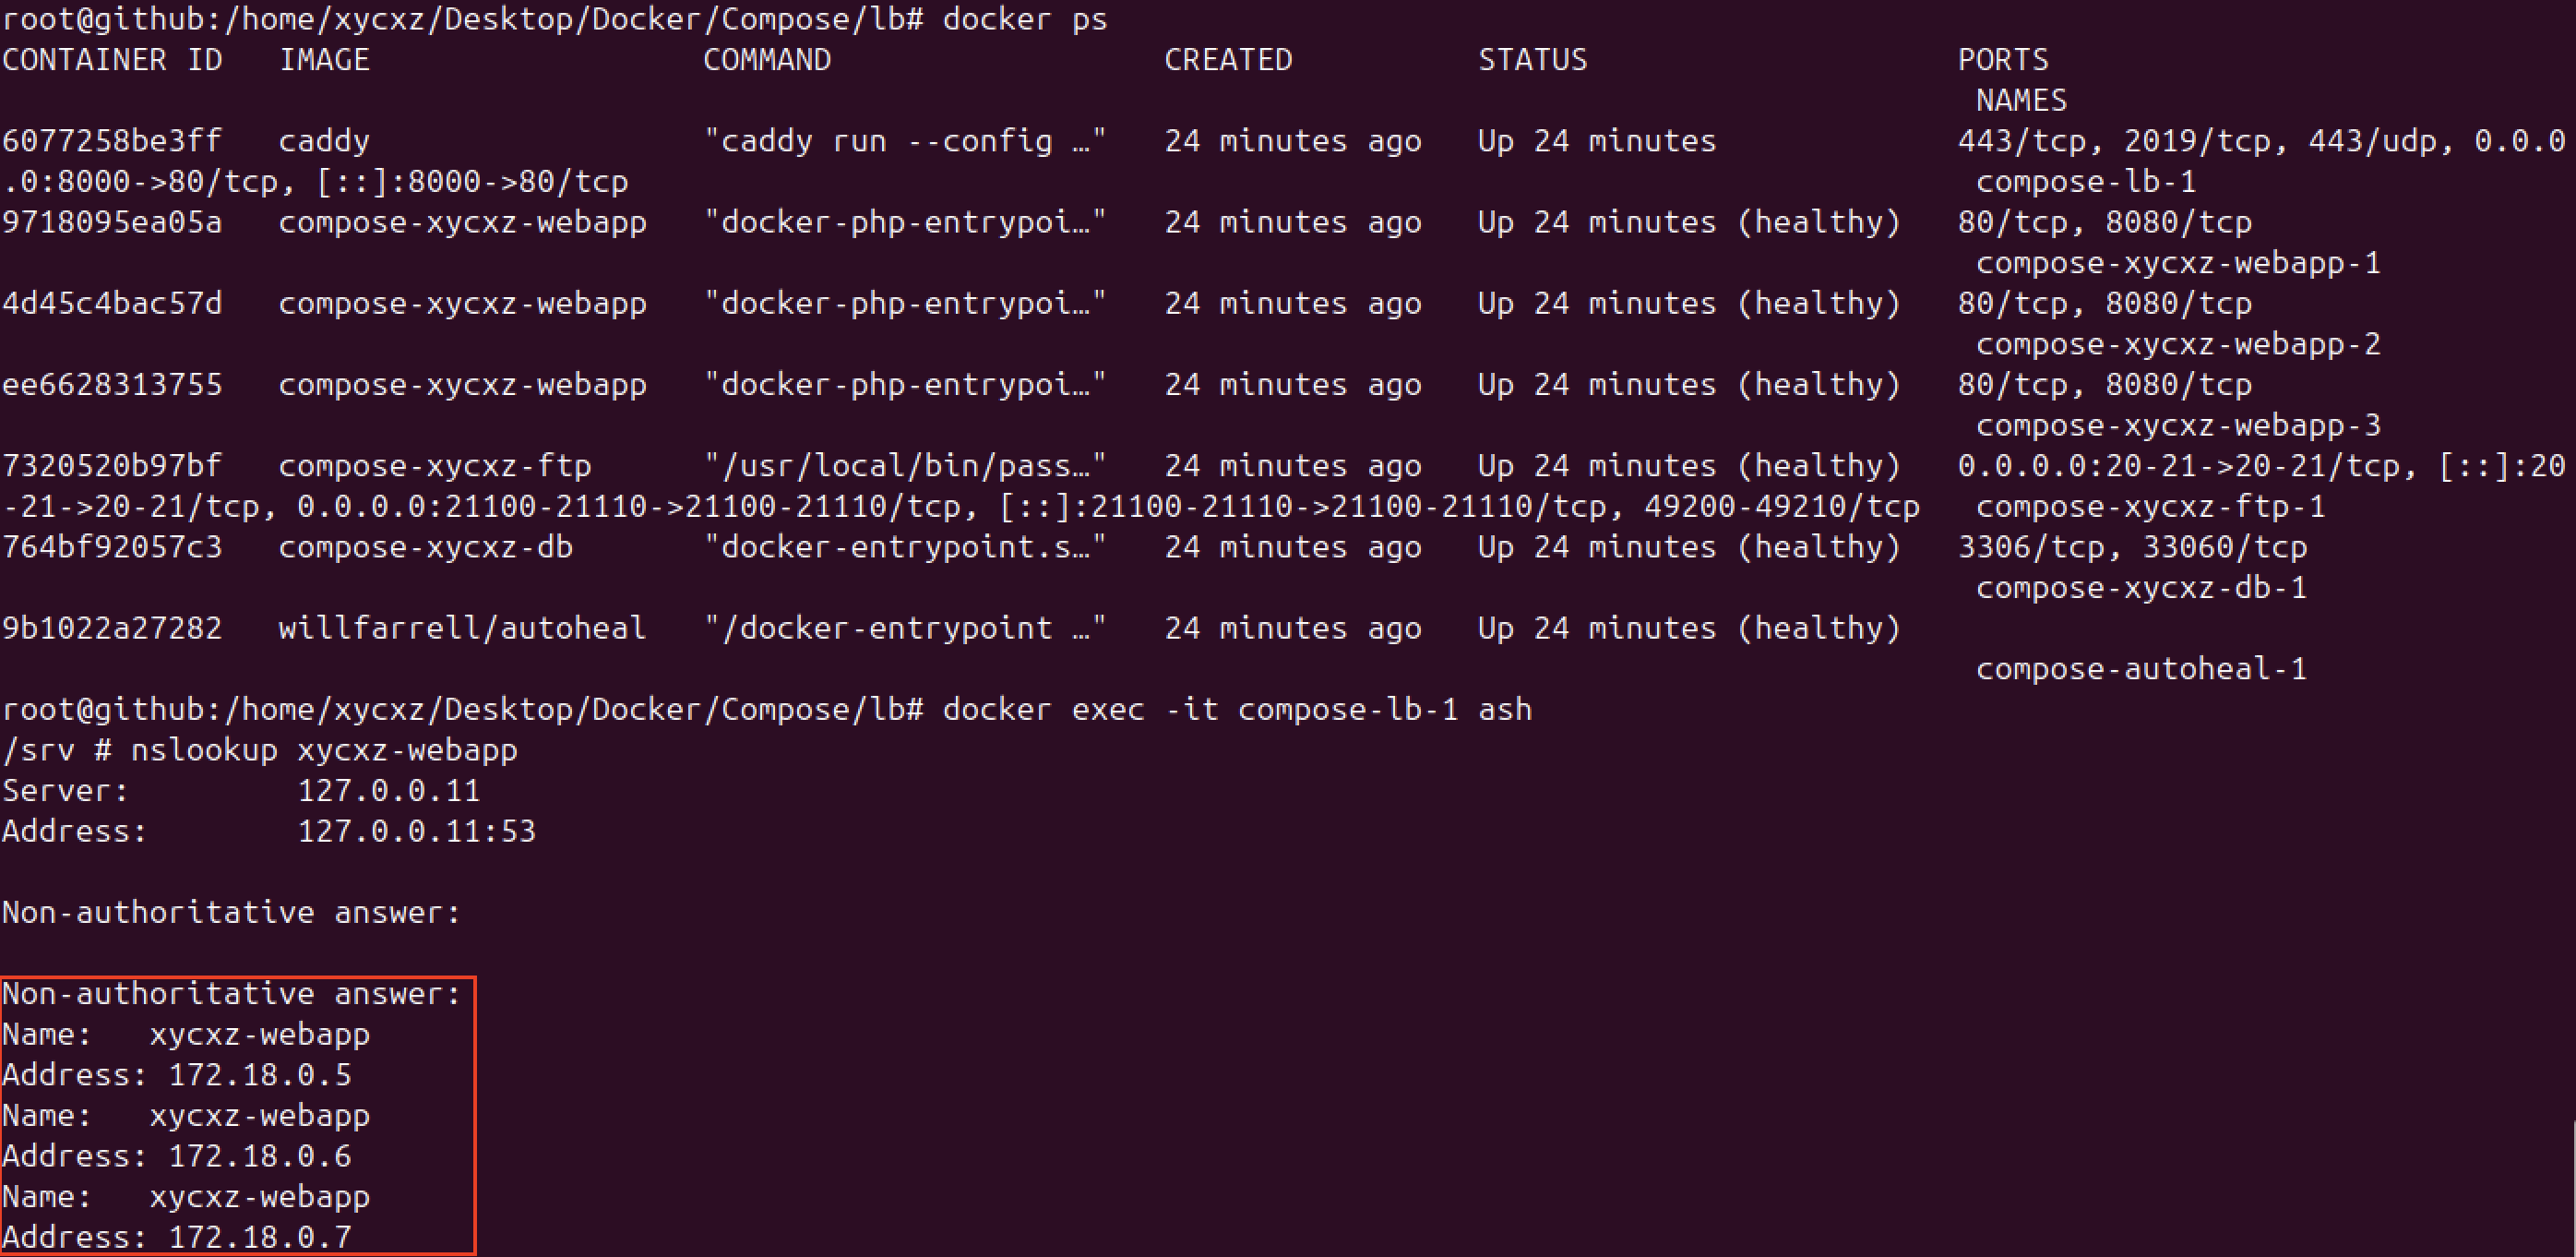
We use the long form of the property indicating the port the proxy should send requests to (remember we configured our application to listen on port 8080), and the refresh time for how often it should refresh cached results, thus checking the DNS resolution that can help us to detect a crash in one of our instances. Along with the always restart policy, this should work smoothly in case of crashing.
Nevertheless, what happens when we have a frozen instance? How can we detect that? A freeze instance means that the whole process becomes unresponsive, although it is still running. Now, how would we differentiate between an unresponsive process, and a process that just happens to do some heavy work for a few seconds?
To solve this, we did two things: If an instance does not reply within a few seconds, we can try to query another instance (so the browser can seamlessly work, even though we might have a small time delay, allowing users to still use our site). We need to also add a healthcheck + autohealing to actually deal with the frozen instance. Because we’ve done this already (at a docker compose level), we just need to take care of the first thing.
This is why I set the transport property in the configuration file, because it will help us identify a possible frozen instance. We combine this with load balancing to tell the load balancer what to do in case we have timeouts with the traffic. This, of course, indicates Caddy to redirect the traffic to a working instance.
Note: You should add a healthcheck to the load balancer as well in a production environment. I’ll leave the documentation you need to do this. I highly encourage you to try it yourself!
Conclusion
We’ve seen quite a few new concepts we should explore and study to get a firm grasp of what we’re doing. However, it is important to mention that Docker Compose should be used for development deployment, while AWS services like ECS, ALB, or RDS, should be used for production deployment. There are also many headaches to save when we use the cloud, because many things are automated and we will explore this in future posts.
Before finishing, I want to show something to the reader. Now that the application is running correctly, check what happens when we sniff the network using Wireshark:
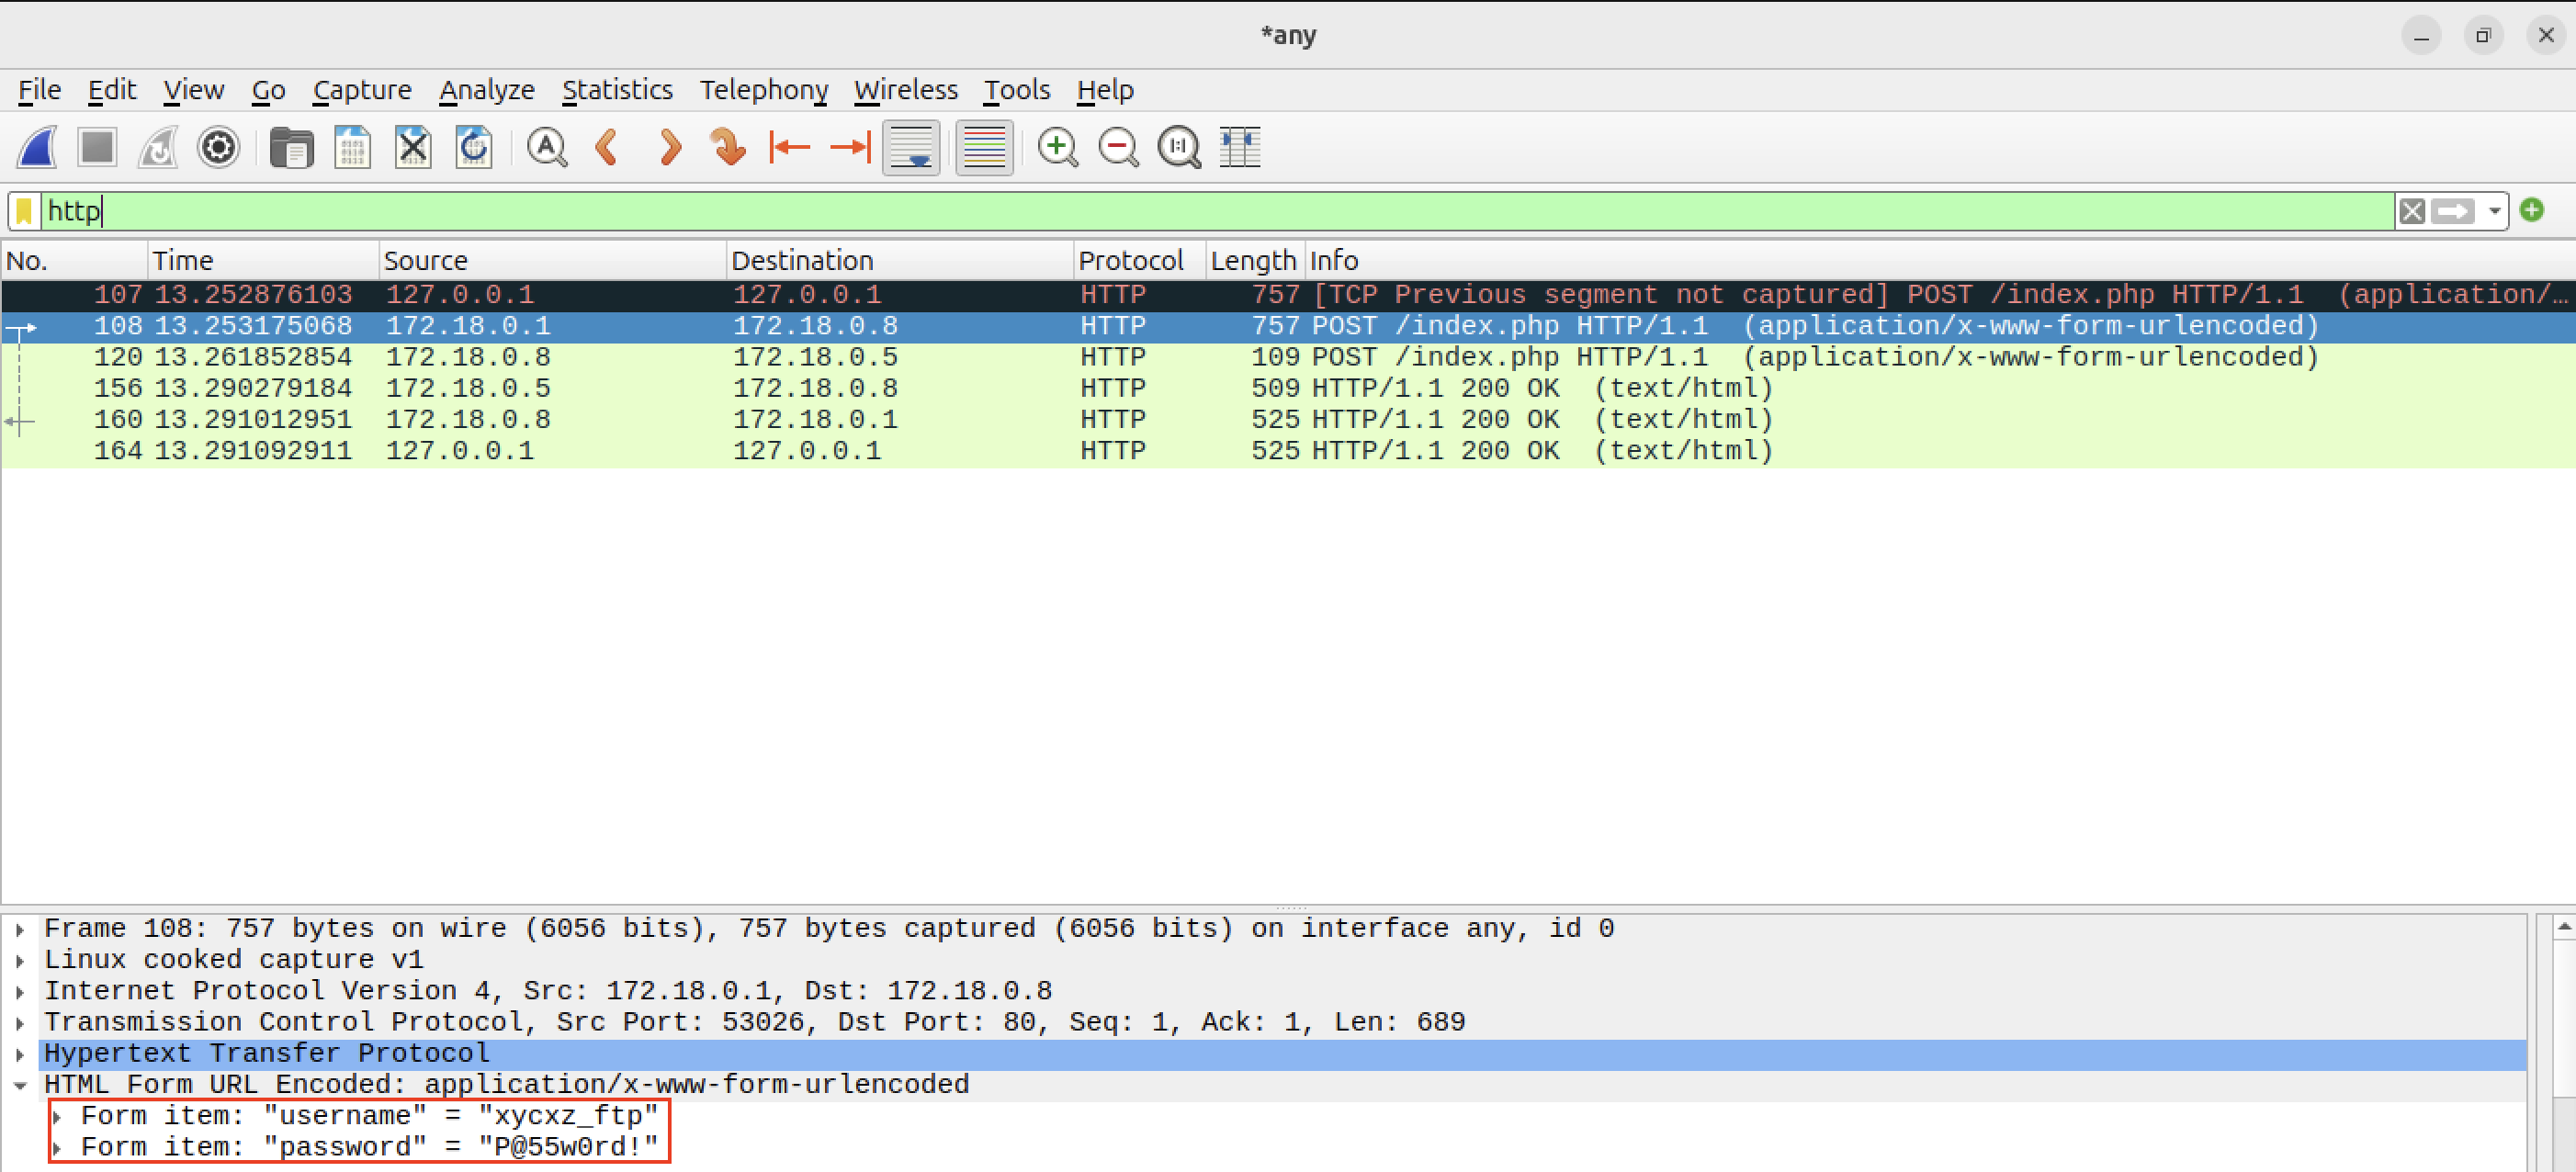
As you can see, the credentials can be seen in plaintext. This is because we have not configured HTTPS yet. Nonetheless, I will leave this configuration for a future post, so stay tuned!
Next Steps
Now that we have finished with Docker Compose, we can start exploring the AWS cloud and how it works. I will explain some topics separately and then come back to this project to fully integrate everything.