Web Server - Docker
Objective
The goal here is to configure a web server (Apache in this case) inside a Docker container. This will have a login form which requires some user credentials which will be linked to a MySQL database. However, this integration has been done here.
Installation
To start configuring our web server and, at the same time, avoid some painful headaches, we will download the official PHP image from DockerHub. In my case, I’ll pick the PHP 8.2 version running on Apache.
Let’s start by pulling the correct image and giving our new container a custom name. Remember to run this on detached mode (-d) because it will help us remove the need of opening another terminal tab. Also, we need to map the corresponding port like we did in the previous post which will allow us to access from a computer inside our local network:
1
2
3
4
5
# Getting the image from DockerHub (We can skip this step and running the docker run command directly since the image pull can happen automatically)
docker pull php:8.2-apache

# Running the container
docker run -d -p 8080:80 --name <CONTAINER-NAME> <IMAGE>
Note: Like I did in my FTP post, I will once again provide a script with the configuration ready to use so you don’t have to worry about the manual method. However, I highly encourage you to walk with me through the manual method to really understand what you are doing and not simply fire off an automated script.
Once we have our container up and running, we will execute a shell inside of it so we can take a better look at the configuration (I will use bash here, since the container supports this interpreter by default). For this, we run the following:
1
docker exec -it <CONTAINER-NAME> <COMMAND-LINE-INTEPRETER>
We will notice that our current working directory is /var/www/html, which is the standard webroot of PHP combined with Apache. In here is where we would like to have our files that will display our customised login form.
However, how can we know where our webpage is being hosted? Web servers usually run on port 80 by default, but since we don’t have a command like ifconfig installed on this container to check the correct interface, we will use the following command in our VM to discover that:
1
docker inspect <CONTAINER-NAME>
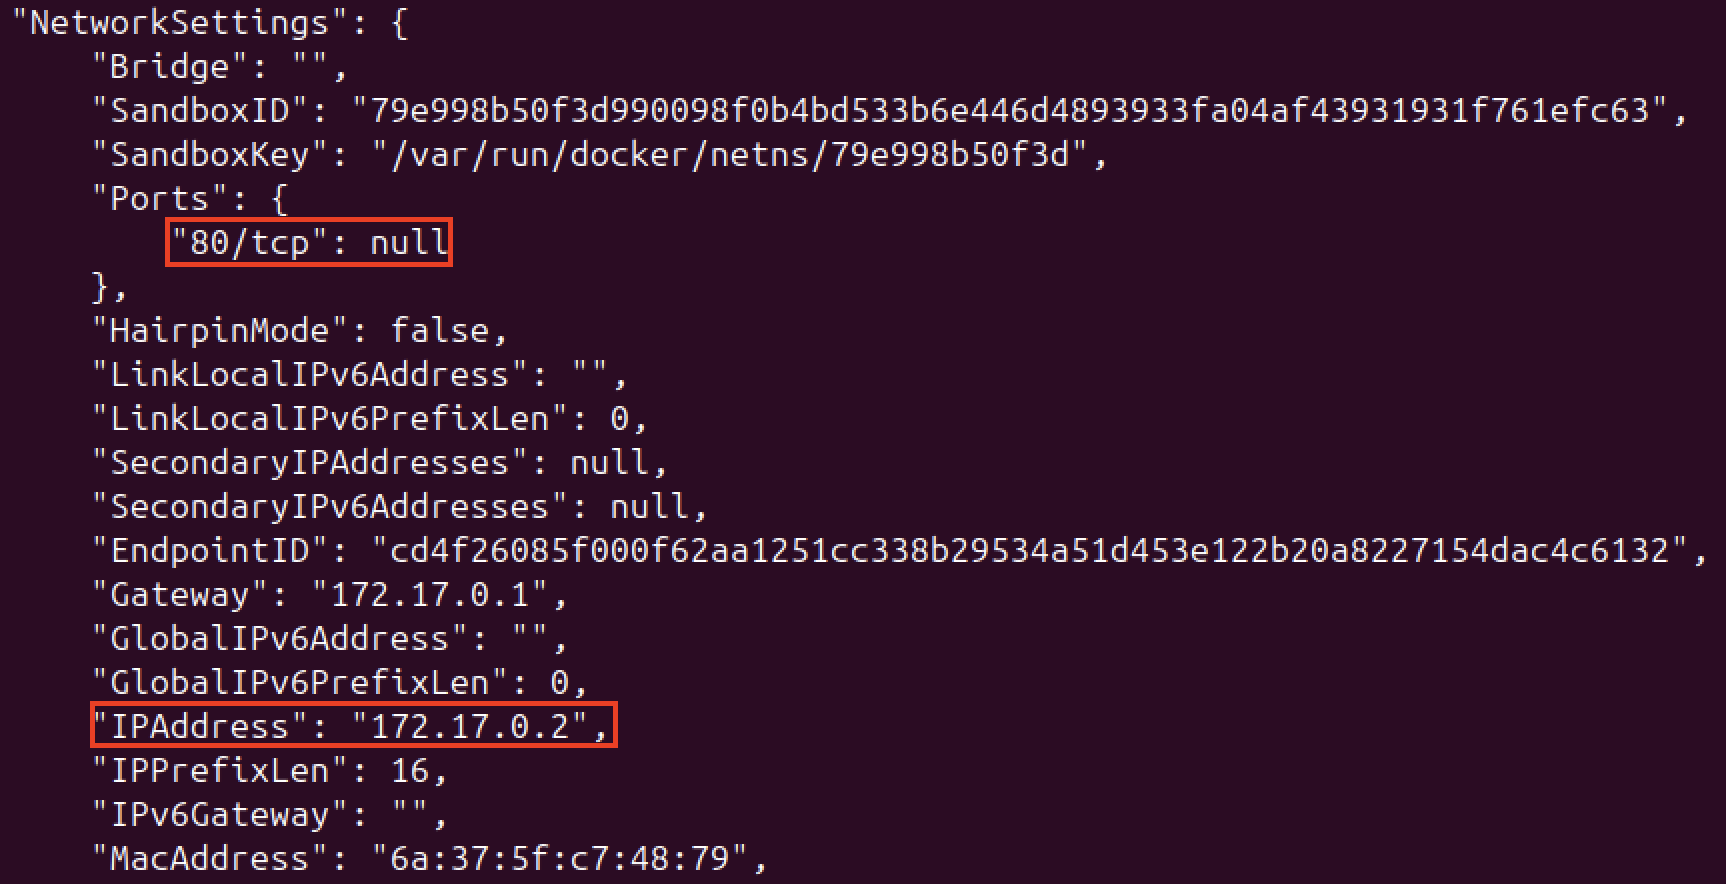
Now that we know the IP address and port where the web server is running, it is time to navigate to it and see what it displays. Apache by default will display a page that says It works! in case the installation is correct.

As we can see, we can confirm that we successfully installed our web server and it is up and running. Next, we will explore some configurations that need to be done in order to achieve our goal.
Note: Because we’ve mapped the ports, we can easily access the web server from our host machine’s browser at http://localhost:8080. However, learning to find the container’s internal IP address with docker inspect is still a valuable skill. It’s essential for debugging and for scenarios where containers need to communicate with each other directly using Docker’s internal network.
The How and Why
Before jumping in, we have to think about how web servers work and the intended use they have. One extremely important concept to have in mind is what vhosts are. Vhosts are similar to subdomains, but with the key difference that they are served on the same server and have the same IP address, such that one IP address could be serving several websites.
Web servers implement this, which make us capable of hosting different web applications inside our container as long as we have the required technology. Since the idea of containers is to test very specific things, we won’t be changing the technology it uses. I would recommend to use a Virtual Machine in such cases. Alternatively, in modern cloud-native design, this is often handled by running each application in its own container and placing a reverse proxy (like Nginx or Traefik) in front to direct traffic to the correct container (I will implement this in later posts, when working with AWS).
The reason I made this very concise explanation about vhosts, is that it will allow me to introduce some core directories within Apache. Those are the following:
| Directory | Purpose |
|---|---|
sites-available | A library of all your website configurations, both active and inactive. |
sites-enabled | A list of symbolic links pointing to the sites that are currently turned on. |
Note: We can find apache2 configuration files inside /etc/apache2/ directory (in case we did not change the default configuration).
To understand these directories better, think about the following scenario. Imagine you are hosting 10 different websites within your web server but you need one to go down due to maintenance. I am pretty sure you would not like to remove the whole configuration file of that particular web application from the container. This is where our sites directories shine.
The naming convention used by them are pretty self-explanatory, but I still consider it something important to bear in mind. If our site that needs maintenance is up and running, its configuration file will be inside the /etc/apache2/sites-enabled directory. To stop it from running without the need of deleting the file, we can run the following command:
1
a2dissite <my-web.conf>
The web application will be down and ready for us to perform changes on it. Up until this point, we got our configuration file removed from the sites-enabled directory but at the same time we conserve it inside the sites-available directory. Once we finish our changes, we can host it back again with the following command (we will see that the configuration file will once again appear inside sites-enabled):
1
a2ensite <my-web.conf>
Now that we have explored some core concepts, let’s look into one example of a configuration file. For this, we will just take the default configuration file we saw in the beginning as an example:
1
cat /etc/apache2/sites-available/000-default.conf | grep -v "#" | sed -r '/^\s*$/d'
1
2
3
4
5
6
<VirtualHost *:80>
	ServerAdmin webmaster@localhost
	DocumentRoot /var/www/html
	ErrorLog ${APACHE_LOG_DIR}/error.log
	CustomLog ${APACHE_LOG_DIR}/access.log combined
</VirtualHost>
As we can see, here we are dealing with a virtual host that is listening on port 80 using all of its interfaces (* is a wildcard for this). In case of having multiple interfaces (like having two NIC card), we can also manually set which interface we want our web application to listen. If we have eth0 at 192.64.16.1 and eth1 at 192.64.16.2 and we set this to <VirtualHost 192.64.16.1:80>, the eth1 interface will ignore requests to this specific vhost since it is not listening on that interface.
The ServerAdmin just displays the contact email (not real) that Apache displays in some error pages. DocumentRoot is the most important directive because it indicates the root folder for our website files. The directory it points is the one Apache will use as a reference to find the files that make our web page.
ErrorLog and CustomLog are the instructions that indicate the paths to the error and access log files. If Apache runs into an internal problem, it will write a detailed message about what it went wrong and when to the error.log file. access.log records every request that comes into the website (useful for monitoring). In both cases, we see ${APACHE_LOG_DIR} which is just a variable that points to Apache’s main logging folder, which is /var/log/apache2/ by default.
We can confirm the value of this variable by going checking /etc/apache2/envvars:
1
2
3
4
5
grep APACHE_LOG_DIR /etc/apache2/envvars

#Output
: ${APACHE_LOG_DIR:=/var/log/apache2$SUFFIX}
export APACHE_LOG_DIR
Configuration
You might be wondering why we were able to see a page being displayed when navigating to our container host on port 80 if there are no files in our webroot. This is due to that what we are seeing is NOT actually a file, but a default action that Apache executes when it finds the webroot empty.
To partially fix this, we need to create our custom index.html (or index.php) file and reload the service. Reloading the service forces Apache to re-scan the DocumentRoot directory, where it will now see our new file and serve it instead of the default page.
1
service apache2 reload
Nevertheless, what I have said so far introduces one critical problem: What happens when we have multiple files in our webroot? How would the server know which one to display as the default page? This is why we use the DirectoryIndex instruction in our configuration file to fix our issue. With this rule, we can tell the web server to always display the page we choose as default:
1
2
3
4
5
6
7
8
9
10
<VirtualHost *:80>
	ServerAdmin webmaster@localhost
	DocumentRoot /var/www/html

<!-- Setting default page -->
	DirectoryIndex index.php

	ErrorLog ${APACHE_LOG_DIR}/error.log
	CustomLog ${APACHE_LOG_DIR}/access.log combined
</VirtualHost>
I’ll create an index.php file to include all the elements at once on a single file. The final script looks like the following:
1
2
3
4
5
6
7
8
9
10
11
12
13
14
15
16
17
18
19
20
21
22
23
24
25
26
27
28
29
<?php

if ($_SERVER["REQUEST_METHOD"] == "POST") {
    echo "<h1>Thank you for loggin in. We are processing your request...</h1>";
} else {

    ?>

    <!DOCTYPE html>
    <html>
    <head>
        <title>Login</title>
    </head>
    <body>
        <h2>Please Log In</h2>
        <p>Enter your credentials to continue.</p>
        <form action="" method="post">
            <label for="username">Username:</label><br>
            <input type="text" id="username" name="username"><br><br>
            <label for="password">Password:</label><br>
            <input type="password" id="password" name="password"><br><br>
            <input type="submit" value="Log In">
        </form>
    </body>
    </html>

    <?php
}
?>
Here, I simply created a small two-way logic for the login form. When sending POST requests to the server, I want it to display the message of Thank you for.... Otherwise (GET), just display the login form to the user. Summarising a bit, we can say this form currently doesn’t validate credentials and just displays a message.
In our final integration, we will modify the POST request logic to query a MySQL database. We will intentionally write this query in an unsafe way, creating the SQL Injection vulnerability that will form the core of our attack chain. Since I want to show everything separately and then put everything together, I will leave this as it is and create the Dockerfile for it, which will serve as an automation method.
You can check the final code on this post.
DockerFile
1
2
3
4
5
6
7
8
9
10
11
12
13
14
15
16
17
18
19
FROM php:8.2-apache

RUN apt-get update && \
    useradd -m -s /bin/bash apache2 && \
    a2dissite 000-default.conf && \
    rm /etc/apache2/sites-available/000-default.conf && \
    rm /etc/apache2/ports.conf

COPY xycxz.conf /etc/apache2/sites-available/
COPY ports.conf /etc/apache2

COPY index.php /var/www/html/

RUN a2ensite xycxz.conf && \
    chown -R apache2:apache2 /var/www/html

EXPOSE 8080

USER apache2
Before moving on, let’s explain what we are doing here since I did some changes along the way. Because I don’t want this container to be running as a privileged user (such as root), I created a standard user of apache2. This introduces a couple of changes in order to make the image work properly.
Note: We won’t set a user password this time here because it is not needed for the attack chain I want to demonstrate. Nevertheless, we should always set strong passwords for any user in our environment and make sure the credentials are not hardcoded.
First of all, we should know that the RUN and COPY instructions in Docker perform actions during the build process; so the flow we want to follow is using the root user for this kind of instructions to avoid any kind of denied security permissions when executing them (reason why we are switching users at the end of the build). However, this presents another problem since (on Linux) only the root user is allowed to bind a program to a network port below 1024, and the default Apache configuration is set to listen on port 80.
This is what forces us to change the port configuration and expose a different one (8080 in this case). Luckily, those changes are very easy to do. We just have to make the configuration file of our site to listen on that port and also change ports.conf to match that port. We should have the following:
xycxz.conf
1
2
3
4
5
6
7
<VirtualHost *:8080>
	ServerAdmin webmaster@localhost
	DocumentRoot /var/www/html
	DirectoryIndex index.php
	ErrorLog ${APACHE_LOG_DIR}/error.log
	CustomLog ${APACHE_LOG_DIR}/access.log combined
</VirtualHost>
ports.conf
1
2
3
4
5
6
7
8
9
Listen 8080

<IfModule ssl_module>
	Listen 443
</IfModule>

<IfModule mod_gnutls.c>
	Listen 443
</IfModule>
Note: Notice that I made this user the owner of the webroot (chown) which simulates a realistic scenario, because companies usually have this type of service accounts to manage specific tasks.
This command can help us test the application:
1
docker run -d --name <NAME> -p 8080:8080 <IMAGE>
Note: We expose 8080 because Apache is reconfigured to listen on that port—allowing us to drop root privileges safely.
With our configuration and Dockerfile files ready, now we can automate the whole process.
Automation
I will create a Python script in the future on this section! For now, make sure to understand the process :)
Next Steps
In the upcoming post, we will finish configuring the web server linking it to a database. This is the final piece to finish with our containers configuration.